Happy New Year friends! Cruising Facebook and message boards this week I’ve seen so many crafters resolve to use their scraps, be more frugal, or give *handmade* this year – but how does one DO that?! Here’s one idea…
This past week, as I caught up on movies and TV shows with the family, I created a stack of cards using only scraps. I gathered a smattering scraps and cut card bases from the ones that were large enough to make cards from and punched shapes from the smaller pieces. I threw those into a bin with all of the odds and ends I just never put away from the last few months of crafting — a couple of diecuts here, an errant stick pin there, the last of a letter sticker sheet… and then I armed myself with Tombow Mono Liquid Glue (for bulky embellishments), a pack of Tombow Foam Tabs (to add dimension), and the Tombow Permanent Adhesive Stamp Runner (for large paper pieces and small embellishments).

These 3 cards go together lickety split and use the same design with a few slight variations depending on what was in the bin that matched the color scheme I had chosen: blue, white, and kraft. Change the colors and shapes, and well, they are different cards!

Sticking with a similar design can make using up scraps a much easier job. Here’s how I created these cards:
Supplies:
- Tombow Mono Multi Liquid Glue
- Tombow Foam Tabs
- Tombow Permanent Adhesive Stamp Runner
- Kraft Labels – Maya Road
- Paper – SEI (suede paper), DCWV (patterned paper), ColorMates (cardstock)
- Stamp – Hero Arts
- Card Bases – The Paper Company
- Embossing Powder and White Ink – Clearsnap
- Candles – DollarTree
- Stickers – Echo Park
- Twine – The Twinery
- Self-Adhesive Bling – Want2Scrap
- Stick Pin – hydrangeahippo.etsy.com
- Cabochon – French General for Jolee’s Boutique
- Punches – EK Success
- Die Cut Circle – Sizzix/Ellison
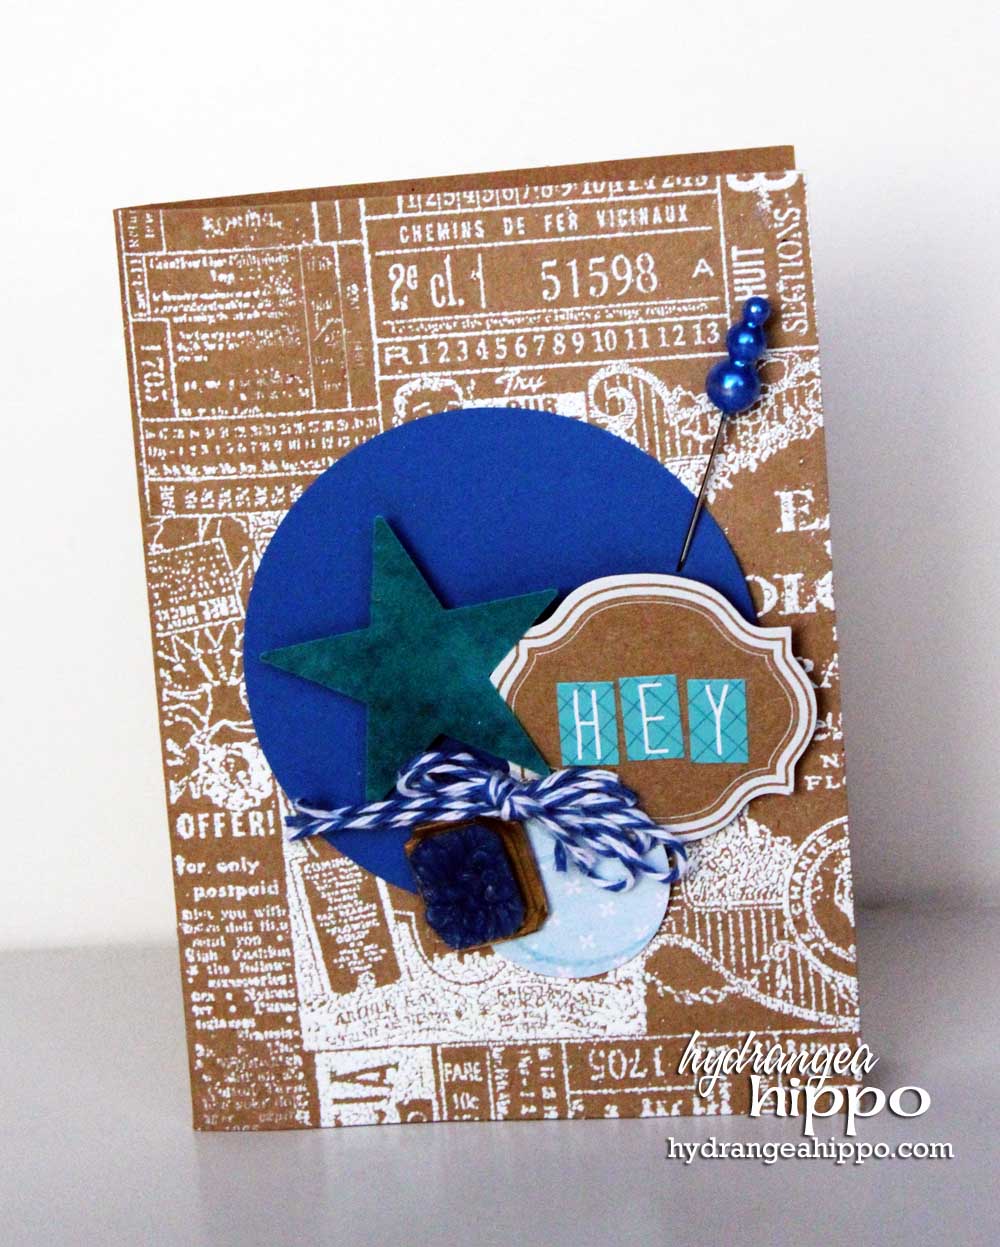
- Stamp and heat emboss the card bases with a background stamp.
- Adhere a circle die cut to the center of each card base using Tombow Mono Multi Liquid Glue.
- Adhere a small punched circle overlapping the lower right side of the large circle using the Tombow Stamp Runner.
- Apply a Tombow Foam Tab to the back of the Maya Road Kraft Label and add to the right hand side of the circle cluster, overapping both circles.
- Apply another Tombow Foam Tab to the back of a punched paper star and apply to the left of the Kraft Label.
- Add a cabochon to the left side of where the two circles meet using Tombow Mono Multi Liquid Glue.
- Add stickers to the kraft label to create a sentiment. Small words or text message abbreviations, such as LOL or ROFL, are a great way to use up the remnants of partially used sticker sheets.

- “Hey” Card: Tie four 12″ long pieces of twine into a bow. Adhere the bow to the card using Tombow Mono Multi Liquid Glue. Insert a stick pin into the Tombow Foam Tab on the back of the kraft label.
- “LOL” Card: Randomly add self-adhesive to the card.
- “Yeah” Card: Tuck two birthday candles behind the punched paper star and adhere to the card with Tombow Mono Multi Liquid Glue. Tie four 12″ long pieces of twine into a bow. Adhere the bow to the card using Tombow Mono Multi Liquid Glue.


Pingback: A "Scrap"py Resolution | Hydrangea HippoHydrangea Hippo