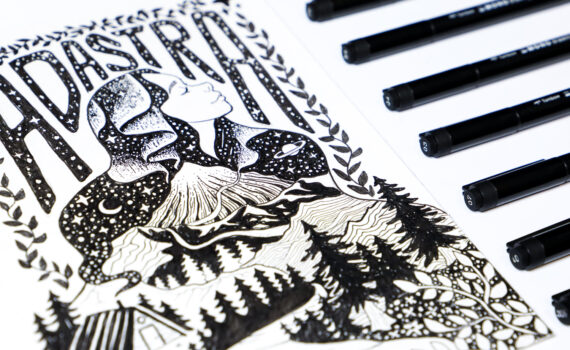
Dec
23
Dec
22

this week’s blog hop allowed me the opportunity to stretch my creative juices and take these fun stickers past just paper and try using them in a different way.

i love hand-making ornaments! Elizabeth Craft Designs have a great product that helped me make some fabulous ornaments this Christmas season. the product are their peel-off stickers and they have so many uses.
 
using clear plastic ornaments (the kind that separate into two halves) i attached the peel-off stickers inside. i smoothed them down really well, making sure there weren’t any gaps between the sticker and the ornament.
the next step was to paint the inside of the ornament, over the stickers, with acrylic paint. this could be a quick paint the whole thing one color, or an intricate job by painting individual sections different colors.


once the paint has dried, about 1 1/2 – 2 hours, carefully peel the sticker off of the ornament. i used a paper piercing tool to help lift it up, without scratching the paint. then i used
Tombow Power Tabs   and added a bow to the top of the ornament and tied on some gold cording. the result is an outline of the image, that allows light through, and glows when it hangs on the Christmas tree. and i love it!

thank you Elizabeth Craft Designs for a great product and a fun blog hop! be sure to check out their blog this week for more ideas on how to use their peel-off stickers and other fabulous products!
 
if you enjoyed this post follow us on facebook and twitter!
  http://www.facebook.com/tombowusa  and  http://twitter.com/#!/tombowusa
 
 
Dec
21

We are three days away from Christmas, can you believe it?!

But before the year is over we got to play with stickers from Elizabeth Crafts which are very versatile, fun, cool and they work perfect with the Tombow Dual Brush Pens.

For my first card I used some of Marie’s Tips on Monday, isn’t she a genius?! After I used the sticker to color the negative space I cleaned it a bit with a wipe or dry cloth and stuck it behind the strip I made. For the sentiment I used a rubber stamp with my Tombow Dual Brush Pens and then added a tiny bit of  water with a water mister and it worked gorgeous because it made it darker in a few corners like a shadow but it covered evenly. I also used the Tombow Dual Brush Pens for the Faux Stitching. In case you didn’t noticed *the Tombow Dual Brush Pens work for coloring, rubber stamping, doodling and calligraphy. They would make the perfect gift for that special crafty person in your life.  I know I love mine because they amp up every project I make.

On my second card I went Springy, I know is Winter but I don’t do so well with winter temperatures and I can’t wait for Spring. These bird stickers are the cutest!! I wanted to make a little scene based on the sentiment which says “Follow Your Dreams” in Spanish. I took simple white frame and I stamped my sentiment there and then I doodled the border to spice it up and I did the same to the leaves. When I glued the leaves with my Mono Multi Liquid Glue I just applied glue to one point on the leaf under the branch and bent the other to give it some dimension. For the clouds I used Tombow Foam Tabs and for the bird I stacked two Foam Tabs together.

Doing the mask technique with my Tombow Dual Brush Pens was really fun, I hope to try it again soon!!

I hope you liked my project!!

Take Care!!

If you enjoyed this post please follow us on
Dec
20

Are you ready for Christmas? I can’t believe how fast it is sneaking up on me. Wednesday is the last day of school and then hopefully I can get some stuff done.

This week Tombow is partnering up with Elizabeth Craft Designs. I first learned of this company at CHA and I LOVE their stickers! They are open images that you color in. You can even remove the sticker after coloring in to leave a white border, but I liked the raised image on my card. They make coloring fun and cardmaking quick and easy.

I colored the image with Dual Brush Tip Pens and adhered the layer with Mono Adhesive Permanent. We were sent so many lovely designs. For my card I chose Christmas Ornaments. These come in gold, silver and black.

The colors of pens I used were 847, 098, 993, 452, and blender.

Thank you for stopping by,

If you enjoyed this post, we would love it if you would follow us on:

  http://www.facebook.com/tombowusa               http://twitter.com/#!/tombowusa

Dec
19

Negative Image with Peel-offs

This technique is a fun and different way to use peel-offs and Tombow Dual Brush Pens.

My favorite Peel-offs come from Elizabeth Craft Design – the designs are beautiful with lots of open spaces for coloring.

Supplies:

Tombow Dual Brush Pens - 725, 755, 856, 982, 173, 195, 245

White Cardstock or lightweight watercolor paper

Water Mister

Elizabeth Craft Design
Peel-offs

Step 1: Place the peel-offs onto the paper panel. I like to use a piercing tool. Fine tipped tweezers also work to lift the peel-off.

Step 2: Color the peel-off and add color around the outside edges of the peel-off image.

Step 3: With the water mister, lightly mist the card so the colors blend. Let dry completely.

Step 4: When the panel is completely dry, use the piercing tool to remove the peel-offs. It’s important that the panel is dry or the paper may rip. Do not use a heat tool to dry this quickly; it tends to make the peel-offs stick more.

Step 5: Reattach the peel-off off centering it from the colored image. Leave blank, as in the ornament card or color as in the tree card.

                                    Finished card sample using ‘Christmas Ornaments’ from Elizabeth Craft Design
                                   Finished card sample using ‘Christmas Trees’ from Elizabeth Craft Design
 
I hope you enjoyed this “Tip-nique” and find many usful ways to use it. Thank you for stopping by. Untill next time…Happy crafting,
If you enjoyed this post, we would love it if you would follow us on:   http://www.facebook.com/tombowusa      http://twitter.com/#!/tombowusa
Dec
16
This week we were giving the task of creating something with the theme of “Gifts that keep on Giving”  It took me a bit to think about what I wanted to create, but then it hit me.  I give gift cards to several people in my family and those are definitely gifts that keep on giving so I decided to create a little gift card holder with a vintage feel to it.  
 I used papers from the Melissa Frances Deck the Halls 6 x 6 paper pad and some ivory cardstock to create this quick and easy gift card holder.  I started with a 4″ x 6 1/2″ piece of ivory cardstock.  With the long side at the top score at 2 3/4″ and 5″  Fold on score lines.  Add Tombow MonoAdhesive Dots to the left and right sides on the 1 1/2″ flap and fold up to create the pocket for your gift card.  I used more MonoAdhesive Dots to attach th
e print papers to the outside/inside flaps of the holder. 

 I stamped the sentiment from Northwoods onto a small oval with Cranberry Adirondack ink and then punched out some branches from a MS punch and the leaves from the Spellbinders Foliage die set.  I used a Tombow Foam Tab on the back of the oval to hold the branches in place and to create height for my sentiment.  

This would be a quick and easy project that could be decorated for any holiday or celebration.  The possibilities are endless!
If you enjoyed this post, we would love it if you would follow us on:
Dec
15


I wanted to share a quick, easy and cheap idea for a gift. Since I just moved to the States I wanted to send our family photos of our daughter and I made a photo book (that can be easily made with any kind of binding system). I just clustered some embellishments, most made by me like that felt flower that I made using my Tombow Mono Multi Liquid Glue. I also used the Mono Multi Liquid Glue for gluing the doily and the ribbon. For my background mat I used my Stamp Runner Dot Adhesive. I love using Tombow’s runners that way, they look super smooth without any lines or wrinkling.

 I used my Mono Aqua Liquid Glue for the Clear Dew Drops. In like all my projects I used the Foam Tabs for the butterflies and for the brad since I didn’t want to pierce the book I folded the prongs and stuck a foam tab there and it worked like a charm!  But I have to say that the star of this project was my loopy embellishments that I made with… are you ready to go back in time… My Spirograph and the Tombow Dual Brush Pens!!! I am officially hooked, the fine tip of the *Tombow Dual Brush Pens fit perfectly in the holes, you can mix colors, you can use the blender pen and they are acid free so they work amazingly for your scrapbooks and paper crafts. Plus you have over 90 colors to choose from, that makes a lot of loopy embellishments!!

 The Tombow Dual Brush Pens are a must in every crafter’s room. They are so versatile, you can use them for coloring images, calligraphy, doodling and Spirograph-ing (if that is even a word). If you don’t have them, now you know what you can ask Santa to bring you this Christmas.   I hope you liked my retro inspired project as much as I loved making it!!

Take Care!!

If you enjoyed this post please follow us on

Dec
14

This is the other challenge I was telling you about that had me stumped. The only thing I could think of was organ donation and Sharron said “no” to that. Ü So it was back to the drawing board….what to do.

I came across these free printables and thought that this gift “keeps giving” (fresh breath for every mint) LOL! Well, it works doesn’t it? Ü

For the front I wrapped cardstock around the Tic Tacs and used Tombow’s Mono Adhesive Permanent. I colored the image with Dual Brush Tip Pens: 977, 856, 905, & 491. To make the polka dots on the hat and scarf, I made the dots with the Glue Pen and let it dry then colored the images. The glue acts as a resist and is fun to add designs to an otherwise plain image.

Here is the cute saying on the back:

I hope you enjoyed this little treat.

Thanks for stopping by,

If you enjoyed this post, we would love it if you would follow us on:

  http://www.facebook.com/tombowusa               http://twitter.com/#!/tombowusa

Dec
14
while contemplating ideas for this week’s theme ….”the gift that keeps on giving”
i decided to look up the origin of the saying. did you know that it was coined to promote “talking machines”, “talking machine records” in 1924, which was a phonograph.
who knew???? i certainly didn’t.
but that didn’t help me with my idea. and then i got to thinking, the gift idea i had found for my husband for this year is a gift that will keep on giving…at least until December 2012!
my gift is a year’s worth of dates. my husband is very supportive of my creative projects, so i know he will appreciate the time that i am putting into this. so as the scrapbooker that i am, i wanted to make a place to keep pictures or our thoughts about the dates. i created a little book to present to him on christmas morning.
 
SHHHHH!!! it is supposed to be a secret! i won’t even let him look at this post!
 
i found these mini folders at the teacher supply store. by binding them together i turned them into a book. i wanted a place to keep ticket stubs, notes and/or pictures, so i used Tombow MONO Aqua Liquid Glue and glued the bottom of each of the folders together. when i give it to him some of the pockets will have gift certificates inside.
Aqua is the best option for making pockets because it dries clear and it dries completely…so no sticky residue that papers in the pocket would get stuck to.
 
i printed off descriptions of the dates in text boxes from a word document and used Tombow MONO Adhesive Dots to attach one to each of the folders/pockets.
this is the bare bones without too much embellishment, i may save that for later, or let the dates speak for themselves.


i found several of my ideas around the internet, so not all are original. but i thought i’d share some of the ones i have planned…
*lunch @ Atlanta Bread Company to work out yearly budget – (i know…this is FUN one!)
*bucket of balls – driving range and donut holes from Krispy Kreme
*make calzones @ home and watch a movie
*dollar date – dollar store, dollar menu, dollar theatre
*movie theatre
*walk in the park with italian ice
*Gwinnet Braves baseball game
 
well then, i’ll be giving for a whole year!

If you enjoyed this post please follow us on

  http://www.facebook.com/tombowusa  and  http://twitter.com/#!/tombowusa

Dec
13

It’s OUR Birthday but YOU get the gifts…

The Tombow Blog is 2 years old and we want YOU to help us celebrate…

just go to our Facebook page, http://www.facebook.com/tombowusa

between Dec. 13th, 8 am (EST) – 16th, ending at 4:00pm (EST) 

“Like” us and be entered to win a “BLOG” 

(Big Load Of Goodies) from Tombow …

The drawing will take place on Monday Dec. 19th

If you are already a follower on

  http://www.facebook.com/tombowusa and    http://twitter.com/#!/tombowusa

Thank you… please leave a comment on our Facebook page for a chance to win!