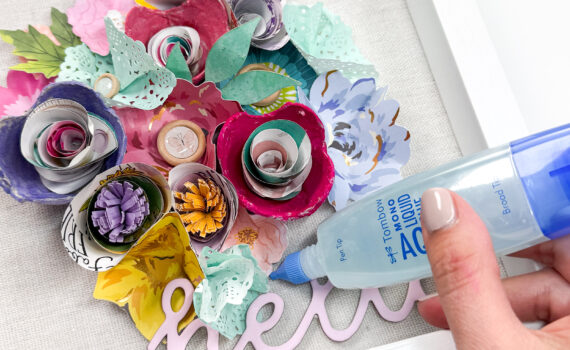
Posts from ‘Cards’

Jan
26

“What a Sweet Face” is a layout of our new puppy last year. So sweet and I wanted to remember just how cute he was as a puppy, I know the time won’t last forever.


 I wanted to use these heavy chipboard pieces on the layout but the adhesive already on them did not hold on the paper, it kept falling off.

I applied a layer of Tombow MONO Permanent Adhesive to the large chipboard piece so I could display the layout.  I held great, now I have a real memory keeper. They grown up so fast don’t they…

I hope you enjoyed this sweet project and I’ll see you next time…..

Kathy

If you enjoyed this post follow us on facebook and twitter!       http://www.facebook.com/tombowusa  and http://twitter.com/#!/tombowusa

Jan
25

It’s never too early to start thinking about Easter is it? I didn’t think so, so I have created an “Easter Egg Seed Packet” for my project today.

The adorable seed packet cover and packet template is from High Hopes Rubber Stamps.

I stamped and embossed the image with black ink and embossing powder. I stamped the sentiments inside the banners with black ink. The image was colored with Tombow Dual Brush Markers. I added liquid appliqué to the clouds and heat set it to make it puffy. I made the seed packet with cardstock scored on the fold lines and cut the window out. I adhered a piece of acetate behind the window and the edges of the seed packet with Tombow MONO Power Adhesive Bond . Using my doily lace punch I cut  ¾” strips of white cardstock and punched the borders. I cut the corners at 45degree angles and adhered them to the back edges of the image. Using foam tape I adhered the image to the seed packet front. To close the packet I used Tombow Fastener Tabs. Fastener tabs are sticky backed hook and loop fasteners perfect for papercrafts where a closer is needed. They close securely and open with ease!

 I filled the seed packet with candy and it’s ready for an Easter basket!!

Here are the Tombow Dual Brush Marker colors I used….  947 brown, 985 yellow, 451-491 blue, N25 black, N65 grey,  761-772 pink, 623- 603 purple, 133-126-076-177 greens.

This is a fun and creative way to send some Easter fun to those you know far and wide…I hope you enjoy this project.

Huggs,

Karen


If you enjoyed this post follow us

    http://www.facebook.com/tombowusa  and http://twitter.com/#!/tombowusa


Jan
23
The birthday card was for a sketch challenge and I really wanted to make use of the small piece of yellow ball rick rack that I had.  The only way to attach this ribbon was to use both the Tombow Permanent Stamp Runner and the dot portion for both parts of the ribbon so that it really stayed on the card.  

I also used Tombow’s MONO Aqua liquid to attach the red felt flower and the jewell emblishment. This was such a fun card to make, I hope  you enjoyed it.
 
Hugs,   Kathy
 
If you liked this post please folow Tombow on facebook and twitter!       http://www.facebook.com/tombowusa  and http://twitter.com/#!/tombowusa

Jan
20
Hello!  This week on the Tombow blog we are continuing our journey through some of the past Pantone colors.  Today I am sharing the 2010 color which was Turquoise.  Tombow’s Dual Brush Pen #373 (Sea Blue) was a great match so I decided to use it along with some of the Irojiten Colored Pencils for today’s card.
I stamped this adorable Benton Heart Bear from Inky Antics and then colored the heart with Dual Brush Pen #373.  I then added some Tombow Glue pen and sprinkled glitter over it to make the heart really pop.
I colored Benton with Irojiten Chestnut Brown and Autumn Leaf colored pencils and blended them out with some odorless mineral spirits.  I used Tombow Mono Adhesive Dots to adhere all of the layers together.  The buttons were attached with the the small Tombow Foam Tabs.

TOMBOW Foam Tabs

These acid-free double sided adhesive tabs are great for adding dimension to many projects, the small tab is 1/5 x 1/5 and the large tabs are ½ x ½, they are also great for layering and can be stacked for added dimension.  They are suitable for most surfaces including paper, glass and metal.  They are also crush resistant and instantly bond and hold.


  http://www.facebook.com/tombowusa         http://twitter.com/#!/tombowusa

Jan
17

In case you haven’t guessed, this month is all about Pantone’s color of the year, present and past. This week the Design Team is showing off Turquoise, color of the year for 2010. I would say this is still a very “hot” color. I have seen so much of this color in clothing, homes and fashions of all kinds.

Not only do I love this color, but I love ice cream sundaes. My favorite is hot fudge, what is yours?

The card I have to share with you today is using Irojiten colored pencils. I like to use Gamsol to blend the colored pencils to get a soft look.

How fun is the inside?  (you can click on the pictures to get a larger view)

When using Honeycomb papers from Inky Antics (all the stamp images are by them as well) I prefer to use Tombow’s Mono Glue Stick. It is perfect for the thin papers and adheres so well to cardstock. The adhesive I used for the rest of the card was Mono Adhesive Permanent.

I hope you are enjoying our color month and will give these “colors of the year” a try in your papercrafting.

Thank you for stopping by,

if you enjoyed this post follow us on facebook and twitter!       http://www.facebook.com/tombowusa  and http://twitter.com/#!/tombowusa

Jan
13

This month the Tombow team has been sharing projects created using colors that coordinate with the Pantone “in” colors for the last few years.  Today I am sharing a card that I created using the 2011 color, Honeysuckle.   

 Tombow’s Dual Brush Pen #743 (Hot Pink) is great match.
 I used the marker to color in this beautiful butterfly image from the Inky Antics Brush Calligraphy #3 set and stamped it onto some white cardstock which I then cut out using some cirlcle nesties.  I wanted the wings of the butterfly to have some subtle color so I used the Tombow Dual Brush Blender Pen to pull some of the ink from the stamped image.  I really like how soft the wings look.  I added a touch of glitter to the butterfly for a little sparkle.  I used Tombow Permanent Stamp Runner to adhere all of the layers together and some of the Tombow Foam Tabs to pop up the sentiment panel.  

Did you know?
that the Colorless blender softens and blends colors, creating a watercolor effect. Ideal for fine artists and crafters – perfect with rubber stamps.  
Jan
12

This week we are showcasing the color Honeysuckle, which was the color of the year 2011. This is the perfect color for that special day when we declare our love to that special person in your life. Is also a good time to start preparing our kiddies treat boxes, cards and other gifts, so pay attention to these weeks posts because we will be filling you with awesome ideas for Valentine’s Day.

This mailbox cost me only $1 and dressed it up with 4 x12 patterned paper, ribbons and some stickers. For gluing the cardstock I used the Tombow Stamp Runner and for the embellishments I used the Mono Multi Glue. I also made a coordinating card with the cutest cherub which I colored with my Tombow Dual Brush Pens. I paper pierced the cloud and used Tombow Foam Tabs. The card is size 3 1/4 x 4 1/2 which fits perfectly in the mailbox.

I can’t believe how cute this cherub looks with Honeysuckle hair!! I love how bright my Tombow Dual Brush Pens are and not to mention how incredibly easy they are to use for beginners like me.

I hope you liked this romantic project!!

Take Care!!

If you enjoyed this post please follow us on
Jan
03

Hi there!  This week our theme is “What’s New”.  Each year Pantone comes out with the new “in” color for the year and for 2012 it is Tangerine Tango.    Today I am going to share a card with you that I created using a monochromatic color scheme and a pretty little  flower.  I used the Tombow Stamp Runner-Permanent Adhesive , Tombow Power Tabs and Dual Brush Pen #885 (Warm Red).


I inked up the sentiment with the Warm Red #885 Dual Brush Pen and stamped it onto some cream cardstock.  I  assembled the card layers using the Tombow Stamp Runner, leaving the top right corners adhesive free.  You will roll these down for a little added dimension to your card.  Next, you will use the stamp runner to apply adhesive to the backside of your ribbon/trims and lay them across the card.  I didn’t have the right color of pearls, but no worries.  I used the Dual Brush Pen (#885) to color them for a perfect match.  Give it a try, you will be amazed at how easy it is to color match using the Dual Brush Pens.

Please join us on:
  http://www.facebook.com/tombowusa  and  http://twitter.com/#!/tombowusa

Dec
23
Hi there!  This week the Tombow gals and I are using fabulous peel-off stickers from Elizabeth Craft Designs.  Els sent us several sheets to play with and here are two of my favorites. 
Watercolor Technique

I love whimsy and decided to take these elegant gold ornaments and give them a touch of whimsy.  I started by placing the ornament stickers on some 140# cold press watercolor paper and then I colored them with my Dual Brush Pens.  I colored the different areas of the ornament with the following Dual Brush Pens colors: 093, 133 and 847 and then blended the color with a waterbrush. I used Mono Adhesive Dots to attach the layers together and a couple of Foam Tabs to pop up the ornament that is in the front.  To finish off this card I added a wee bit of Mono Glue Pen to a few areas and sprinkled them with Elizabeth Craft Designs Warm Highlights glitter.
Stained Sticker Technique

 For my next card, I used one of the beautiful floral stickers that Els sent.  I had never seen the Dual Brush Pens used to color the solid portions of the sticker, but I wanted to give it a try.  I am happy to say that I really like the way this turned out.  Because the stickers have a slick, shiny surface I knew that the markers were going to resist the ink so as soon as I colored in the flower,  I wiped off the ink with a dry cloth and created a stained effect on the gold portions of the stickers. I had to use darker markers for this technique and apply a few layers of each color.  For the interior of the flower I used #847 and for the leaves I used #249.  I used more of the Mono Adhesive Dots to hold all of the layers together and a few Foam Tabs behind the image panel to pop it up and add some dimension.  I finished off the center of the flower with some Mono Aqua Adhesive and ECD Warm Highlights glitter.


If you enjoyed this post, we would love it if you would follow us on:

  http://www.facebook.com/tombowusa               http://twitter.com/#!/tombowusa


Dec
21

We are three days away from Christmas, can you believe it?!

But before the year is over we got to play with stickers from Elizabeth Crafts which are very versatile, fun, cool and they work perfect with the Tombow Dual Brush Pens.

For my first card I used some of Marie’s Tips on Monday, isn’t she a genius?! After I used the sticker to color the negative space I cleaned it a bit with a wipe or dry cloth and stuck it behind the strip I made. For the sentiment I used a rubber stamp with my Tombow Dual Brush Pens and then added a tiny bit of  water with a water mister and it worked gorgeous because it made it darker in a few corners like a shadow but it covered evenly. I also used the Tombow Dual Brush Pens for the Faux Stitching. In case you didn’t noticed *the Tombow Dual Brush Pens work for coloring, rubber stamping, doodling and calligraphy. They would make the perfect gift for that special crafty person in your life.  I know I love mine because they amp up every project I make.

On my second card I went Springy, I know is Winter but I don’t do so well with winter temperatures and I can’t wait for Spring. These bird stickers are the cutest!! I wanted to make a little scene based on the sentiment which says “Follow Your Dreams” in Spanish. I took simple white frame and I stamped my sentiment there and then I doodled the border to spice it up and I did the same to the leaves. When I glued the leaves with my Mono Multi Liquid Glue I just applied glue to one point on the leaf under the branch and bent the other to give it some dimension. For the clouds I used Tombow Foam Tabs and for the bird I stacked two Foam Tabs together.

Doing the mask technique with my Tombow Dual Brush Pens was really fun, I hope to try it again soon!!

I hope you liked my project!!

Take Care!!

If you enjoyed this post please follow us on