Hi, friends! I’m Andrea Lake, and I’m beyond excited to share how I created a cute set of five handmade cards using Tombow Dual Brush Pens—both to design my backgrounds and as watercolors to add color to some beautiful floral stamps. These stamps became the main embellishments for my cards, […]
Cards & Papercrafting

Hello, friends! I’m Andrea Lake, a passionate crafter who loves setting goals and planning to achieve them. Inspired by patterned papers, rainbows, flowers, and butterflies, I prefer my goal-setting tools to be simple yet colorful. Mood boards are an amazing way to visually map out your goals and stay motivated […]
How to create a Colorful Mood Board
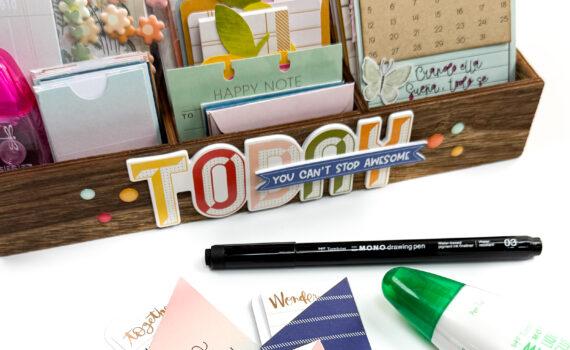
Hi, friends! I’m Andrea Lake, and I’m so excited to celebrate National Hobby Month with you. Life can feel so busy, and it’s easy to get caught up in our daily tasks. That’s why it’s so important to make time for hobbies—they bring us joy, help us relax, and give […]
DIY Stationery and Calendar Holder
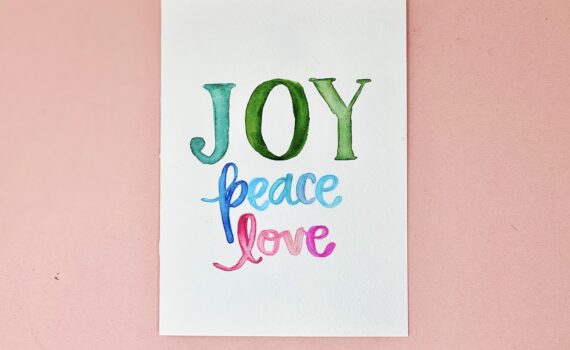
Hi Tombow Friends! This is Smitha Katti from the blog Smiling Colors, sharing a joyful holiday tutorial. The holiday season is a great time to use your favorite Tombow products to create handmade gifts for your friends and family. This Holiday Joy Peace Love Card Tutorial is colorful, modern and yet […]
Holiday Joy Peace Love Card Tutorial

Hi there, it’s Katie here to show you how to make a cute DIY Advent Calendar Book that looks like a cute little gingerbread house (but pink, because that’s my favorite color!). I love making advent calendars because they make every day leading up to the holidays feel extra special. […]
DIY Advent Calendar Book

Hey Tombow Friends! The weather and the leaves are changing! To celebrate I’m making a few handmade cards using Tombow Products! Supplies Tombow MONO Air Touch Adhesive Patterned Paper Tombow Dual Brush Pens Card bases Tombow Adhesive Dots Embellishments (Die Cuts, Washi Tape, Stickers, Buttons, Etc.) Step #1: Pick your […]
Fall Inspired Handmade Cards

Hi Tombow Friends! This is Smitha Katti from the blog Smiling Colors, sharing a DIY Cheers Celebration Card to celebrate 40 years of Dual Brush Pens with Tombow. Tombow Dual Brush Pens are so versatile and easy to use. Let’s create this watercolor illustration together to say cheers! Supplies: Watercolor or […]
DIY Cheers Celebration Card

Hi Tombow Friends! This is Jennie Garcia and, in this post, I’m taking you on a cozy Fall crafting adventure! I have a very comfortable craft room, but sometimes I need a change of scenery. On those days, I make a kit so I can bring it with me. I […]
Cozy Fall Crafting Adventures

Hi Tombow Friends! This is Smitha Katti from the blog Smiling Colors, sharing a DIY Save The Date Card tutorial. You can use your Tombow Dual Brush Pens to create unique, customized DIY Save The Date Cards that truly represent you. Whether you are a beginner or advanced artist, these […]
DIY Save the Date cards for Wedding

Wedding season is here, and whether you’re planning a shower, a rehearsal dinner, or the big day itself, these Mini Floral Arrangement Place Cards are a beautiful way to organize your guest seating. They also work wonderfully for other types of festive events, like anniversary and birthday parties, too. Here’s […]
Mini Floral Arrangement Place Cards
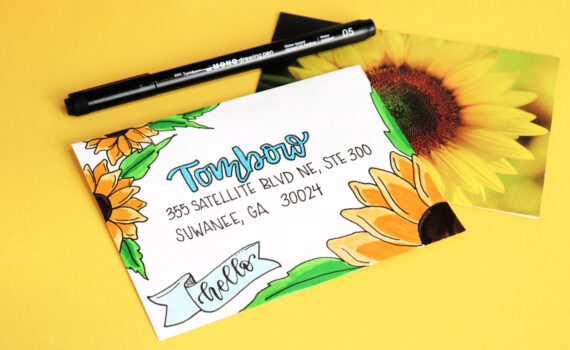
One thing that never fails to brighten any day is receiving “happy mail!” When I get a card or a package from a friend, it’s sure to make me smile, and I bet the same is true for you. In this digital age, when it’s so easy to text or […]
Happy Mail: Sunflower Envelope

This summer, why not send a handmade postcard from your favorite vacation spot? I’m Amy from Amy Latta Creations, and today I’m excited to walk you through how to make a Vintage Sunset Postcard that you can customize for any destination you visit. How to Make a Vintage Sunset Postcard […]