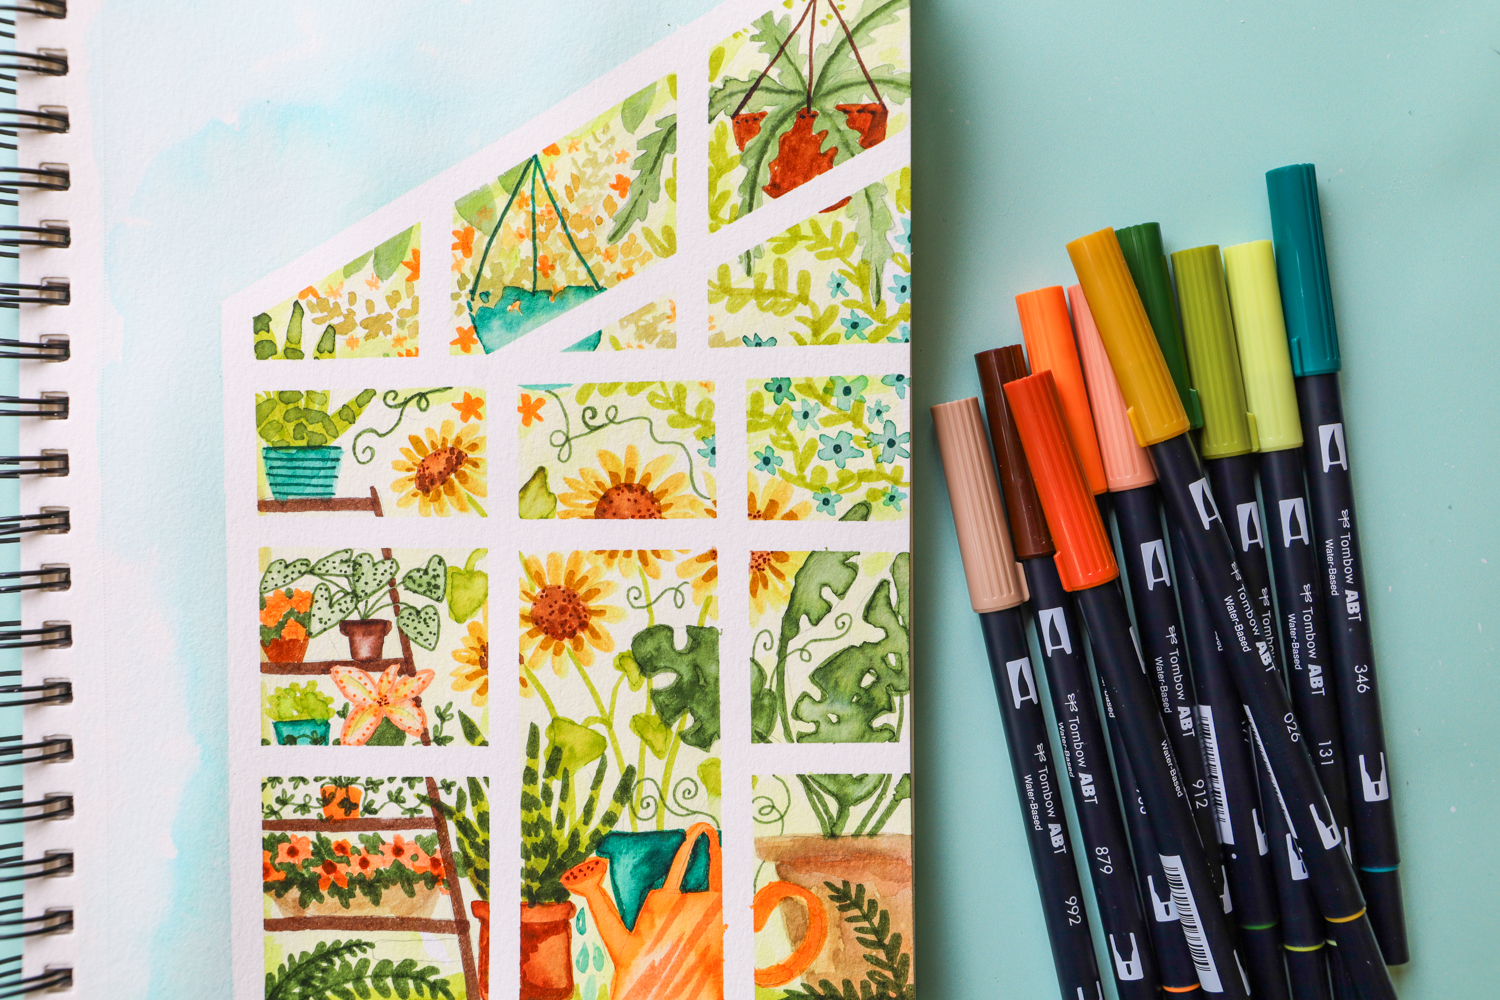
Posts Tagged ‘Tombow Dual Brush Pens’

May
03

Have you caught the Smash Book Fever?? Well I’ve had it for a while and is incredibly fun. I wanted to share a few pages that I made. I don’t really follow a theme I just put things that make me happy.

My Smash Book’s Best Friend is the Stamp Runner Dot Adhesive. I mostly use magazine pages and this adhesive doesn’t wrinkle the pages and is pretty small so you can have it in your bag or purse. Some people have like a Smash Travel Kit and I think that in this kit you should include the Stamp Runner Dot Adhesive, Mono Multi Liquid Glue and the Mono Glue Stick.

Most of these things are from my college years including my student card and my train card :0)

The Smash Book tabs have only one sticky side and I don’t fully trust so I use the Stamp Runner Dot Adhesive.

For the Epiphany Crafts Embellishments I use my Mono Multi Liquid Glue. I used a lot of washi tape and rub ons.

I made this page because I am getting very serious about my health and losing weight :0)

This page is about the places I want to go :0) The arrows are stamps that I colored with my Tombow Dual Brush Pens.

The little envelope on the corner I made it with my Cricut and to put it together I used the Stamp Runner Dot Adhesive, to keep the Twine in its place I used the Mono Aqua Liquid Glue. The cute angel stamp I colored it with the Tombow Dual Brush Pens.

For this Earth Friendly Page I made two tags on my cricut and I put them together with the Stamp Runner Dot Adhesive. For the little punched pink  flowers  I used the Mono Multi Liquid Glue which has a broad tip for big spaces and small tip for small things like these. It also doesn’t clog, which is the best thing for me :0)

Do you have Tombow on your Smash Kit??!!

Take Care!!

If you enjoyed this post please follow us on
Apr
26

This week we got to play with Sweet Stamp Shop. I got this cute Bubblegum Machine  and i wanted to do some playful tags.

The base of all the tags are normal shipping tags and the first thing I did was color the hole back with the Tombow Dual Brush Pens and then I added an eyelet. They all have Trendy Twine. I stamped the Bubblegum Machines on book pages and I LOVE how they turned out. To color them I used my Tombow Dual Brush Pens. On this first tag I used washi tape on the bottom, doodled a little bit and then stamped a sentiment from Peachy Keen Stamps. On top of that I added a tag in which I added the black lines to coordinate it a bit more with the image. The photo corners are raw chipboard that I colored with a black Dual Brush Pen.

For the heart in the center i glued a lot of “Bubblegums” together and then I punched with my Epiphany Crafts Tool and added this shiny heart. I LOVE how it turned out.

In the second one I stamped this sentiment from Joy’s Life. I used half of a doily and on top I added washi tape. To glue my doily and stamped image I used my Runner Dot Adhesive. For my Epiphany Crafts accents like the stars I used the Mono Multi Liquid Glue.

In this last one I amde a little banner and on the bottom I used another stamp from Joy’s Life. I painted the scalloped oval with white paint and on the back I added a piece of patterned paper. I outlined the oval and the inside to make it pop.

I hope you liked these playful tags!!

Take Care!!

If you enjoyed this post please follow us on
Apr
19

The star of the week are the Tombow Foam Tabs which I LOVE because I love dimension in my projects. To continue with the Home Decor theme of last week I made a banner for my daughter’s room using the same Momenta Kaleidoscope Paper.

I started by making my pennants with recycled cardboard from cereal boxes, you can use your chipboard too. I made a pattern and traced it in to the cardboard. After cutting ALL the cardboard I used the broad tip of the Mono Multi Liquid Glue to spread the glue in all the pennant and then I added a rectangle of the paper of my choice. It dries pretty quickly. What I do is keep gluing in all the pennants and when I’m done gluing I take my craft knife and I cut the excess in the order that I glued. I used my Tombow Dual Brush Pen to doodle around each pennant. You can punch the holes now or at the end, it really doesn’t make a difference. I do recommend using eyelets to protect it and make it look more polished.  Now I will explain how I did the flower with the letter.

First I did a simple rosette. In case you don’t know how these are made, is really easy. I used 1 1/2 x 12 paper and punched one of the borders. Using my scoreboard I scored at every 1/4 and 3/4, I turned it around and I scored at every half inch. Glue the corners (like in the second photo). Using a one inch circle I used my Mono Multi Liquid Glue to apply it around and I glued the rosette on it. You can keep it really close or give it a little wiggle room, is up to you because it won’t show anyways.

I glued the rosette to a doily with the Mono Multi Liquid, on top of that I glued my scalloped circle. I doodled it with the Dual Brush Pens and on top of it I placed the letter with my Tombow Foam Tabs. Then you just glue the whole thing to the pennants.

The banner says my daughter’s name which is Ithamar.

A little close up. I added a few Momenta stickers to spice it up.

Easy right??

I hope you liked this girly banner!!

Take Care!!

If you enjoyed this post please follow us on
Mar
29

For this ABC Week I have another layout.

For this layout I started with a sketch that I didn’t use exactly but it gave me a few ideas. I started with 4 squares that measure 4 1/4 and using my Tombow Stamp Runner Dot Adhesive I arranged them in a 9 inch dark brown square to make them pop. I used the Tombow Dual Brush Pens to doodle on each square and on the border of the page. I love matting my pages with the Stamp Runner Dot Adhesive because is durable, acid free and it doesn’t wrinkle the photos. I placed the photo on the right first because on the one on the left I used the Tombow Foam Tabs to make that photo stand out and hide a journaling tag behind it. On that same photo I used some dimensional stickers and in the part that is not attached to the photo I used Tombow Foam Tabs.  On the top of the layout next to the cardstock sticker I made a flower with a brad on the center but instead of piercing the paper I used a Tombow Power Tab. I added a few stickers, brads and, punch outs to the layout. The big pennant is a wood piece and I used the Tombow Mono Multi Liquid Glue to glue the paper, after it was dry I just used my craft knife to cut around it. I did more doodling with the Dual Brush Pens and to decorate I used a trim tape, a cardstock sticker and a big dimensional sticker. I wanted to give the illusion of a wall hanging so I glued twine behind the piece and used a brad as a nail.

Maybe you don’t feel the love for brads, just tuck the prongs behind it and use a Power Tab it will work great!!

I hope you liked this layout!!

Take Care!!

If you enjoyed this post please follow us on
Mar
15

Top of the morning to ya!!  St. Patrick’s is on Saturday so I hope you are all set up in all things green!! I made this happy Leprechaun card and it was super fun!! 

The rainbow and the Leprechaun are actually separate images. For the rainbow I stamped the Leprechaun on top to color the shadows in the rainbow. On a separate piece of paper I stamped the Leprechaun, colored it and then I did some extreme fussy cutting to put him on top of the rainbow. That way the image of the legs and the rainbow won’t mix ;0) I did all the coloring using the Tombow Dual Brush Pens. Then I made some clouds like we used to do back in the day in the BDCM era (Before Die Cutting Machines). I put the whole image together using the Mono Multi Liquid Glue. A little fact about this awesome glue *the fine tip makes the Mono Multi Liquid Glue the best for paper piecing and it doesn’t clog so you won’t get a bunch of glue suddenly which could ruin the project. Trust me it happened before with another glue. For the background I heat embossed a  background stamp with blue embossing powder. The sentiment was placed using Foam Tabs and underneath I used Twine and brads.

I hope you feel as lucky as this Leprechaun is!!

I hope you liked my lucky card!!

Take Care!!

If you enjoyed this post please follow us on
Mar
08

The theme for the week is Give Me A Hug !! I love this stamp set not just because is super cute but I get to do two of my favorite things when I stamp: paper piecing and coloring.

I always start with the image and then I decide what the background will be. First I picked their clothes, or the pattern paper to paper piece their clothes and then I stamp the image to cut their clothes.  Then I decide what color to use on the hair, eyes, etc. Since these are gnomes I have permission to use any colors I want which I love! I color the parts I want to color with my Tombow Dual Brush Pens BEFORE I glue the clothes with my Tombow Mono Multi Liquid Glue. Using my Stamp Runner Dot Adhesive I made a simple background with a hill and a pair of rays. I doodled the background before adding the gnomes with Foam Tabs. I also used twine and a cloud for the sentiment.

I think this is a pretty magical card. Don’t you think?! :)

I hope you liked my magic!!

Take Care!!

If you enjoyed this post please follow us on
Mar
01

Is that time of the month when we give cards a week free to make other type of projects. I love making layouts and I plan to do a whole lot more. For those of you, brave people who are making the LOAD (Layout A Day) Project I hope you are all set with your Tombow products to tackle this quest. Since I’m not that brave I’ll stick to a Layout each week, here is my Layout for this week.

I’ve wanting to do this background for a while and I found this great photo to use. First I sketched it on a blank page but you can also do it on the back of your page. Maybe you can even free hand it but I am a perfectionist. After gluing the stripes I matted my photo with the Stamp Runner Dot Adhesive which is the one I always use since is Acid Free and glues smoothly. I doodled all the stripes and I used my Tombow Dual Brush Pens with the fine tip ideal for perfect doodling. I used alpha stickers for the title and I drew a line around the letters so they can stand out and I added twine to some of the letters. I hold the twine in it’s place using the Mono Aqua Liquid Glue and for a little extra detail I like using a staple on both ends. On the right I clustered many embellishments like the journaling and Bingo Card Stamp, some Puch Outs, the brad, and for the tag I colored the brown hole protector with a Tombow Dual Brush Pen and added Twine. For the green embellishment in the center I glued the Bubble Cap with my Mono Multi Liquid Glue and Glued the green part to the layout using Power Tabs. On the corners for balance I used the punch outs, brads and twine and in the bottom I used Tiny Alphas.

Remember to buy your Tombow Products for the LOAD Projects, Project Life or even if you just scrap once in a while. Now they are available at the Tombow Online Store!!

I hope you liked my layout!!

Take Care!!

PS: Be sure to go HERE if you haven’t to sign up for Tombow’s Leap Year prize.

If you enjoyed this post please follow us on
Feb
24
TGIF!  This week on the Tombow blog we have been given a “Designer’s Choice” week.  
I decided to share my March calendar page with you.
This page is 5″x 7″ and stands up on its own with an easel back.  I started with a base layer of kelly green cardstock and then adhered some Bo Bunny Double Dot cardstock with my Tombow Mono Adhesive Dots, Roller.  Next I inked up the shamrock image from the Our Craft Lounge, Shamrock Blessings set with three different green colors of Tombow Dual Brush Pens using the thumping method to ink up the stamp and then stamped them to the bottom of the white calendar panel. I did the same thing for the flowers that I stamped in the upper left corner using the same green Tombow Dual Brush Pens and adding two tones of purple Dual Brush Pens.   Next, I cut out another piece of kelly green cardstock with the Spellbinders Nestabilities Mega Dies, Labels 17 and adhered the calendar panel to it with Tombow Mono Adhesive Dots, Roller and then attached this panel to the calendar base popped up with Tombow Foam Tabs.  The sentiment was also inked up with the Dual Brush Pens and stamped onto some white cardstock.  I cut the sentiment panel and background layer with my Spellbinders Nestabilities Die-Petite Ovals set and popped it up onto the calendar with Tombow Foam Tabs.  The two shamrocks were cut from the new Memory Box Lucky Leaves dies, embossed with clear embossing powder with a touch of Glitter Ritz Warm Highlight glitter from Elizabeth Craft Designs and adhered to the calendar with Tombow Mono Multi.


Did you know?

Tombow MONO Multi Liquid Glue

Has ual applicators in one ergonomic dispenser.  A pen tip for small areas or fine line of glue and broad tip for large areas. Bonds two ways: permanent by applying while glue is still wet; removable by letting glue dry before positioning. Safe for use with photos, cardstock, fibers, buttons, etc. Acid-Free and non-toxic.
If you enjoyed this post follow us on facebook and twitter!
Feb
23

This week at Tombow is Designer’s Choice and since I love making layouts all I needed was a photo.The other day I was going through some High School pictures and thinking about how things were back then. So I made this layout documenting some of my favorite things at the age of 15.

I matted all the patterned paper with black cardstock using my Stamp Runner Dot Adhesive. Sometimes I like to use double mat like in the picture and the journaling card. For the banner I used my Tombow Foam Tabs to emphasize the title and birds.  I used my Tombow Dual Brush Pens to doodle on the blocks of patterned paper including the base. The little Attention Man is one of the icons of the Cricut Imagine that I cut and printed. I thought that it was a bit too bland a little boring and I used my Tombow Dual Brush Pens to make him more snazzy. I used a page of a Roll Book for part of the title and to journal. I used my Tombow Dual Brush Pens to stamp the red flowers on the title. I also used some Twine and to keep the bow in place I used the Mono Aqua Liquid Glue. I matted the Roll Book page and added a little bit of patterned paper to make a nice journaling card. For each topic I used some bling as a bullet point. Using my Stamp Runner Dot Adhesive I made a pocket with the journaling tag to put a shipping tag inside, in case I remember more things. The hand is also from the Imagine and I also used the #025 Light Orange to color some details like that fine string on the finger.

Tombow Dual Brush Pens are a great way to add detail to some pieces that may be a little simple.

I hope you liked my layout!!

Take Care!!

If you enjoyed this post please follow us on
Feb
16

The theme for this week is “Pencil Me In” and I came across this awesome Digi Stamp and I just had to try it. I am trying to pile up some cards for Operation Write Home and I thought that this card would work great for the cause.

I love Tombow Dual Brush Pens they are unbelievable easy to blend, take it from me, when it comes to coloring I am kind of a newbie.  I really wanted to use that green conversation bubbles patterned paper but I didn’t want the girl to blend in the green. So I made this pattern and put it together with my Stamp Runner. For my cute girl I paper pieced the pencil and I used Tombow Foam Tabs to give it some pop and I also used Tombow Foam Tabs on the whole girl. Since this is an easel card I need that bottom piece to hold the card. If you knew that I would use Tombow Foam Tabs you are absolutely right. For the sentiment I did some double matting, which I love to do with sentiments because it gives it a little bit extra detail. I used twine tied to the red brads so I used the small Tombow Foam Tabs on the corners to lift it without interfering with the twine. To hold the twine and bling in place I used the Mono Aqua Liquid Glue.

Here you can see all the Dual Brush Pens I used. I love my Foam Tabs they are super durable and for this cause we need tough adhesive.

I hope you liked my card!!

Take Care!!

If you enjoyed this post please follow us on