
Sharisse is a brush calligrapher located in Sacramento, California. She enjoys engaging with other calligraphers and handlettering artists and learning something new every day. When she is not chasing her toddler twin boys or working at her day job, you can find her creating, teaching, or blogging about brush calligraphy.
Social Media links:
- Blog: http://piecescalligraphy.com
- Instagram: @piecescalligraphy
- YouTube: piecescalligraphy
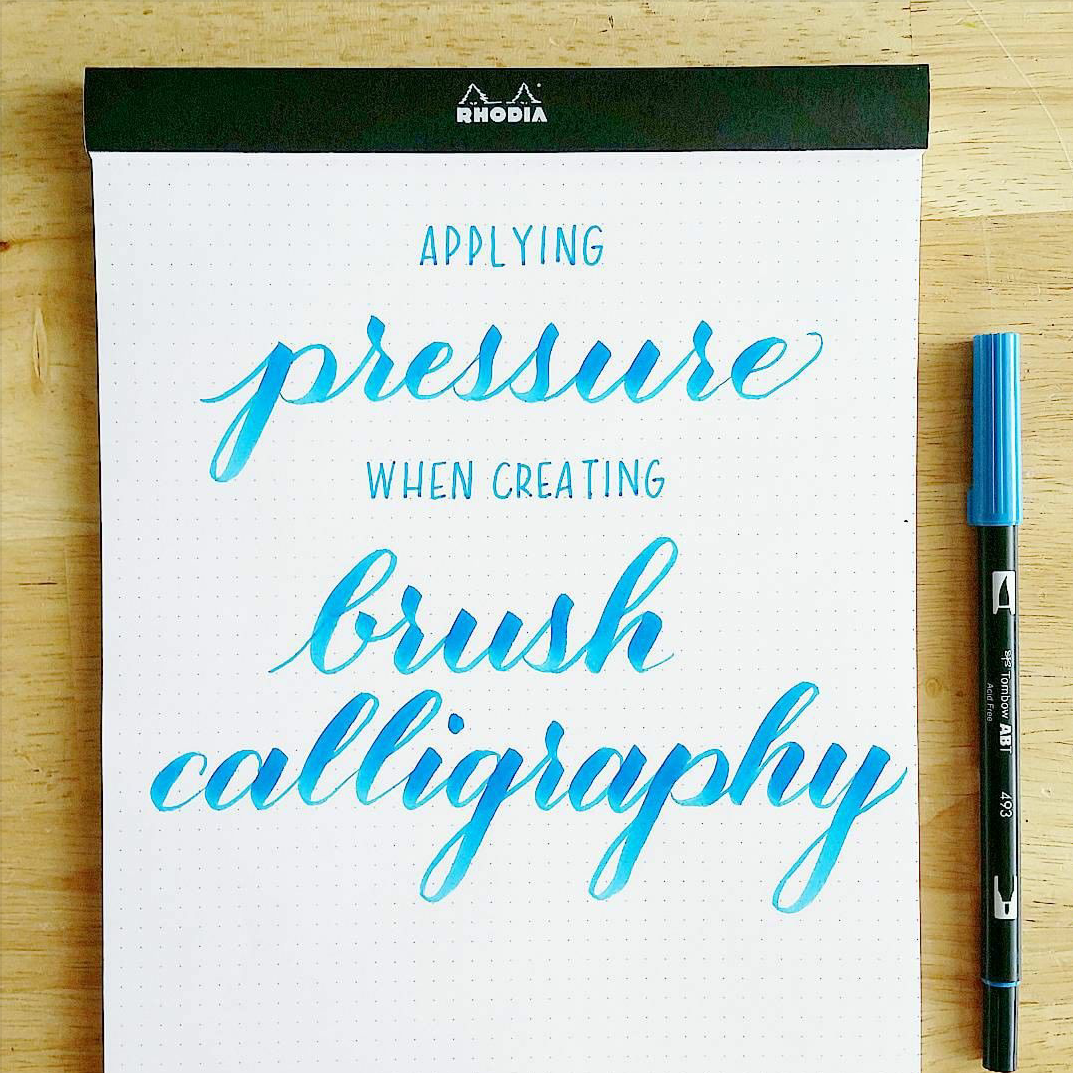
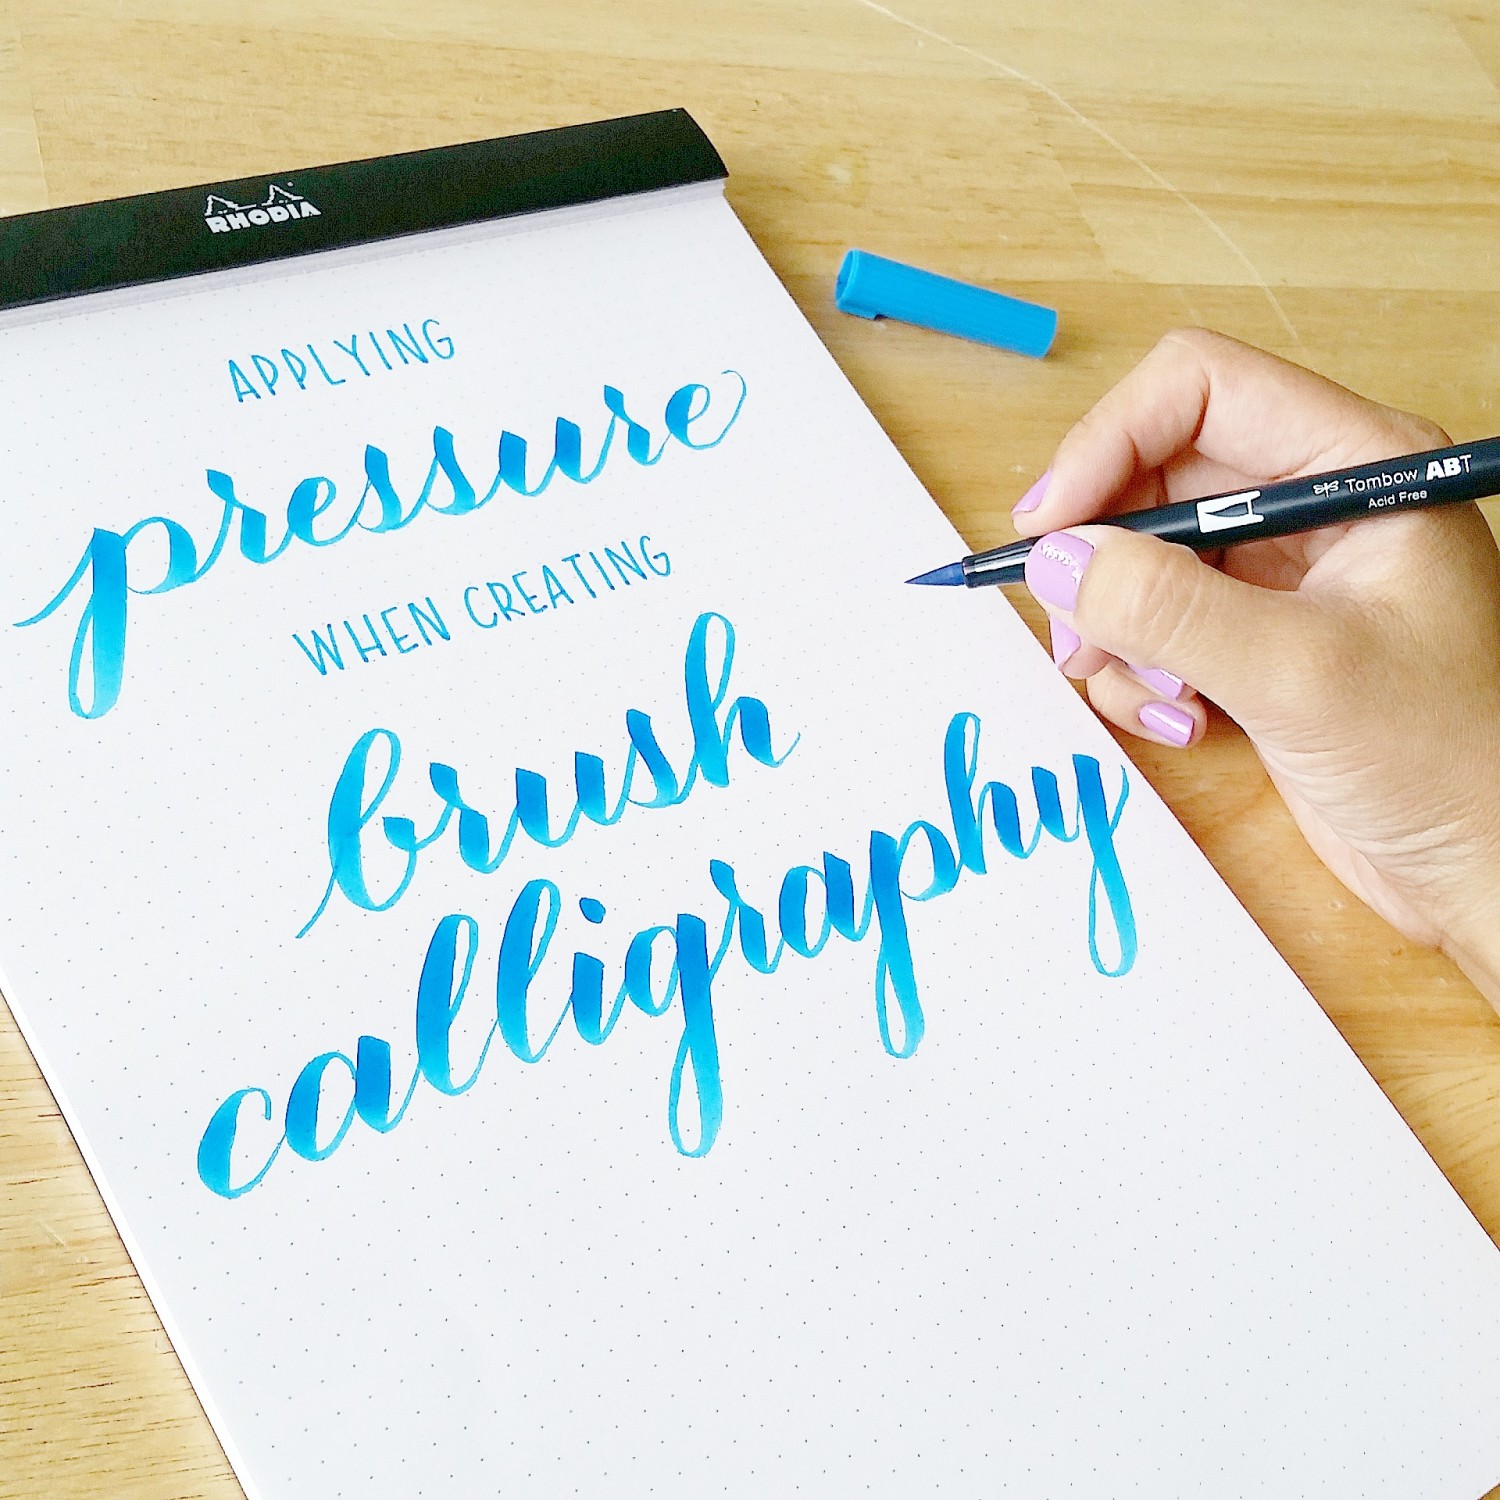
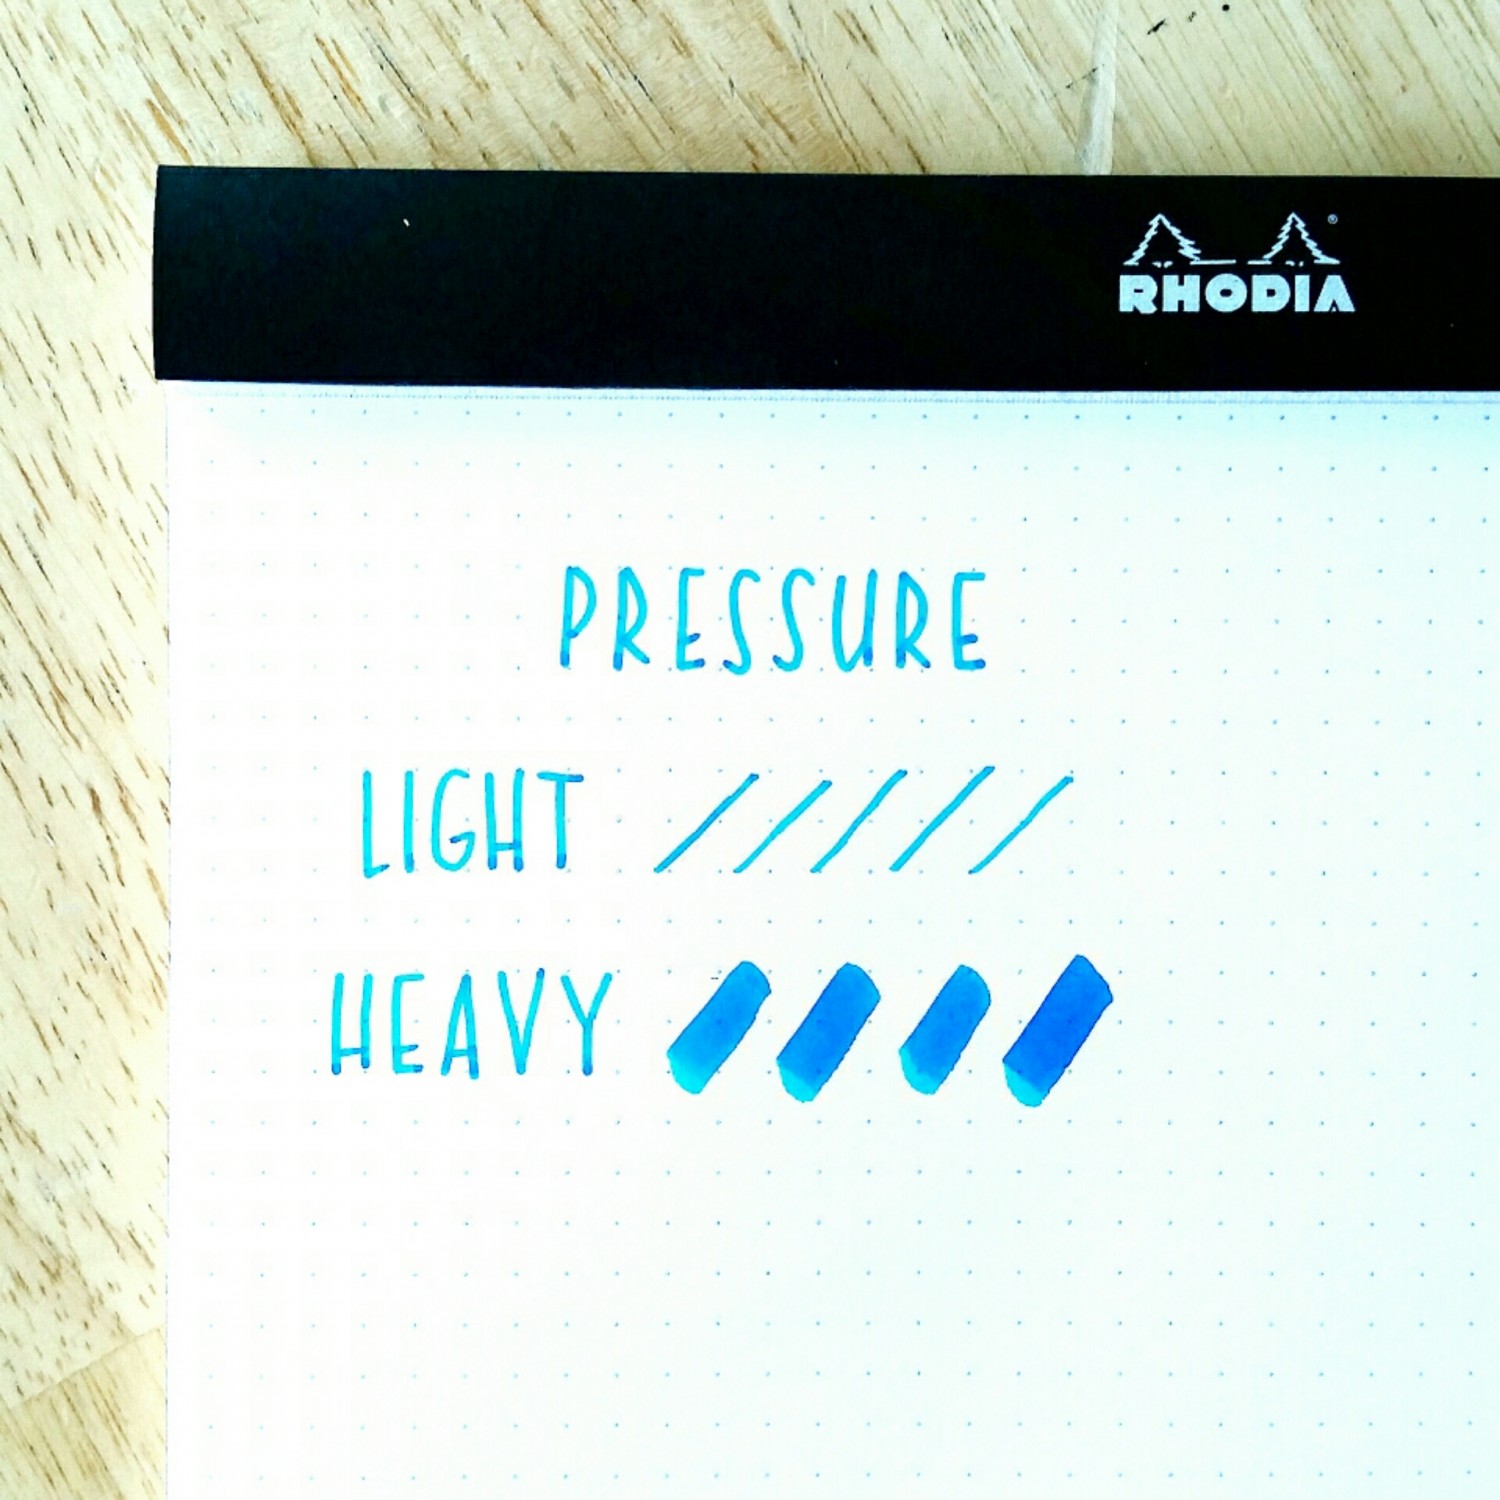
When creating brush calligraphy, it is important to understand when to apply pressure.
The amount of pressure you apply to your brush pen directly affects the width of each of your strokes. The more pressure you apply, the thicker your strokes will be. And the less pressure you apply, the thinner your strokes will be.
But what exactly is pressure? How do you create and control pressure? When do you apply pressure?
WHAT IS PRESSURE?
Pressure is the act of exerting force of an object (such as a brush pen) onto something else (such as a piece of paper).
Pressure can be heavy and forceful, or it can be light and gentle. The amount of pressure you need depends on the writing style and effect you desire.
When creating brush calligraphy in particular, you want to apply heavy pressure to create thick downstrokes and light pressure to create thin upstrokes. The variation of thick and thin strokes is what defines calligraphy. Therefore, knowing when to apply pressure is crucial for creating brush calligraphy.
HOW DO YOU CREATE AND CONTROL PRESSURE?
As mentioned above, you create pressure by pressing your brush pen down onto the paper with force.
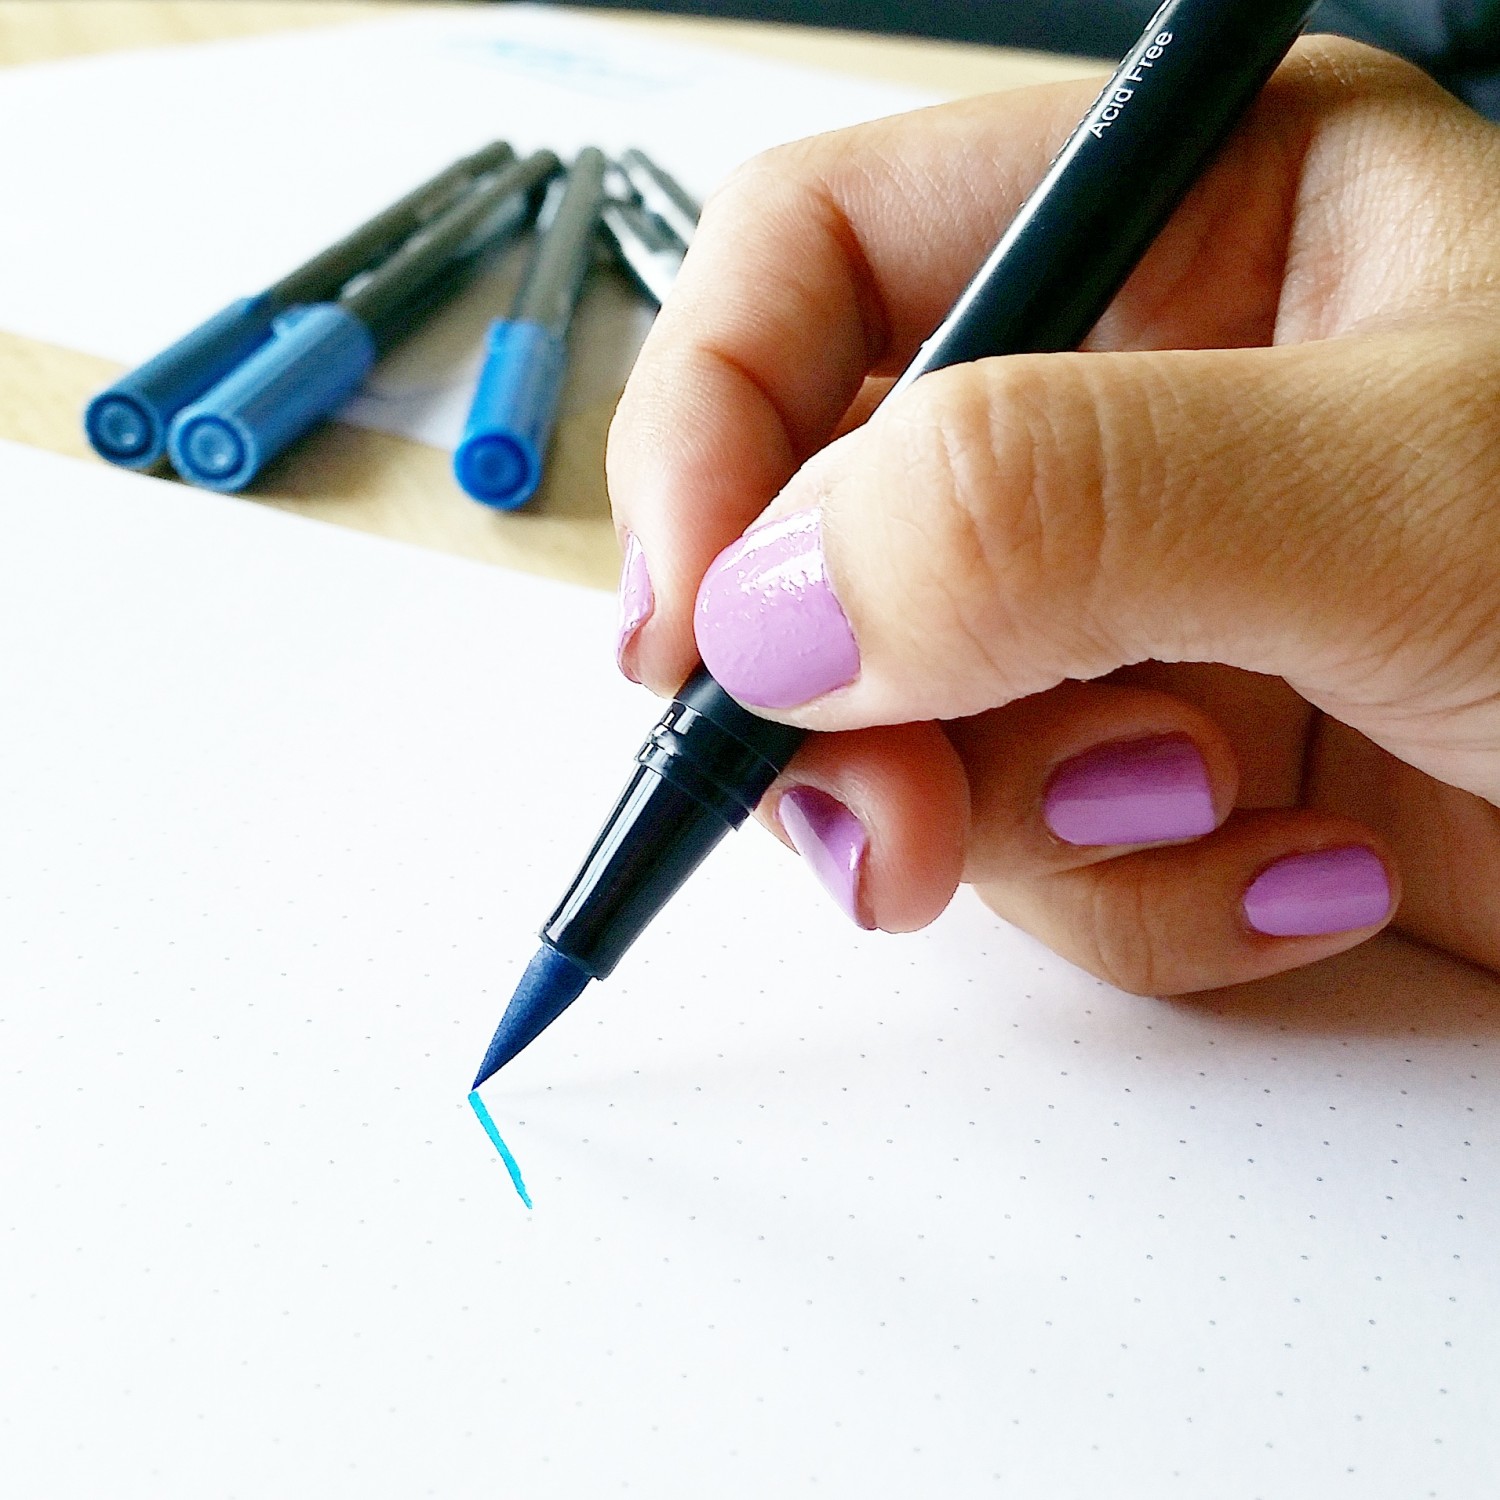
Before you begin writing, be sure you are holding your pen correctly and at the proper angle. Every brush pen is different in size and flexibility, which means you must spend time getting familiar with your pen.
Hold your pen at an angle to avoid fraying the tip of your pen and to also optimize the flexibility of the tip. It may take some time getting used to the brush pen, as it is very different from a regular marker or writing tool. (If you are left-handed, you can achieve the proper angle, too! Hold the brush pen using an overwriter grip, which will allow you to hold the pen at the same angle as a right-hander.)
When exerting pressure, you must maintain control over the brush pen and continue holding the pen at the proper angle. Your angle may adjust slightly with each stroke. Over time, you will find yourself adapting your own unique grip and hand/finger position around your brush pen to adjust for your own writing style.
USING PRESSURE TO CREATE THIN AND THICK LINES
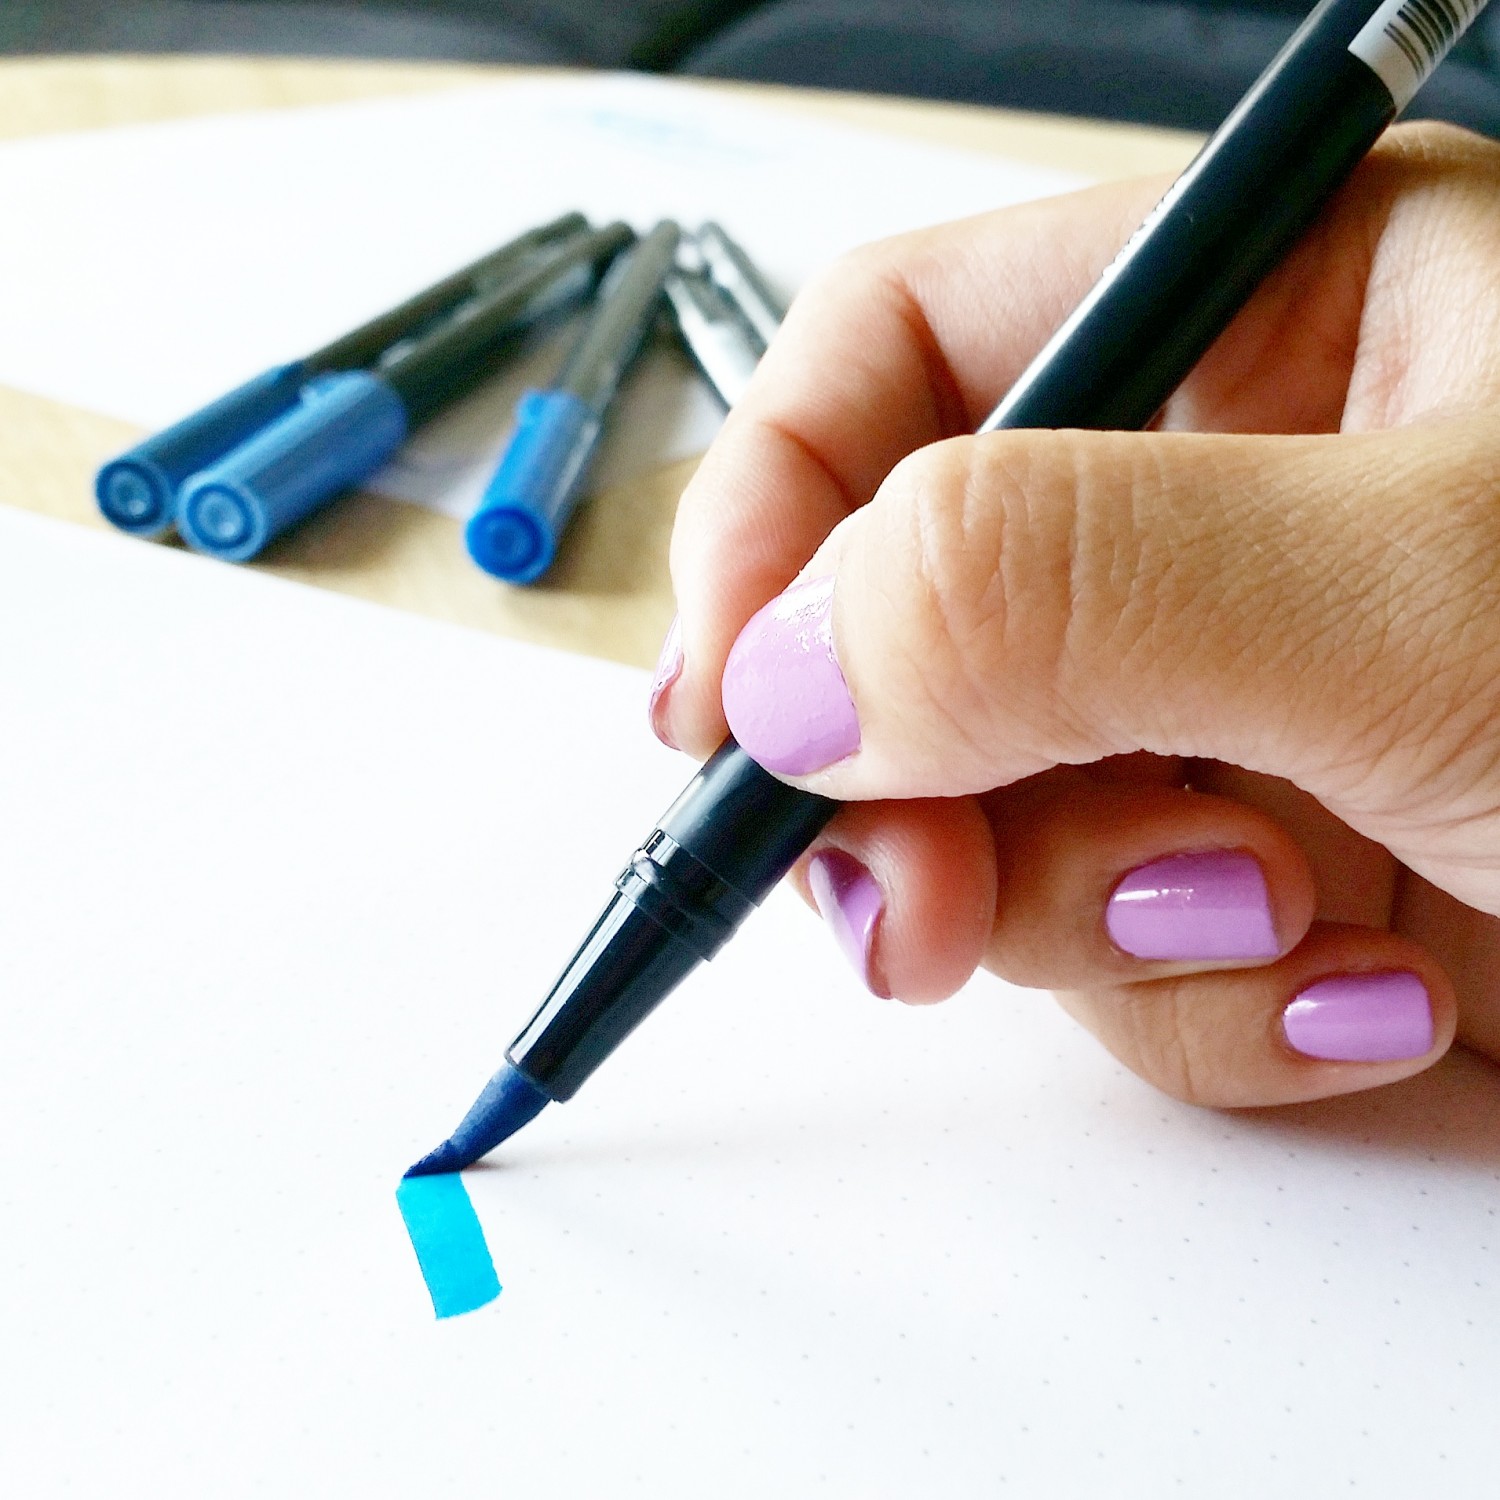
Once you are holding your pen with a comfortable grip and at the proper angle, bring the pen to the page and by barely touching the tip of the paper. When creating thin strokes, you do not need to apply much pressure, if any at all. Once the tip of your pen touches the paper, slowly and carefully draw a line at an angle, and do not exert much force with the pen.
To create a thicker stroke, apply more pressure to the pen. Press your brush pen onto the page (maintaining the proper angle) and watch as the tip flexes or slightly bends, allowing more of the tip to touch the page. Keep this pressure, or amount of force, on the pen, and draw a stroke. If you are holding your pen at the right angle, you’ll see that the stroke is significantly thicker than your previous upstroke. You can experiment with different amounts of pressure and observe the varying stroke widths each amount of pressure creates.
HOW DO YOU CONTROL PRESSURE?
Controlling the pressure can be tricky when you are first learning brush calligraphy. A huge part of gaining control is knowing your pen. Be sure to get familiar with your pen and learn how to hold it correctly.
To control the pressure you exert, practice varying amounts of pressure for long periods of time. In other words, PRACTICE!
The biggest advice that has helped me develop a good sense of control is to break down my words and letters and go slow. If you get too much ahead of yourself and try to write long paragraphs before you master basic strokes, you will find it difficult and frustrating to master control over your pen. Do not rush or else you risk compromising quality and the ability to improve your strokes based on the pressure you exert.
For starters, begin with the lightest amount of pressure you can exert, one in which you are barely touching the page. Create strokes with this amount of pressure only and fill an entire page with that stroke. Then, increase the amount of pressure slightly, and fill a new page with that stroke. Drills, or practice sessions, in which you work on creating thin and thick lines will best help you develop control over pressure.
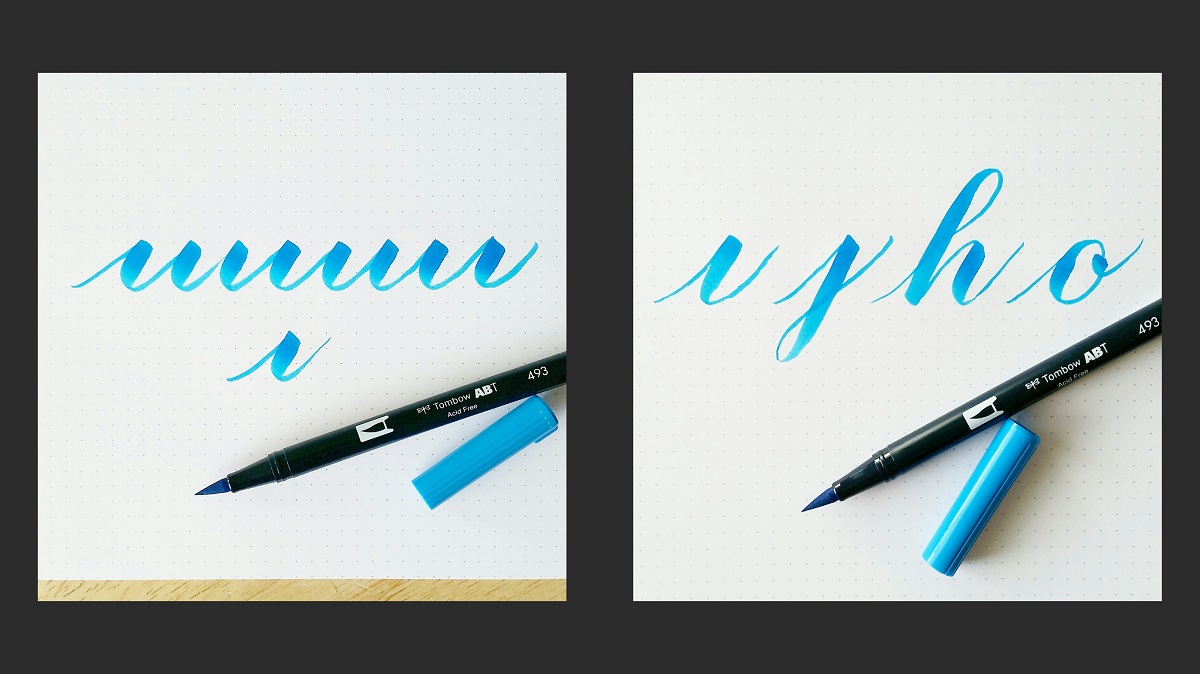
Here are some example strokes to practice:
Try these simple drills to get familiar with your brush pen, experiment applying various amounts of pressure, and identify the areas in which you need further practice.
Left: The lowercase “i” repeated over and over and connected to the next.
Right: Lowercase letters containing more advanced strokes. Remember to hold your pen at the proper angle as you write the entire letter.
In this short video, I demonstrate how to apply light pressure for achieving thin strokes, and heavy pressure for downstrokes for achieving thick strokes. These strokes are great for practicing control over the brush pen, which in turn contributes to better control of your brush calligraphy.
Thanks for reading! I’d love to hear what questions you have on applying pressure with brush pens or any additional tips you have of your own. You can also check out more of my brush calligraphy tutorials, tips, and videos on my blog at piecescalligraphy.com.
Happy writing!
Sharisse
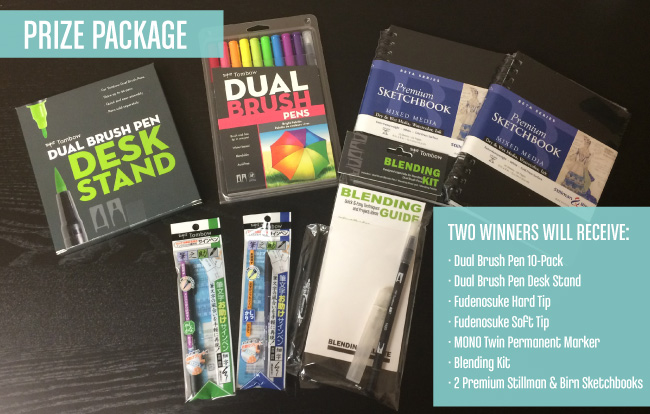
If you have been curious about lettering or even if you are a seasoned lettering artist, this GIVEAWAY is perfect for you! Just use our Rafflecopter to get as many entries as you can! You can come back everyday and leave a comment on the posts to earn even more points! You have until October 8th to enter!
Awesome advice! Thank you ?
Love sharisse’s work! Really looking forward to the rest of this series!
I am just getting started with brush lettering and calligraphy, and I need all the help I can get. Thanks so much for these great tips. I’ve looked at Sharisse’s blog and her work is stunning.
Beautiful work!
I’m just getting started into brush lettering and this series will be great for learning how to do this. This prize package is awesome! Thanks for the chance!
Excellent advice, thank you!
I have been wanting to learn how to do this. Thank you SO much!! Great tutorial. Videos really help a lot, for me. ^_^
I’m starting to do hand-lettering and found great talents such as Sharisse (piecescalligraphy) works. Love those pens too from Tombow. Great for writing.
I’m pretty impatient when it comes to learning things, but I too learned that breaking down what I want to write and going slowly gives the best results. Plus, practice!
Thank you for the lesson, wonderful work.
P.S. Is this Giveaway open wordwide??
This is great advice! I’m looking forward to the rest of the posts in the series!!
Tombows are my absolute favourite brush pen – without fail. You can do so much with them – the possibilities are endless.
Sharisse! Your advice, as always, is as sweet & wonderful as you! 🙂
Such a helpful tutorial! Hoping to win the giveaway!! *fingers crossed*
I’ve followed Pieces Calligraphy on Instagram for a while now, and her work is amazing! Thanks for the advice and demonstration!
So excited to see this opportunity. I am a new learner in the new exciting calligraphy world and I am on a project of practicing with tombow brush pens everyday, so far it has been so fun and I am so excited to go further and make progress everyday.
Thanks so much for the awesome brush lettering tutorial!
Sharisse’s work is amazing! I love seeing her lettering videos!
Awesome advice! Been following Sharisse for a while now on IG! Would love to follow in her footsteps by winning a prize like this!
Love this tutorial – always helpful to help “sharpen the saw” and refine skills.
perfect tutorial!
I just discovered Tombow and am so excited to get a pen from them! I have heard great things.
Love this, thanks!
I just discovered your blog. Love all the tutorials!
Just opened my eyes to the beautiful world of calligraphy!! I am so stunned and amazed at the endless possibilities that can be created with a simple stroke of the hand! Sharisse, I love seeing your posts on Instagram everyday. Keep up the lovely work!❤️
Ooooh I would die for this!
I would LOVE this giveaway! I love doing calligraphy but haven’t ever tried these markers!
this was super helpful! love this week!
thanks for great tutorials! I was able to select my own beginner tools through your recommendations!
Thanks for the Brush Pen Pressure Tutorial Sharisse! I have some old Tombo brush markers that make it hard to get nice thin lines along with the thick … Winning this lettering package would be fun to be able to practice more and have my lettering look so much better!
Great post 🙂
Great post. Especially helpful since I am a lefty!
I started brush lettering few weeks ago when I registered for a class over at Bog Pictures Classes. Since then I have been searching the internet for ideas, tips, artists, etc. That is how I found Sharisse’s blog. She is very talented and I love her tutorials and tips.
I loved today’s post. I still figuring out how to control the pressure and today’s tips are very helpful.
Thanks for the tips! I just started learning about hand lettering and calligraphy and found this to be quite helpful. Thanks!
Such good advice from the lovely Sharisse! As always 🙂 I’m struggling with my transition from thin to thick in the letter o but I guess it’s just gonna take more practice!
Thank you so much, this is very helpful! I’m bad about warming up and doing full page practices, that’s probably why the brush pen hasn’t been successful for me. Such a wise and simple thing to do!!
Beautiful work and great advice!
Loved this blog post and thanks for all the tips!!
Thanks for this! I’ve been having so much trouble with brush pens. You make it look so easy! But now I know I should go slow and practice. 🙂
Wow – such wonderful tips! I love looking at these! I need to practice!!
Thank you for the tips and giveaway!
I’m inspired to go do some drills now! I always forget how helpful they are.
Thanks! This was helpful, and your work is beautiful!
I am so excited to learn more about brush pen calligraphy! Sure wish I lived closer so I could take your classes! This was a great lesson. I am excited about the giveaway and hope to try out all those awesome products!!! I am a total beginner, so this would be a great way to start!!
Thanks for the great tutorial!!!
Such clear, engaging instructions. I’m ready to get going.
Thanks for the chance to win the prize package on top of sharing Sharisse’s helpful tips! Even if I don’t win the prize package, I am gaining something I did not have before visiting this blog.
Thanks for all the tips. I had some problems with my tips fraying and now I know why. Looking forward to the rest of the series!
I love this so much!! So many useful tips! Looking forward to the rest 🙂
Such really great tips! I appreciate the video, it helps to see the pressure in action!!
Great advice! Stumble upon this and I really want to start brush calligraphy! Such beautiful art pieces they are.
Such a great giveaway! Very cool products! Love your markers for brush lettering!
Thanks for the giveaway! Learned so much from you, Sharisse!
I have been eyeing these beautiful brush pens! Thanks for the tutorial! Crossing my fingers!!
I follow piecescalligraphy on Instagram and everything she does is beautiful!
Thank you for the awesome lessons!
great lesson, thank you!
This was super helpful! I actually started with regular point pen calligraphy, but I love the fluidity of brush pen as opposed to nibs!
Thanks for a great tutorial! I have been practicing a lot lately using brush pens and this is so helpful! 🙂
Thanks for the great tips! I think I went through 50 sheets of paper today just practicing pressure!
Perfect timing! I just got my first set of Tombows and I was feeling a bit lost.
Thanks, Sharisse! I’m just getting started with brush lettering and am still trying to find the correct pressure. Thanks for this helpful blog post!
Thank you so much for sharing these tips! I’m newly trying to navigate my way with the brush pen, and this beginner advice is perfect!
Great advice, My wife is just starting out and is loving it.
Great post! Excited about the giveaway!!
As always, you do a wonderful job teaching and giving encouragement to us who are starting out. Nicely done! Tomboy is lucky to have you on their blog!
I’ve struggled with connecting my downstrokes to my upstrokes. Now I know…you actually pick up the brush pen! I need to keep in mind this isn’t cursive writing!
great advice , thank you
As always amazing calligraphy!
Wonderful! Thanks for the tips! Can’t wait to get my hands on these brush pens and use the blender!!
I would love to take this up as a new hobby.
Thanks for the great advice!
Great post! Now to practice 🙂
Can’t wait to practice.
I so want to learn to do this. I must buy a brush pen!
As always Sharisse you make it look so easy! Practice, practice, practice. Thanks for reminding me to barely touch the paper on the upstroke, so important! ❤️✒️
Great information. Makes it so much easier to know when to lift the brush pen and when to apply pressure.
Nice blog post! As I was reading it, I was also practicing applying the right pressure on thin and thick strokes. Very helpful indeed!
Love the tutorials on lettering and thanks for offering this awesome contest! Love my Tombow pens!!
Beautiful work… as always <3 <3
This is an awesome give-away set to learn calligraphy. Of course I would like to win this. But one big question: Can I join/apply as I live in Europe?
Thanks for the video, very good tips, Sharisse! Now I only need to get me a set of tombow!!!
Love! Thank you for the tutorial!
This is a great tutorial… I’d love to try this.
Mastering the basics – like pressure – can never be under rated. Thanks for the practice tips!
cool tips and love products in the giveaway.
Thanks for that simple and easy tutorial. I REALLY need to practice more!!
I used Tombow Markers about 15 years ago along with rubber stamps to create cards. I LOVED them! I want to get back in to using them again and start creating with my own hand lettering. Ah – – – wishes & dreams! 🙂
Gonna be a lettering fool!
Love Sharisse and her willingness to share her amazing talent!
Love learning new things about brush calligraphy!
Can’t wait to make lettering a talent.
I would love to win this giveaway, I would love to try tombow pens.
Wow this is so awesome, I’d like to continue learning to write just like you !
Love this post, Sharisse! Your info inspires me all the time. Thanks for looking out for us lefties!
Great tips, thank you!!
I’d love to win this giveaway set. I was a vendor at a local craft boutique last week. The booth next to mine featured modern calligraphy prints. I can’t get learning this skill off my mind. I’ve scoped out some local classes and feel like I’ve hit a goldmine in finding your website. Thanks for all the tutorials and supply lists!
Hoping to win the giveaway so I can put these tips to good use!
Beautiful! Great advice!!
Thanks for the giveaway!! Hope I win <3
Very helpful! Thanks, Sharisse.
such a great package!
I NEED to get my hands on some tombow pens and markers. I love handlettering and your brush lettering is phenomenal. Id love to practice and learn more with those markers 🙂
I love this! This really helps to better understand brush lettering. 🙂
Great video – you make it look so easy!
I just love your tutorials! Thanks for the tips. Proper pressure is my biggest issue. I’m working on it!! ??
Very helpful! Thank you! Off to practice now! 🙂
Great tips and amazing work. I love it. Thank you for sharing.
Looks amazing! Thank you for the tips and walk thoughts!! Will you be showing more tips soon?
I love everything about these blog posts! So much helpful info 🙂
This was the most helpful advice I have found on brush pens! Beautiful lettering.
Thank you so much Tombow and Sharisse! this has helped so much and I just love your work so beautiful!! #lovetombowbrushpens
thanks for such great info! can’t wait to try this lettering!!
I will be practicing this tonight!
This is so helpful! I love following your work. Thanks for the great advice!
So excited for all this info! Thanks a bunch!
Sharisse’s lettering looks almost unreal, like a professional font downloaded off Adobe! This looks fantastic and I love seeing her works :-))
By the way, is this giveaway international?
Really excited to try this product. This could’ve what I have been searching for! A new hobby.
So much good information! Thanks!!
Love these tips and I will surely put them to use. I have a few of the Tomboy markers but just recently got interested in trying my hand at brush lettering 🙂
Sharisse makes it look so easy and simple. Breaking down the steps really helps!
Amazing tips! I’m just getting started and this is the best advice! Thank you!
Loved the suggestions! Thank you!
Thanks for some basic instructions for the know-nothings, I mean, beginners….like me!!! 🙂
<3 J
jwoolbright at gmail dot com
HerPeacefulGarden.blogspot.com
CAT LOVERS HOP coming Oct. 26-30 at HerPeacefulGarden.blogspot.com
thank you for the awesome brush lettering tips!
Enjoyed The video by Sharrise. Thank you for sharing your techniques and expertise!
must practice on my pressure!
Ah!! So excited to see the giveaway results!! When & how will the winners be notified?
Pingback: Lettering Week Winners! - Tombow USA Blog
Pingback: Free Lettering Guide from Tombow! - Tombow USA Blog
Hello Sharisse. Do you have a tutorial of you do the letters of the alphabet?
nice!
???
I’m so happy whenever i watched or found a piece by calligraphy, and i want to try.
My heart inlove with this but my hand don’t want hahahhaha?
Now I’m trying for brush calligraphy as a beginner. This is a nice tip for me!
Pingback: Tombow Dual Brush Pen Review - Tombow USA Blog