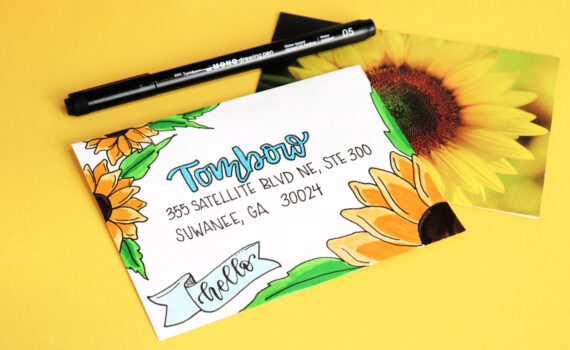
Posts from ‘Design Team’

Mar
22

This week we are hopping with My Mind’s Eye and I have to say that they spoiled us rotten!! Getting a box of their products made my day!!  I received products of Miss Caroline and Bright and On The Bright Side Collections and I was blown away by all the colors and patterns!!

Since these photos don’t have much color, my palette was inspired in the third picture and the color of the stamps.  I kept using the woods with the crackled paint and the chevrons. I started by choosing the patterned paper for the big rectangles. I didn’t use the same arrangement in both pages because the blue would be too predominant. In the left the blue goes in front of the gray stripe and the yellow goes behind the gray, in the right page is the opposite. This technique helps to keep a balanced layout so your eye flows through both pages. I layered all the pieces with black to make them stand out. For the  photo mats I used the 6×6 pads and I also layered them with black using my Stamp Runner Dot Adhesive . The pennants connected by the My Mind’s Eye  Twine are from the Accessory Sheets and I used the Tombow Foam Tabs with them. I also used other punch out from the accessory sheet, with some stickers, brads and pins.

For the tiny pennants I used scraps and the Epiphany Crafts Tool and I used the Mono Multi Liquid Glue to attach them to the page. For attaching buttons I used Tombow Power Tabs, I learned this trick from Design Team Member Melissa. I outlined some elements to make them stand out, including the photos and the pages.

Thanks So Much to My Mind’s Eye!! Their products work in perfect harmony with Tombow!! I can’t wait to use both again!!

I hope you liked my double page!!

Take Care!!

If you enjoyed this post please follow us on
Mar
21

CREATIVITY GALORE!

My Mind’s Eye has always been a favorite of mine…the company is always coming out with great products and designs. their collections are fabulous to work with, and this one was no exception. “Follow Your Heart” has a touch of vintage and whimsy, and it was so unlike my normal choice of patterns. there was so much of it i knew whatever project i did had to use as much as i possibly could!

i was intrigued and i hatched a plan…it took me a while to get the idea out of my head, but in the end, it turned out better than i hoped.

i saw this idea (yes, yes, i spend too much time checking out other blogs and pinterest!) but this ideas was to keep a stash of index cards and each day, or as often as possible, take the time at the end of the day to write your thoughts about the day, things that happened, funnies, tragedies, what have you. a journal, without using a bound book.

i created this box to hold these index cards and perhaps some pictures along the way. i titled the box 2013/365. which means that i’m saving it for 2013 (yes, i’m crazy! but i’m already doing something else to document 2012) and that i’ll attempt to do it for a full year. the dividers i created are blank, and more than likely i’ll do some scrapbooking on them. but putting them together was easy, and they look classy. i attribute that to the paper line!

using the 6×6 stack i trimmed them down to fit inside the box – 3×6. then i made them sturdier by backing them to each other with Tombow MONO Aqua Liquid Glue. then using a circle punch i created tabs for the top of the dividers by folding them in half and gluing them down with the MONO Aqua.

inside the box is a quote, decorated with the very vintage mini chipboard banners. and the outside of the box buttons and paper were layered with Tombow MONO Multi Liquid Glue. and the metal paper clip was held down with an ultra sticky Power Tab.

i used Tombow MONO Permanent Adhesive Runner to put paper to paper and a Dual Brush Pen to help ink up some of the edges on the paper.

so yes, now i am officially crazy, but i am officially ready for 2013. but you don’t have to wait that long. create a box and start today. document your life!

Jump on over to My Mind’s Eye and see all the neat things they have created with Tombow!


if you enjoyed this post follow us on facebook and twitter!

  http://www.facebook.com/tombowusa         and  http://twitter.com/#!/tombowusa

Mar
20

WOW! Two of my favorite companies team up this week on Tombow!! If you follow my blog, you know how much I love My Mind’s Eye. I love that their double sided papers allows you to mix and match to your heart’s content. Ü MME really spoiled the DT with all the goodies they sent us.

I used Tombow’s Mono Adhesive Mega Roller to put these 3 cards together. With as much adhesive as I use, I think I will be using this product alot more. I also like how it feels in my hand and gives a smooth run of adhesive.

I also used Dual Brush Pen #N95 Cool Gray 1 to add shadows on each of the cards around the birds. The birds are precolored digis by Scrappin Doodles. I’ve been sick with bronchitis the past 10 days and this was a way I could make some quick and easy cards and still show off My Mind’s Eye paper and Tombow products.

I love the little pop up embellishments that My Mind’s Eye sent us. The box of goodies I received were all from the Miss Caroline line.

Be sure to stop by the Tombow and My Mind’s Eye blog this week to see all the goodies both design teams created.

A HUGE “Thank you” to My Mind’s Eye for all the goodies!! I will be showing more projects using the products they sent.

Thank you for stopping by,

If you enjoyed this post please follow us on http://www.facebook.com/tombowusa and http://twitter.com/#tombowusa

Mar
19

These containers – I call them ‘Column Twist Containers’ are so easy to make and they don’t require a template – just a rectangle piece of decorative paper! The paper is the ‘Miss Caroline’ collection from My Mind’s Eye. Embellishing is a breeze using the new Tombow Tags and matching brads and stickers from the ‘Miss Caroline’ collection.

Cut the paper into a 6″ x 8″ panel (container), a 2″ x 4″ panel (bottom flap), and 3″ x 4″ panel (top flap). Fold the flap pieces in half lengthwise and trim the bottom corners round.

Create the container by applying the Permanent Adhesive Stamp Runner to the 6″ edge. I used a very tiny amount of the MONO Multi Liquid Glue along the edge to make sure it holds down firmly – this is important if using heavier paper to make these containers. Roll the paper into a cylinder and press down with a bone folder.

Pinch the bottom of the cylinder and adhere on the bottom flap. Pinch the top of the container and adhere the back of the remaining flap to the top of the container. Add the Fastener Tab to the front flap to hold the container closed. Use Power Tabs and Foam Tabs to add the embellishments.

Here are the dimensions for the larger container and tall container:          Large Column Twist Container: 6″ x 12″ panel (container), 2″ x 6″ panel (bottom flap) and a 3″ x 6″ panel (top flap)

Tall Column Twist Container: 7″ x 9″ panel (container), 3.25″ x 2″ panel (bottom flap) and a 3.25″ x 3″ panel (top flap)

Have fun with these – make lots! Visit us again for lots more Tipniques with Tombow products! Now, hop on over to My Mind Eye and see what they’re doing. http://mymindseye.typepad.com/

if you enjoyed this post follow us on facebook and twitter!   http://www.facebook.com/tombowusa         and http://twitter.com/#!/tombowusa

Mar
16
Happy Friday Everyone!

This week my Tombow teammates and I are sharing projects with the “Luck of the Irish” theme in honor of St. Paddy’s Day tomorrow.  

I created this card using stamps from the Our Craft Lounge Shamrock Blessings set.  One of my favorite ways to use Tombow Dual Brush Pens is to color directly on my stamps.  For this card I used the following colors:  098 Avocado, 177 Dark Jade, 665 Purple and 676 Royal Purple.  I started by coloring the lighter color of marker onto the stamp and then just tapping on a bit of the darker colors.  Give the stamp a little “huff” to re-moisten the ink and then stamp onto some cardstock.  I then stamped the sentiment right over the top of the image.  Now, some people call me an “adhesive hound” because I use many different adhesives on all of my projects from cards to 3D items.  

I like to use Tombow Mono Dots Roller when I am holding patterned papers/cardstocks together as it has a nice strong hold and I can always be sure that my cards arrive at their destination safely together in one piece. Did you know that the roller is refillable? On this card I also used Tombow Mono Multi to add a thin line of adhesive down to hold this pretty May Arts trim in place. The final adhesive I used on this card was some Tombow Foam Tabs to pop up the sentiment panel.  When you do this, it adds a little extra dimension to your cards therefore adding interest.
The products I used are:
 

if you enjoyed this post follow us on facebook and twitter!

  http://www.facebook.com/tombowusa         and  http://twitter.com/#!/tombowusa

Mar
15

Top of the morning to ya!!  St. Patrick’s is on Saturday so I hope you are all set up in all things green!! I made this happy Leprechaun card and it was super fun!! 

The rainbow and the Leprechaun are actually separate images. For the rainbow I stamped the Leprechaun on top to color the shadows in the rainbow. On a separate piece of paper I stamped the Leprechaun, colored it and then I did some extreme fussy cutting to put him on top of the rainbow. That way the image of the legs and the rainbow won’t mix ;0) I did all the coloring using the Tombow Dual Brush Pens. Then I made some clouds like we used to do back in the day in the BDCM era (Before Die Cutting Machines). I put the whole image together using the Mono Multi Liquid Glue. A little fact about this awesome glue *the fine tip makes the Mono Multi Liquid Glue the best for paper piecing and it doesn’t clog so you won’t get a bunch of glue suddenly which could ruin the project. Trust me it happened before with another glue. For the background I heat embossed a  background stamp with blue embossing powder. The sentiment was placed using Foam Tabs and underneath I used Twine and brads.

I hope you feel as lucky as this Leprechaun is!!

I hope you liked my lucky card!!

Take Care!!

If you enjoyed this post please follow us on
Mar
14

i love being Irish! i love knowing where my family came from. i went to Ireland years ago and loved knowing that i was in the place where my great grandparents had come years ago. my son had an assignment for scouting to create a cake based on his heritage and ancestors. he likes the Irish in him too!

this is layout #9! i challenged myself to use scraps for this layout. the only whole piece of paper is the one that was used as the background. i used chipboard and punches to get the layered shapes. and of course, whenever i use chipboard, i use Tombow MONO Multi Liquid Glue. i had the cutest shamrock punch, but just one little paper punch shamrock did not have the depth to look right with the chipboard pieces. i took 5 mini punch-outs and layered them together, using Multi, to make it thicker.

i attached paper to chipboard using the Multi and then the chipboard to the layout also using Multi.the paper and pictures were attached with Tombow MONO Permanent Adhesive Runner.

have a happy st. patrick’s day!


if you enjoyed this post follow us on facebook and twitter!

  http://www.facebook.com/tombowusa         and  http://twitter.com/#!/tombowusa

Mar
13
Happy St. Patrick’s Week! This week the DT is sharing their Luck of the Irish themed projects. Do you celebrate St. Patrick’s Day (this coming Saturday) in any way? I try to do something fun each year for the boys. One year when my youngest was 6 or 7 I was sick and wasn’t able to do anything. He said “this is the worst St. Patrick’s Day of my life!” I had to laugh and told himwe were probably the only ones that even celebrated it! LOL!!
So this year, we will again have green eggs and ham (and since it’s on Saturday, I plan to make some green pancakes as well) and green milk. (minus the green for me cuz it just looks gross Ü). I will also be making some fun rainbow food and have some goodies bought that my youngest (17) will enjoy. I’ve already sent a pkg to my son and his girlfriend filled with fun green and white and rainbow treats.
Okay, so now on to my card. Green is my favorite color, so St. Pat’s just has to be celebrated right? LOL! This card is created with a fun image from Designed2Delight. I love their digi images and this is one of my many favorites of Faith’s that she has designed.
I colored the image with Dual Brush Pens 098, 076, 992, 977, N75, and blender pen. I used Mono Adhesive Dots to adhere the layers of cardstock.
            
Thank you for stopping by and have a very Happy St. Patrick’s Day on Saturday!
If you enjoyed this post please follow us on
Mar
09
Happy Friday!  I can’t believe how nice the weather has been this week, it really has me in the Spring mood.  

This week the Tombow team has been sharing “Hug” themed cards/projects with you and today is my turn. 

I chose this adorable image from the Our Craft Lounge Showers of Blossoms set.  I stamped the image with Adirondack Pitch Black ink and colored it in with Tombow Irojiten Colored Pencils and Gamsol.  These pencils blend beautifully and the colors are so vibrant.  I used Tombow Mono Dots Roller to adhere each of the layers together and Power Tabs on the two pink roses.  I wanted the aqua rose to sit a bit higher so I used a Foam Tab to give it a little extra lift.  I used Tombow Mono Multi to adhere the die cut leaves.   
if you enjoyed this post follow us on facebook and twitter!
Mar
08

The theme for the week is Give Me A Hug !! I love this stamp set not just because is super cute but I get to do two of my favorite things when I stamp: paper piecing and coloring.

I always start with the image and then I decide what the background will be. First I picked their clothes, or the pattern paper to paper piece their clothes and then I stamp the image to cut their clothes.  Then I decide what color to use on the hair, eyes, etc. Since these are gnomes I have permission to use any colors I want which I love! I color the parts I want to color with my Tombow Dual Brush Pens BEFORE I glue the clothes with my Tombow Mono Multi Liquid Glue. Using my Stamp Runner Dot Adhesive I made a simple background with a hill and a pair of rays. I doodled the background before adding the gnomes with Foam Tabs. I also used twine and a cloud for the sentiment.

I think this is a pretty magical card. Don’t you think?! :)

I hope you liked my magic!!

Take Care!!

If you enjoyed this post please follow us on