Monthly Archives: June 2010
Paper Posies is a monthly scrapbooking kit club dedicated to bringing theirmembers the hottest and newest scrapbook products on the market. The kits are chock-full of patterned papers, specialty papers, cardstock, always two alphabets, ribbons/trims, tons of embellishments, and an alterable project (and this month, some added Tombow gifts!). Their Design […]
Paper Posie and Tombow Team-Up!
Do you want to make $25 for testing a new Tombow product? What a silly question; of course you do! We will be hosting one-on-one interviews from June 29 to July 1 at the Tombow offices in Suwanee, Ga. for those who would like to participate. So if you live […]
The easiest $25 you ever made!
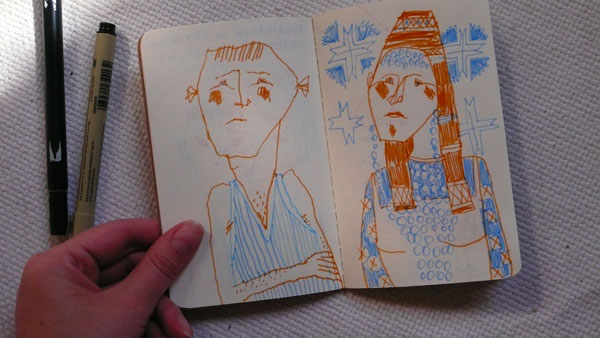
 2
2 We promised you a manga illustration and a Tombow Tale in our May 27 post, and that’s exactly what you’re going to get! This illustration, created by Nate Morris, is featured on the packaging for our Shojo Dual Brush Pen Set. We were so inspired by the illustration that we […]
Artist’s Corner – Fun-filled fantasies with Shojo Dual Brush Pen
“tangle” supplies; Tombow MONO Adhesive Dots , Tomobw Dual Brush Pen – N15 black , Tomow White Gel Pen the idea of the “ZENTANGLE” is interesting to me. all those doodles in the notebooks of my college classes actually have a name now! well, unfortunately i am not much of a doodler […]
DT Spotlight – Sarah and her scrap-tangle
A few weeks ago, we asked you a question – “How do you choose correction tape?” It’s not an easy question to answer, especially since we make such a large variety of applicators. So let us help you. We’re going to give a quick tutorial on each our correction tape […]
The view from the top
Ever heard of it? I had never heard the word til the end of last month when Joanna with Tombow challenged us to create a project with this technique. Basically it’s a fancy word for doodling, but with more detail. You can read more about it here. I found some […]
Zentangle Card
A sneak preview of what I have been working on – coloring Zentangles with Tombow Dual Brush Pens. What is a Zentangle®? It is basically a doodle – a doodle that reduces stress and improves your focus while you create a beautiful piece of art. Traditional Zentangles® were developed by […]
What is a Zentangle?
 2
2 Irina Troitskaya is a freelance illustrator and tutor at the British Higher School of Art and Design in Moscow, Russia. Her artwork has been commissioned by Elle, Afisha, Popular Finances, Kids, Hewlett-Packard, Alfa-Capital, Yandex and BMW – to name a few. Her works are in private collections in Russia, Spain, […]
Artist’s Corner – Artist Profile: Irina Troitskaya
i have been on a frame kick lately. i love frames, and i keep buying them, but i don’t always fill them right away. this frame i’ve had for quite sometime, and because of the odd sizes and the number of pictures it needed i never felt like i found […]
Daddy Decor
I love this new Cappella paper by Basic Grey. I received this lovely package with papers, stickers and brads from this line. To me it is very vintage. Tombow is highlighting their Mono White Gel Pen this month. I used this on both of my cards today. For this first […]
Tombow goes Grey… BASIC GREY!
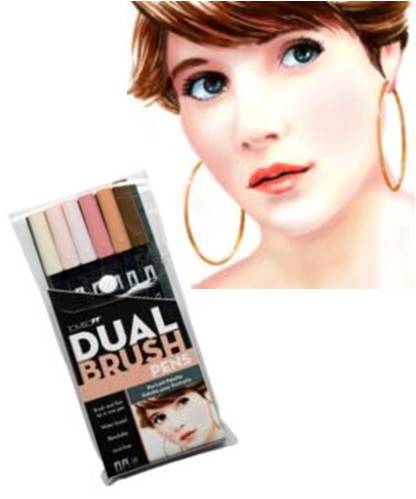 4
4 Drawing portraits can be a challenging experience for artists. Even seasoned vets can find recreating exact skin tones, eye colors and hair colors a difficult task. We want to make life a little easier for our artist friends, so we created the Tombow Dual Brush Portrait Set. The set, which […]