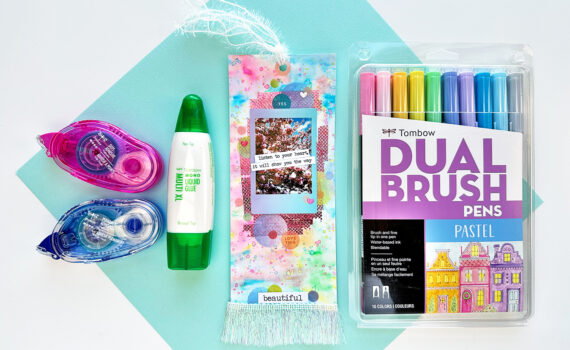
Posts Tagged ‘MONO DOTS Adhesive Runner’
thank you …..by melissa cash
![]() |

TOMBOW Foam Tabs
These acid-free double sided adhesive tabs are great for adding dimension to many projects, the small tab is 1/5 x 1/5 and the large tabs are ½ x ½, they are also great for layering and can be stacked for added dimension. They are suitable for most surfaces including paper, glass and metal. They are also crush resistant and instantly bond and hold.

http://www.facebook.com/tombowusa
http://twitter.com/#!/tombowusa

If you enjoyed this post, we would love it if you would follow us on:
http://www.facebook.com/tombowusa
http://twitter.com/#!/tombowusa


This week on Tombow the design team is creating items for the challenge them “It’s My Party”. When I think of Halloween, I think of it as a time for small children to dress up and go out and trick or treat. But I thought it might be fun to design something for your girlfriends. Maybe a night out with fun, food, and laughter.
I wanted to create something a little more “mature” and came up with this “Happy FALLoween” card (could be an invite or maybe even a “thank you” to send out after the gathering to thank those who attended) and a treat holder. It is so much fun to create a little thank you for the guests to take home with them as a reminder of the fun times had that evening.
For my card, I used a SU! punch to punch the bird and branch in black. I punched 3 of the wings and adhered them together with Mono Adhesive Dots. A little tip for using adhesive on small pieces is to lay the piece that you want to add adhesive to on a scrap piece of paper. Add the dot adhesive all over the piece and then lift up. When you apply it to where you want it, just rub away any extra “dots” that may be on the edges. I have been doing this a long time and I love how I can get adhesive all over little pieces to get them to adhere.
I also used the dot adhesive for adhering the page from a book. It adheres well to old book pages, where the stronger adhesives can sometimes separate the paper.
I printed the Happy FALLoween from Designed2Delight onto designer paper and then cut with a Nestibilities die from Fancy Tags 1.
To create my treat holder, I cut designer paper to fit a toilet paper tube. Then along the outside ends, I applied a thin spiral of Mono Multi Liquid Glue along the edge. After it dried clear, I scrunched and gathered crepe paper along the edge to create a ruffle. After the glue dried I zig zag stitched and then decorated. The 3 panels behind the bird are cut with my Cricut using the shape from Accent Essentials cartridge. The panels are adhered to the tube with Power Tabs, so that they stay on since the tube is rounded.
I cut the end off of a gusset cello bag and tied off with rick rack. Then I inserted it into the tube, added corn candy flavored taffy and tied off the other end.
I love to decorate and have a theme when I have friends over. I found this blog with a fun party themes and thought this and/or this link would also be so much fun to decorate for a “FALLoween” theme.
Thank you for stopping by,
If you enjoyed this post please follow us on
http://www.facebook.com/tombowusa and
http://twitter.com/#tombowusa
Hello everyone! I’m Kim Watson & I am so happy to be here on the Tombow blog as a Guest Designer today.
Since discovering Tombow’s adhesive range about three years ago, I have become a HUGE fan & always have a bunch of their products on hand. So given that I tend to use a variety of different adhesive types in a single project I thought you might enjoy a peek at how I put a page together from Start-to-Finish using product from the June Cocoa Daisy kit, Cherry Soda & Tombow.
My paper layers are always adhered with MONO Multi Liquid Glue because I love how fast it dries. However if I am still shuffling elements around it is great thatMONO Multi Liquid Glue has the versatility of being removable if allowed to ‘tacky’ dry first.
MONO Adhesive Dots, Roller is also a great adhesive to attach photographs.
I needed extra height on my cut out flower accents, NEW Foam Tabs, were perfect to do this. Coming in two square sizes meant getting a couple into the small areas was a cinch.
More MONO Multi Liquid Glue for my paper tabs…

The page now almost complete, just needed a few finishing touches. MONO Aqua Liquid Glue was perfect for these. Fabric flowers, buttons & some metal accents.
Voila! A pretty page that wouldn’t have come together quite the same without Tombow’s adhesive.
Enjoy…..Kim….
My blog,My Open Gallery,My published gallery
Hi there! Happy Friday to you all!
Today I am sharing a little flip book that I made. I used papers from the Basic Grey Sweet Threads Line.
This little book has several pages that have adorable little flip tabs perfect for journaling.
The book was bound using a Bind it All.
I used Tombow Glue stick to attach the paper to the chipboard covers.
Adhere print paper to pages using Tombow Mono Dots Adhesive.
I used Tombow Mono Aqua to adhere the delicate leaves die cuts to the front of the book. I love that the Aqua adhesive has two different sized tips, the pen tip is perfect for putting adhesive on the small areas of the leaves and stems.
You can find complete instructions for making this Flip Book in the resources section at Splitcoaststampers.
Thanks for stopping by ~ Melissa
www.elizabethallan-blog.blogspot.com
Supplies: Tombow Dual Brush Pens: 055, 133, 173, 228, 685, 703, 755, Tombow Foam Tabs, Tombow Power Tabs, Tombow Mono Adhesive Removable, Tombow Dot Adhesive Stamp Runner
Rubber Stamps: Penny Black – 4154K Lace-Edged, 30-067 To You, 30-048 Illuminations, Penny Black Mix & Match Cardstock: Olive Grove 04-001, Periwinkle 11-003, Fuchsia Fantasies 13-003Other Materials: Craft Fun Foam, Black Dye Ink, Crystal Glitter, Paintbrush, Decorative Trimming Scissors
To create a background stamp, cut a piece of Fun Foam to the desired size and attach it to an acrylic block with Tombow Removable Adhesive.
Color the foam with a Dual Brush Pen and slightly blend the ink with your finger tip leaving a bit of the foam uncolored in the center. “Huff” on the ink and stamp. To blend the image, lightly smooth the impression with a damp paintbrush.
Stamp the flower and sentiment with black dye ink. Color the flower with a combination of DTP (direct-to-paper) and Transfer methods.
For the background pattern, ink the image with Tombow Marker #228 and stamp on olive cardstock. Repeat the same steps for a second impression. If a slightly softer second impression is desired, do not re-apply the marker color, but simply “huff” on the stamp after the first impression has been completed to re-activate the remaining ink. Trim the stamped cardstock with decorative scissors and adhere to a white, top-folded card with Tombow Dot Adhesive Stamp Runner. Layer the stamped image with colored cardstocks and attach to the front of the prepared card with Tombow Foam Tabs.
To create a fun embellishment, attach a Tombow Power Adhesive Tab to the card and remove the protective backing. Dust the exposed “sticky” portion of the tab with crystal glitter. Rub the glitter into the sides and top of the tab. Tap off the excess glitter and dust with a soft brush.
Au revoir -
Elizabeth
spring is here!
january, february…i have the winter blues for sure.
but bring in the end of march and the beginning of april and i am one happy girl.
love to be outside, love the sunshine, love the baseball (upcoming project on that one soon), and spring cleaning.
so, that got me thinking about all the pictures i have of my home. clean, messy, decorated, etc.
i wanted a place to put all those pictures without doing a full album. (i have so many other pictures i want to work with, pictures of the home are low on the priority list.) but still, a place to put them, get them out of the stack…
i found doodlebug’s “hometown collection” and fell in love. the bright spring colors and whimsical die cut embellishments were exactly what i wanted to go with my plethora of pictures of my home.
i had a clipboard shaped as a house and an empty 4×6 photo album (this one was from Franklin Covey years ago).
i made the clipboard first, then decided that a place for all those “home” pictures was in order…
and here is what i came up with.
i used Tombow MONO Multi Liquid Glue to put the paper to the wood clipboard. the die cut “love our home” was put on with Tombow Foam Tabs, and all edges of the paper and embellishments were inked with a combination of a brown ink pad and a Tombow Dual Brush Pen – they are perfect for getting in the little creases of the die cuts.

in the photo album i created the first two pages. on these pages i used the Tombow Stamp Runner Dot Adhesive to put the 4×6 pages together and did a little sewing, using the Stamper to add a “bandaid” to the back holding the loose threads in place.


