Archive for April, 2010

Apr
28

PINK PAISLEE WEEK, keep the comments coming! I love clipboards! I tend to be a bit obsessed with having them hanging around my office so I can quickly grab them to use while taking garden notes outside or for planning, sketching or doodling on my lap when sitting out on the deck or watching TV.  When I saw the ravishing paper and embellishments from the Pink Paislee Queen Bee Collection I knew I wanted to embellish yet another clip board.

To cover a clipboard with decorative paper you need two essential tools; a sanding block and MONO MULTI Liquid Glue. A bone folder is also handy. I really like the wooden clipboards from Walnut Hollow. The hardware can be easily removed for easy covering of the board.  Cut the paper pieces slightly larger than the board and use the wide applicator end of the Liquid glue and cover the back of the paper lightly with glue. Use the bone folder to burnish down the layers of paper and crease the excess paper down at the edges. When dry, hold the sanding block at a 45° angle and ‘cut’ the excess paper away by sanding. This gives a beautiful flush edge. Replace the hardware and add decorative accents, gluing down with the MONO MULTI. The glue is very strong and even embellishments glued to the hardware hold fast, even with heavy use.


Apr
27

Tombow and Pink Paislee are pairing up this week. Be sure to stop by the Tombow blog daily to see what projects the DT create using the Pink Paislee kit we received.

Altered Notebook

This is a fun little extra gift that is quick and easy to make that I will be adding to the graduation cards I make for the girls on my list. I used paper and diecuts from Pink Paislee’s 365 Degrees line and Tombow’s MONO Adhesive Dots. The notebooks are mini composition books that Alco stores carry. They measure 4 1/8″ x 5 7/8″. Perfect for sticking in your purse for list makers or to write down your dreams and goals.

Apr
2
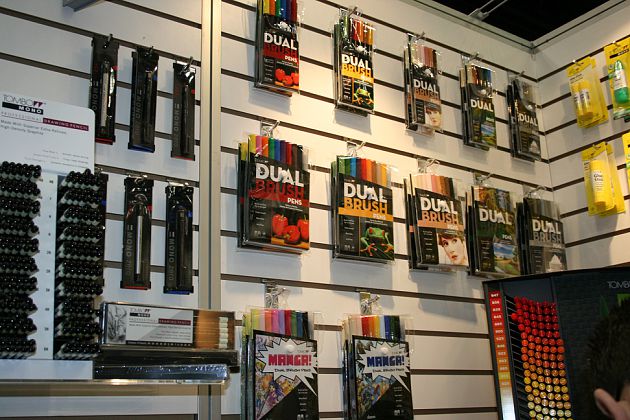
1

Last Thursday through Saturday, we attended the National Art Materials Trade Association show in Indianapolis. We debuted 12 Dual Brush Pens, manga and professional.

Our Manga Dual Brush Pens, which are named for the popular Japanese comic art form, feature sets named after the two primary manga segments, shojo, or girl, and shonen, or boy. Shojo Dual Brush Pens have bright purples, blues, pinks and reds, while the Shonen Dual Brush Pens contain variations of warm browns, oranges, yellows and greens.

The Professional Dual Brush pens were created with the professional artist in mind. The new sets are offered in 6- and 10-packs, and grouped by the most common types of art that professional create – primary, secondary, landscape, portrait and grayscale. The new Dual Brush sets will be in stores soon. Click here to see all of the sets.

 Be sure to stop by our Facebook page to look through our NAMTA photo album!

Apr
16


Tombow’s Dual Brush Pens and Cosmo Cricket’s ‘The Boyfriend’ collection team up to make this six page, 5” x 5” mini accordion album. I was inspired by the paper to feature Katelyn and boyfriend Curtis in this fun and funky gift scrapbook.

Inside; Tombow Dual Brush Pens not only added the journaling and heart accents, but also colored the photographs to match the papers and embellishments.
Dual Brush Pens that match the Boyfriend collection:
312 Holly Green
126 Light Olive
N57 Warm Gray
993 Chrome Orange
847 Crimson
946 Gold Ochre
N25 Lamp Black

The photos are printed on matte photograph paper and the clothes colored with the pens. It the photographs now match the paper and give the photo a funky element that also works well with the collection. Hold everything together with Tombow MONO Mega Adhesive DOTS.
The journaling pages are accented with hearts – made by simply pressing the brush point onto the paper and making a teardrop shape. Add another teardrop shape right beside to create the heart. Make sure the paper is upside down when making the hearts.

Apr
14

i had seen an idea to use a picture frame as a message board over a year ago and i just had to made some… i went through my scraps, bought some frames and was totally uninspired. fast forward to last week. i opened a box that had the lovely early bird collection from Cosmo Cricket and i knew just how to use it! i’ll definitely be making more of these, what a fun gift. it came together quickly too. just a paper trimmer and Tombow MONO MULTI liquid adhesive is all it took to wrap the paper around the chipboard that is included with the frame. a few Cosmo Cricket chipboard stickers, a quick title and i was done. seriously, fifteen minutes from start to finish! i’m off to get a jumpstart on this fun gift for a few special people in my life. thanks Cosmo Cricket, for some much needed inspiration.

Apr
12

I LOVE Cosmo Cricket and was so excited when I learned that Tombow would be partnering with them for the month of April. The two kits I received were Early Bird and The Boyfriend. I have two cards to share with you today using each kit. You will be seeing lots more cards and projects made with these two lines.

My first card uses paper and coordination chipboard from The Boyfriend line. The chipboard has adhesive on the back which makes it even more easier to use.

For my second card I used my favorite kit Early Bird. I love the colors and patterns in this line. This ADORABLE image is from MFT’s (My Favorite Things) Pure Innocence line called Apple For You. These images are just so sweet!

I colored the images with Tombow’s Markers with a blender pen. Numbers 098, 062, 990, N00, 761, 243, 856, &, 977.

 I also used Tombow’s MONO Adhesive Dots to put the cards together and MONO Aqua Liquid Glue for the button.

I love the large scallop dies that I’ve seen people use and don’t have one, so punched circles and lined them up behind the dotted patterned paper piece.

See the ribbon on my card? It looked like this first:

The stitching was too white for my card so I just colored the stitching with Tombow’s #990 marker. Cool huh? Ü

Apr
01

This is a quick project that you can place into a lunch bag or briefcase; a gift of a silly moment on April Fool’s day!

Tombow vellum adhesive, Dual Brush Pens and Imaginisce paper and embellishments were used along with some paper punches and vellum.

The card is to be hanged on your nose to view the scripted message on the other side – and to look silly while doing it! It will be fun to do, but also to share with others!

I liked the paper from the Imaginisce ‘Scooter’s Vacation’ and also added stickers, a stamped image and flowers from the same collection so everything matched.  The Tombow Dual Brush Pens that match the Imaginisce Scooter’s Vacation Line:

837 Wine Red. 969 Chocolate. 373 Sea Blue. 991 Light Ochre. 126 Light Olive

Everything was put together with Mono Adhesive Vellum.

I use an upside down vase punch for the nose opening, but cutting a triangle from the paper would also work well. On the front of the card place the following message:

To view your message, go to a mirror and hang this on your nose…

For the flip side, write this message on a piece of vellum:

Wishing you a goofy, funny and silly day! Love from Lirpa Sloof

Turn the vellum over and copy the letters. Adhere this side up on the card.

I decorated the card to make it look as goofy as I could – you could really go to town with this idea, big ears maybe? Silly hair?…have fun!

Have you figured out who Lirpa Sloof is yet? April Fools spelled backwards!

What about you? Do you play any April Fool’s day pranks at your house?