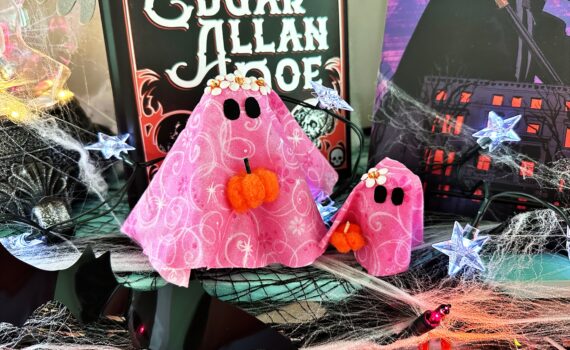
Posts Tagged ‘Halloween’

Oct
28
 Hi there!  Today is my turn on the Tombow blog to hop along with the gang at Fancy Pants.  Fancy Pants sponsored us by sending each of the Tombow DT tons of goodies from the Oct 31 line to play with.  I was thrilled when I received my goodies as I hadn’t started my Halloween cards yet and this gave me the perfect opportunity to get started.
 For my first card I used the adorable Frankie digi image from By Lori Designs.  Isn’t he cute?  I  colored him in using Irojiten Colored Pencils and Gamsol.   These pencils really blend so easily with this technique.
In addition to the polka dot print from the Oct 31 line, the word “spooky” is from the Oct 31 Chipboard Elements pack.  I used Tombow Foam Tabs to attach the image panel and spooky chipboard to the card.  All  other layers were affixed with Tombow Mono Permanent Stamp Runner.
 For this card I started with a base of Gina K. Designs Sweet Mango cardstock.  It is perfect with the Oct 31 line.  I created the flower using some of the circles from the Filter Embellishments pack and the flourish from the Chipboard Elements pack to represent the leaves.  I stamped Happy Halloween from Inkadinkado in black ink and colored in with a Tombow Dual Brush Marker.  The sentiment and  flourish were given a bit of sticky with the Tombow Glue Pen and then sprinkled with lime green glitter.
For my final card, in addition to the cool Oct 31 papers, I used Buttons and Glitter Cuts.  I attached the striped  panel and the Tricks or Treats glitter cut with with Tombow Foam Tabs, the buttons with Tombow Power Tabs. The buttons were tied with a wee bit of black/white twine.
I hope you have enjoyed your visit with me today.  I  would love to hear which card was your favorite and why.
Oct
07

Hi there and happy Friday! I am so excited as this is my first official post as a Tombow Design Team member.  I can’t tell you how thrilled I was to be chosen for this team.  I can’t wait to jump in and get my feet wet.

 This week we are getting ready for Halloween.  I thought I would share a card I made with the adorable Witchy Prue digi image from By Lori Designs. I used cardstock from the Fancy Pants Oct 31 collection.

First, you will want to gather your image, cardstock, and adhesives.  I colored little Prue with Tombow Irojiten colored pencils and then cut her out with my oval nesties dies.

I affixed all of the layers to the base card with Tombow Permanent Stamp Runner and then used Tombow Foam Tabs for the image and words.

Here she is all put together and ready to start her Halloween festivities.  Isn’t she adorable?

See you soon,

Melissa


If you enjoyed this post please follow us on  http://www.facebook.com/tombowusa  and   http://twitter.com/#!/tombowusa


Oct
05

little bits or little bites??? i guess that depends on what you dress up as this year for halloween.

but i have decided to take my halloween in little….well, in small amounts. i take so many pictures that layouts are not an option to show all the fun that we have on halloween. i started creating an album each year. some years i can make them ahead of time and add the pictures after the holiday. and others i am playing catch-up on. several companies have kits that you can use to make it easy. all coordinated and ready to assemble. i did that with this album from little yellow bicycle…

but even still i had too many pictures i wanted to use. i couldn’t narrow it down anymore; i had to keep them. so i glued several photos together – two at a time, back to back. i used Tombow MONO Aqua Liquid Glue. i used it sparingly as it is a water-based glue and too much can warp your pictures. however, i carefully applied a thin line around the outside edges and a few squiggles towards the middle. this holds the pictures securely and gives it more stability. with that done i was able to punch holes in them and add them into the mini album as their own page.

a tip- if you put together an album before you have pictures for it, leave space for a standard size picture. a picture can always be cut down…i do 4×6′s and 2×3′s (a wallet size).

do you have your costumes picked out yet? how about a way to preserve those memories? are you set to take tons of pictures? i am, and i’m putting together this year’s mini-album now….don’t worry, you’ll get to see it in a few weeks!


If you enjoyed this post please follow us on

  http://www.facebook.com/tombowusa  and  http://twitter.com/#!/tombowusa


Nov
03

Tattoo Fun

Posted by Marie in Art

Not only are Dual Brush Pens beloved by paper artists, scrappers, comic designers, illustrators and graphic artists – they are also are a favorite for tattoo artists! They are used for freehand sketches before the actual tattoo process.

My daughter Lena came to me rather late with her tattoo request on Halloween night. She was dressed as a pirate for her job as a theater manager and wanted a tattoo on her shoulder. I gathered some pens, looked on the Internet for some ideas and created this fun tat.

The water-based pens are non-toxic and work perfectly! It lasted the night and then was simply washed away. Want to freak out your spouse? Entertain the kids? Break out the Dual Brush markers and have some good – and removable- fun!

Oct
30

Oct
28

This tag box is one that I designed myself. Ü It is super easy to make and perfect for that special little something to give someone for holidays or any reason.


Would you like a project sheet for this tutorial? Faith created these awesome sheets for each of us!


Oct
26

if you need a quick treat bag for your kids to hand out to teacher or friends give this idea a try.
a friend found  a variation of this last year and it was too easy to pass up.


i gave my daughter a white piece of cardstock 5 3/4 x 3 1/4. i admit, i helped line up the letter stickers to spell her teachers name. but then i gave her free reign of Tombow’s Dual Brush Pens and some halloween stamps. allow your child to color the stamp with the brush side of the dual brush pens, then “hufff” on the stamp to re-wet the ink for stamping.


i also went back and and wrote in “Ms.” and “Happy Halloween”, then drew a thin line border around the piece using N15 – the perfect black thin tipped pen.

while she was stamping i was cutting the base. using a full sheet of 12×12 black cardstock i cut it in half, so i had (2) pieces of 6×12. i scored each one at the 3 1/2″ mark and folded it over.
when the white name plate was done i adhered it to the black base using Tombow Powerbond Adhesive Runner. then again, using the Powerbond I adhered a treat bag, UPSIDE DOWN so the opening is at the bottom of the card, under the name plate flap. i put Powerbond between the back of the base and the treat bag AND the top of the treat bag and the back of the name plate. i wanted to make sure when i stuffed the treat bag with candy it held good and tight!


now your treat bag is ready to be filled and delivered. grab some stamps, markers, Tombow Powerbond, clear treat bags, cardstock and maybe a few letter stickers and your little crafters will be busy putting together treat bags for everyone they can think of. have the candy or cookies ready!