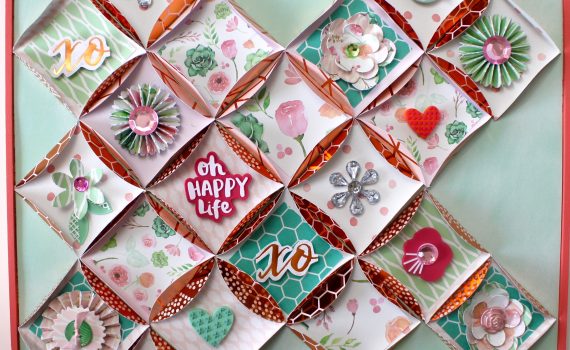
Posts Tagged ‘Foam Tabs’

May
11
Hello, I think things are finally slowing down a bit and I had a chance to get in the studio and get inky.   Today I am sharing a fun little Tea Bag Book that I made.
Isn’t it adorable?  I was lucky enough to recently win a fab supply of goodies from My Mind’s Eye’s new Indie Chic Saffron line.  I love, love the colors in this line.  At first, I wondered if the colors would be a bit to fallish, but nope, they are perfect for right now.
I started with a piece of brown cardstock that measures 4 1/4″ x 8 1/2″ and scored it at 4″ and 4 1/2″ to create the little book.  Next, I stamped this sweeeeeet teapot from the Our Craft Lounge Tea Time set in brown ink onto a print piece of the MME/Saffron paper and colored it in with my Tombow Dual Brush pens and blended out the color a bit with the Tombow Dual Brush Blender pen.  Trimmed it out and popped it up with some Foam Tabs onto the front of the book that had been layered with some of the Saffron prints and some pink cardstock from American Crafts. The pink crochet trim is also from the Saffron collection.
For the inside of the book, I stamped a sentiment from the OCL Tea Time set and layered it to more of the Saffron and solid carstocks.  For the little tea bag pocket, I cut a piece of cardstock 2″ x 3 1/2″ and scored it at 1/4″  and 1/2″ and then removed the corner pieces (cutting on the score lines) and folding on the score lines to create the pocket.  I added some Tombow Mono Multi to the back of the pocket to hold it nice and snug to the right side of the book.  I stamped the tea cup and decorated the same as the teapot.
 For all of my flat layers, I used Tombow Mono Dots Roller to hold everything together perfectly.

I had crinkled up the doily so it would sit real flat onto the right side, so I added some Tombow Mono Multi as I knew that it would hold the doily in place without a problem.
I hope you have a wonderful weekend and take time to share a cup of tea with a friend.
If you enjoyed this post please follow us on
May
08

This week is Teacher Appreciation Week, with today being Teacher Appreciation Day. I am sharing a card with you today that I created for CHA in Jan. I have made extra and will be giving this to the teachers whose rooms I work in. I am a 9-12 grade para and work in all math classes and one reading class this semester so have enjoyed the number break in my day a bit. 

I stamped the image with permanent black ink onto watercolor paper and then colored her with Dual Brush Pens.  The sentiment is also stamped and then underlined with a black Dual Brush Pen and colored along the edge with a soft brown. Mono Adhesive Permanent was used to adhere the panel pieces together. To make the image pop a bit, I used Foam Tabs to raise it.

I plan to give a card thanking the teachers for all their hard work and a homemade caramel apple. What are you doing for Teacher Appreciation Day/Week? I would love to hear from you as I’m always looking for new ideas.

Thank you for stopping by,

If you enjoyed this post please follow us on
Apr
30

This simple card was colored using the Irojiten Colored Pencils and put together with the Permanent Stamp Runner and Foam Tabs. I love my new Wizard of Oz stamp set from Crafty Secrets - where I also found the cute shoe pattern for the ruby slippers. The pattern is found on the Creating with Vintage Illustrations CD.

The Irojiten Colored Pencils work especially well when you want to use a colored paper panel. I did a simple layered and blending coloring using the following Irojiten colors: Chartreuse Green, Olive Yellow, Cactus Green, Celeste Blue, King Fisher, Cherry Red, Gamboge, Bamboo, Terra Cotta, Chestnut Brown, and Ivory Black.

I then used the Permanent Stamp Runner and the Foam Tabs to attach the panels and the embellishments. Not a terribly exciting card with a cool technique this week – I just really wanted to do something that I could display with the ruby slippers!

One of the best features of the Irojiten Colored Pencils are how smoothly they apply the strong pigmented color – so even beginning card artists find them super simple to use. Careful sharpening? Not with Irojiten Colored Pencils! The colored lead never falls out even when you use an electric sharpener or carry them around in your art-to-go bag! Sah-wheet!

As the scarecrow stated: “If I only had a brain!”

If you enjoyed this post please follow us on    http://www.facebook.com/tombowusa      and http://twitter.com/#tombowusa

Apr
27

Happy Friday!  Owl you doin’ today? Isn’t that saying cute?

This week on the Tombow blog we have been sharing projects that we created with stamps from Sweet Stamp Shop.
For my first card, I stamped this sweet owl image with black ink directly onto some print paper from My Mind’s Eye and then I added a bit of shadow to the owl with Tombow Dual Brush pen (#243).  To get the light shading, I scribbled the pen onto a piece of acetate and used a waterbrush to pick up and place the color onto the print paper.  This give a nice, soft subtle shading effect. I cut the owl out and mounted it with Tombow Foam Tabs onto a white embossed panel.  I used Tombow Mono Dots Roller to attach the white panel to the lime green glitter panel.   A little lime twine was wrapped around thise panels and then the glitter panel is popped up onto the aqua card with a few more Tombow Foam Tabs.   To add a little shine, I used Tombow Mono Aqua on the owls eyes and tummy.
For my next card, I stamped the owl in black ink onto white cardstock and then colored it in with Tombow Dual Brush pens (#623, #942 and #977) and then popped it up onto the  lavendar dot card with some Tombow Foam Tabs. I added some Tombow Mono Aqua to the lavendar tummy feathers and then sprinkled with some crystal glitter.
Be sure to head over to Sweet Stamp Shop’s blog  and tell them we sent you over.
If you enjoyed this post please follow us on
Apr
23

Using Tombow’s Foam Tabs you can transfer a stamped image, like this cute little furry friend from the Sweet Stamp Shop, into a card with a dimensional ‘Wow’ factor!


This stamp is perfect for this technique – simple and easy to cut out. Stamp out three images onto smooth 90lb watercolor paper and color using Dual Brush Pens and a water brush. The colors I used were: 723 pink, N89 warm gray 1, N65 cool gray 5 and N35 cool gray 12.

I also prepared some matching flowers by coloring them with the Dual Brush Pens 723 pink and 743 hot pink.

Each stamped and colored image is shaped by using an embossing pad (you can use a mouse pad) and a large ball embossing tool (you could also use the top of a pen. I shaped most of the image from the back, but burnished the ears and the tail from the front so they flipped up on the card.

For the first stamped image, add to the card using the Stamp Runner Dot Adhesive . The Foam Tabs are used to attach the remaining two stamped images, layering the image. Use the large tabs in the larger ares and the smaller tabs in the smaller areas. I also used the Foam Tabs to give dimension to the flowers.

The Foam Tabs are crush proof, so be confident in placing the card in an envelope and mailing off to a furry friend!

See you next week!

if you enjoyed this post follow us on facebook and twitter!      http://www.facebook.com/tombowusa  and http://twitter.com/#!/tombowusa

Apr
17

Did you enjoy last week’s Fastener Tab challenge? I love all the inspiration the DT shared. We are back this week featuring Foam Tabs.

Today I have something creative to share with you. I have seen these owl pillow boxes on blogs and Pinterest (my new addiction for awhile now) and have had them saved in my favorites to make. I first saw them here on Lynn’s blog and then here, here, here, here, and here. So I just took a little from each to create my own.

I am using Cutting Cafe’s  Assorted Pillow Box set and Assorted Heart Borders set to create my owl box.

Is this cute or what?! I love how it turned out. I named her Owl-ivia. Ü Now she just needs her tummy filled with chocolate and she is ready to give as a gift.

A few details:
I glued the bottom end shut with Tombow’s Multi Liquid Glue so that I wouldn’t have to worry about goodies falling out.

Next time I will make the “wings” a bit bigger. I used an oval punch, but think they need to be a bit bigger and this was the biggest one I had.

I scrunched the ends of the heart border up to give a little dimension.

The beak is the bottom of a cut heart. The beak, wings, and borders were adhered with Mono Adhesive Permanent.

Love how my crocheted flowers worked for the eyes! The flowers and buttons were adhered with Power Tabs.

The “eyelids” were attached with Tombow’s Foam Tabs. The tiny foam tabs were the right size for going around the outside edge.

Thank you for stopping by,

If you enjoyed this post please follow us on http://www.facebook.com/tombowusa and http://twitter.com/#tombowusa
Apr
16

Using beautiful papers, like the ‘Once upon a Springtime’ Collection from Graphic 45, and the Foam Tabs from Tombow you can create these simple cards quite quickly!

While some 3D layered images use 3 to 4 images, I am just using 2 of the same image. In this sample, I am choosing to make the wing on the fairy dimensional. Carefully cut out the wing from one of the images. If you need to remove the white edge of the print, simply choose a corresponding Dual Brush Pen color and go around all the edges.

Shape the cut piece using an embossing pad and a large ball embossing tool. To make the wing curve to the back (as shown in the sample photo), burnish the wing from the back. If you wish the piece to curve to the front, burnish from the front.

Place the Foam Tabs onto the back of the cut and shaped piece. I wanted the wing to appear as it is attached to the fairy, so before placing, I added a thin line of MONO Multi Liquid Adhesive. Attach the wing holding the edge with the MONO Multi down for a few moments until adhered.

For the cards, I used the Stamp Runner Dot Adhesive to adhere the panels to the card blank, the MONO Aqua Liquid Glue to add some glitter to the flower centers and the fairy wings, and the Foam Tabs and MONO Multi Liquid Glue to create the dimensions.

Visit us next week where I will show you a dimensional layered card created with a stamped image!

If you enjoyed this post please follow us on   http://www.facebook.com/tombowusa and http://twitter.com/#tombowusa
Apr
05

This week we are playing with our Tab Fasteners and I want to share this cute mini backpack. Is really easy to make, I promise :0)

Sometimes we shy away from projects like this because we think is too hard but this was really easy to make, take it from me, probably the slowest scrapbooker ever!! It will take you only a 8 1/2 x 11 cardstock sheet for the base and for the decorations you can use scraps like I did. I took a 10 1/4 x 5 1/4 and I scored the wide part at 3 1/2 then I turned it around and I scored at 3, 4 3/4, 7 3/4 and 9 1/2. Cut the score lines of the bottom part, below the score line. To make the backpack flap I used a 3 x 2 1/2 cardstock  and score at 1/2. To make it round I used a plate since I don’t have the tool for making circles. For the pocket you need a piece of  3 x 2 cardstock and you should score it at 1 1/4 and 1 1/2 on the sides and at the bottom. Cut out the squares in the bottom corners to make the folding easier. To make the little flap for the pocket use a 1 1/2 x 2 piece of cardstock  and score at 1/4 and 1/2 on the top long side. As I did with the backpack flap to make it round you can use a tool, a plate or anything round. Don’t glue anything yet!! Just have all your pieces.

After all the scoring you turn the page around and you are going to have a little flap to put the backpack together, one of the sides, the front of the backpack, another side and the back. You are going to see a little rectangle in the left bottom, cut it out. Using the Stamp Runner Dot Adhesive I covered the front of the backpack with a less busy patterned paper. Glue the backpack flap to the back of the backpack with the little flap on the inside. Cover the visible part of the flap with a busier or darker patterned paper, do the same with the pocket flap. On the exact score line punch two holes 3/4 from the border, this is for the ribbon on top. In the back make four holes, the two in the top are going to be on the center, close to each other but remember that you need space for eyelets (these are optional but they reinforce the holes, avoiding ripping). The two on the bottom should be close to the corners. For the top ribbon I used 6 inch ribbon and for the ones in the back I used two 8 inch ribbon. You can tie the ribbon or you can use your Power Tabs or Mono Multi Liquid Glue to glue the ribbon inside. Remember to keep the same distance in both ribbons. Now you can put it together, Glue the bottom with the Mono Multi Liquid Glue and the little flap to close the sides. Is super easy to make the little pocket just fold the sides and glue the corners where they touch in the back bottom on the top add the flap, there you will have a frame. You will glue this frame to the backpack using the Mono Multi Liquid Glue. And now the star of the show!! The Fastener Tabs!! Since they come with adhesive on both sides I placed the tab, without separating the velcro, on the flap and I closed it. It worked AMAZING!! For the little pocket I used a little less of half of a tab, same method. Just added a little stack of buttons and Ta-Da!!

I made this A2 card (4 1/4 x 5 1/2) so you can understand how tiny this backpack will be. For the card I used the Stamp Runner Dot Adhesive and the Foam Tabs for the sentiment and the chipboard sticker.

Do you think you will give this a try?? Show us at the Tombow Facebook Page!!

Take Care!!

If you enjoyed this post please follow us on

Mar
23

TGIF!  

This week my fellow Tombow teamies and I have been sharing projects that we created using products from My Mind’s Eye.

I received a wonderful selection of goodies from the Follow Your Heart-Be Amazing collection.
For my first card, I used some of the papers from the 6 x 6 pad to create 
little hills and then stamped the bicycle and sentiment in Adirondack Espresso ink and added some stitching with Tombow Dual Brush Pen #879 (Brown) and sun rays with #991 (Light Ochre).  I also added a bit of #991 to the edges of the chipboard button in the center of the sun rays. I used Tombow Mono Dots Roller to adhere the paper layers and a Power Tab to attach the chipboard button for the sun.
For my next card, I used some of the paper from the 6 x 6 pad to create a backdrop for the Tilth Floral die from Memory Box.  I tied some My Mind’s Eye twine around the card and to the center of the button.  Remember, no naked buttons..:) It just takes a second to finish them off with twine, floss or even a narrow ribbon.  Mono Dots Roller was used to adhere all paper layers and a Power Tab was used to attach the button.
 My final card used some of the softer feminine elements from the Follow Your Heart-Be Amazing collection.  I added a little distressing to the edges of the print and solid panels and added a bit of Scattered Straw Distress ink to create a shabby chic look.  The image was stamped with Adirondack Espresso ink and shading was added with the Scattered Straw ink and a sponge dauber.  I used Tombow Mono Dots Roller to adhere all of the flat cardstock panels.  Tombow Mono Multi was used to adhere the ribbon to the card base.  Tombow Foam Tabs were used to pop up the image panel and finally a Power Tab was used to adhere the button and ribbon to the card.  

Thank you My Mind’s Eye for your generosity!

Products used:

if you enjoyed this post follow us on facebook and twitter!
Mar
19

These containers – I call them ‘Column Twist Containers’ are so easy to make and they don’t require a template – just a rectangle piece of decorative paper! The paper is the ‘Miss Caroline’ collection from My Mind’s Eye. Embellishing is a breeze using the new Tombow Tags and matching brads and stickers from the ‘Miss Caroline’ collection.

Cut the paper into a 6″ x 8″ panel (container), a 2″ x 4″ panel (bottom flap), and 3″ x 4″ panel (top flap). Fold the flap pieces in half lengthwise and trim the bottom corners round.

Create the container by applying the Permanent Adhesive Stamp Runner to the 6″ edge. I used a very tiny amount of the MONO Multi Liquid Glue along the edge to make sure it holds down firmly – this is important if using heavier paper to make these containers. Roll the paper into a cylinder and press down with a bone folder.

Pinch the bottom of the cylinder and adhere on the bottom flap. Pinch the top of the container and adhere the back of the remaining flap to the top of the container. Add the Fastener Tab to the front flap to hold the container closed. Use Power Tabs and Foam Tabs to add the embellishments.

Here are the dimensions for the larger container and tall container:          Large Column Twist Container: 6″ x 12″ panel (container), 2″ x 6″ panel (bottom flap) and a 3″ x 6″ panel (top flap)

Tall Column Twist Container: 7″ x 9″ panel (container), 3.25″ x 2″ panel (bottom flap) and a 3.25″ x 3″ panel (top flap)

Have fun with these – make lots! Visit us again for lots more Tipniques with Tombow products! Now, hop on over to My Mind Eye and see what they’re doing. http://mymindseye.typepad.com/

if you enjoyed this post follow us on facebook and twitter!   http://www.facebook.com/tombowusa         and http://twitter.com/#!/tombowusa