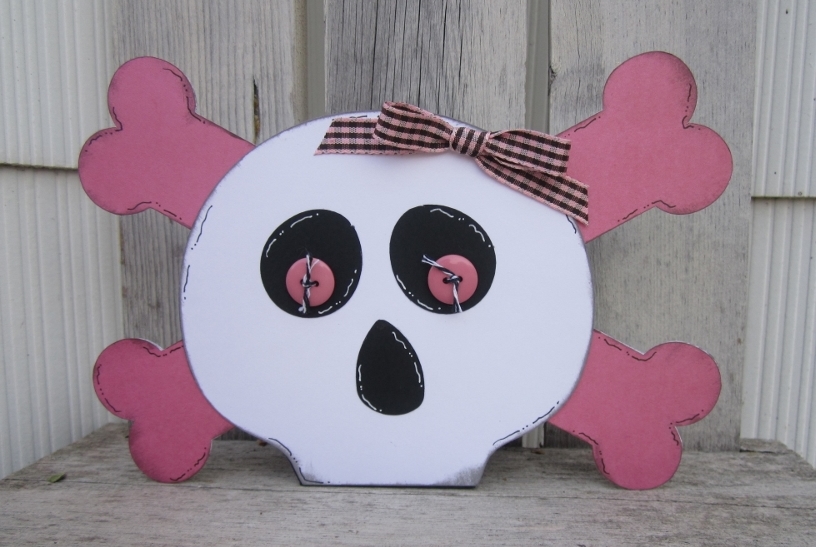
Posts Tagged ‘Power Tabs’
purple and pretty…by melissa cash

Can you believe it is May already? Only 3 weeks of school left for us, then summer vacation! YAY! I can’t wait.
Today, I have a fun May Day project to share with you. I made a few Easter Baskets and had such a great response from the recipients, that I decided to make some as May Day Baskets and give out to friends and coworkers.
.jpg)
I started with peat pots from the Dollar Store plus spray paint. I sprayed about 3 layers onto the pots and then started decorating.
First I added a Power Tab cut in half to the handle (wrapped wire I found at Hobby Lobby) to the outside of the handle and pressed to the inside of the peat pot.
Then I added some Multi Liquid Glue around the top edge and let it set a little bit until it was clear, then pressed moss into the glue.
To decorate the front using Mono Multi Glue, I added a precolored digital image that I printed and then colored shadows with Dual Brush Tip N75.
To finish it off I cut a square of old pattern tissue for the inside. I love using old patterns for tissue paper. I added an Avon lip balm (I buy them when they are on sale and have them on hand as they make great gifts) and some candies.
I hope this gives you some inspiration to make some May Baskets for friends, family, coworkers, etc.
Thank you for stopping by,

Did you enjoy last week’s Fastener Tab challenge? I love all the inspiration the DT shared. We are back this week featuring Foam Tabs.
Today I have something creative to share with you. I have seen these owl pillow boxes on blogs and Pinterest (my new addiction for awhile now) and have had them saved in my favorites to make. I first saw them here on Lynn’s blog and then here, here, here, here, and here. So I just took a little from each to create my own.
I am using Cutting Cafe’s Assorted Pillow Box set and Assorted Heart Borders set to create my owl box.
Is this cute or what?! I love how it turned out. I named her Owl-ivia. Ü Now she just needs her tummy filled with chocolate and she is ready to give as a gift.
A few details:
I glued the bottom end shut with Tombow’s Multi Liquid Glue so that I wouldn’t have to worry about goodies falling out.
Next time I will make the “wings” a bit bigger. I used an oval punch, but think they need to be a bit bigger and this was the biggest one I had.
I scrunched the ends of the heart border up to give a little dimension.
The beak is the bottom of a cut heart. The beak, wings, and borders were adhered with Mono Adhesive Permanent.
Love how my crocheted flowers worked for the eyes! The flowers and buttons were adhered with Power Tabs.
The “eyelids” were attached with Tombow’s Foam Tabs. The tiny foam tabs were the right size for going around the outside edge.
Thank you for stopping by,

No I didn’t spell “thyme” wrong, it was meant to be that way. Ü Did you all have a wonderful Easter? We had a great time. Stop by my blog this week as I will be sharing some fun things we did with the kids.
Are you enjoying the product challenges? If so, please let us know so we know whether to continue this type of challenge or not. We would like your input either way.
This week on Tombow the DT is featuring Power Tabs. These little tabs are amazing! I have used wood glue for my decorative wood projects in the past and they come apart. These Power Tabs are so strong that nothing comes apart!
After painting the egg and plaque, I just added power tabs to the back of the painted egg and stuck it onto the plaque. I love that the tabs are so versatile and can be used on a number of mediums and not just paper.
Don’t forget the contest we have going on to win a huge basket of goodies. You can get the details here.
Thank you for stopping by,

I use Tombow Power Tabs a lot – and I especially love them when creating a mixed media project! They are quick and easy, stick on contact and have tremendous holding power.
This nature inspired shadow box had me adhering different mediums – polymer clay, metal bottle caps, and fabric – into the paper covered wooden box. The Power Tabs allowed me to fasten all these items, even the heavier polymer clay pieces with ease. One Power Tab can hold up to 6.5 ounces so I know all my different items will be held securely with a strong bond. When creating a mixed media piece I also tend to change my mind when placing items. The Power Tabs allow me to pull off the tab without damaging my surface. Before adding objects with the tabs, I finished the surfaces with a clear varnish on both the paper covered background and textured paint background to make sure I can use this reapplying technique.
Here is the side detail showing clear cabochons glued into flattened bottle caps using the MONO Multi Liquid Glue. The pieces were then attached using the Power Tabs.
Hope you enjoyed this weeks Tipnique! Hurray for spring!

Tombow Products Used:

Tombow Products Used:
For this ABC Week I have another layout.
For this layout I started with a sketch that I didn’t use exactly but it gave me a few ideas. I started with 4 squares that measure 4 1/4 and using my Tombow Stamp Runner Dot Adhesive I arranged them in a 9 inch dark brown square to make them pop. I used the Tombow Dual Brush Pens to doodle on each square and on the border of the page. I love matting my pages with the Stamp Runner Dot Adhesive because is durable, acid free and it doesn’t wrinkle the photos. I placed the photo on the right first because on the one on the left I used the Tombow Foam Tabs to make that photo stand out and hide a journaling tag behind it. On that same photo I used some dimensional stickers and in the part that is not attached to the photo I used Tombow Foam Tabs. On the top of the layout next to the cardstock sticker I made a flower with a brad on the center but instead of piercing the paper I used a Tombow Power Tab. I added a few stickers, brads and, punch outs to the layout. The big pennant is a wood piece and I used the Tombow Mono Multi Liquid Glue to glue the paper, after it was dry I just used my craft knife to cut around it. I did more doodling with the Dual Brush Pens and to decorate I used a trim tape, a cardstock sticker and a big dimensional sticker. I wanted to give the illusion of a wall hanging so I glued twine behind the piece and used a brad as a nail.
Maybe you don’t feel the love for brads, just tuck the prongs behind it and use a Power Tab it will work great!!
I hope you liked this layout!!
Take Care!!


.jpg)


