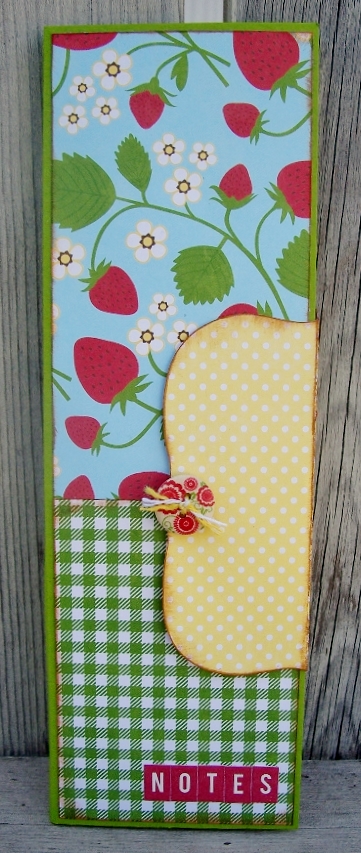
Posts Tagged ‘Fastener Tabs’
just a note…by melissa cash

Tombow Products Used:
This week we are playing with our Tab Fasteners and I want to share this cute mini backpack. Is really easy to make, I promise :0)
Sometimes we shy away from projects like this because we think is too hard but this was really easy to make, take it from me, probably the slowest scrapbooker ever!! It will take you only a 8 1/2 x 11 cardstock sheet for the base and for the decorations you can use scraps like I did. I took a 10 1/4 x 5 1/4 and I scored the wide part at 3 1/2 then I turned it around and I scored at 3, 4 3/4, 7 3/4 and 9 1/2. Cut the score lines of the bottom part, below the score line. To make the backpack flap I used a 3 x 2 1/2 cardstock and score at 1/2. To make it round I used a plate since I don’t have the tool for making circles. For the pocket you need a piece of 3 x 2 cardstock and you should score it at 1 1/4 and 1 1/2 on the sides and at the bottom. Cut out the squares in the bottom corners to make the folding easier. To make the little flap for the pocket use a 1 1/2 x 2 piece of cardstock and score at 1/4 and 1/2 on the top long side. As I did with the backpack flap to make it round you can use a tool, a plate or anything round. Don’t glue anything yet!! Just have all your pieces.
After all the scoring you turn the page around and you are going to have a little flap to put the backpack together, one of the sides, the front of the backpack, another side and the back. You are going to see a little rectangle in the left bottom, cut it out. Using the Stamp Runner Dot Adhesive I covered the front of the backpack with a less busy patterned paper. Glue the backpack flap to the back of the backpack with the little flap on the inside. Cover the visible part of the flap with a busier or darker patterned paper, do the same with the pocket flap. On the exact score line punch two holes 3/4 from the border, this is for the ribbon on top. In the back make four holes, the two in the top are going to be on the center, close to each other but remember that you need space for eyelets (these are optional but they reinforce the holes, avoiding ripping). The two on the bottom should be close to the corners. For the top ribbon I used 6 inch ribbon and for the ones in the back I used two 8 inch ribbon. You can tie the ribbon or you can use your Power Tabs or Mono Multi Liquid Glue to glue the ribbon inside. Remember to keep the same distance in both ribbons. Now you can put it together, Glue the bottom with the Mono Multi Liquid Glue and the little flap to close the sides. Is super easy to make the little pocket just fold the sides and glue the corners where they touch in the back bottom on the top add the flap, there you will have a frame. You will glue this frame to the backpack using the Mono Multi Liquid Glue. And now the star of the show!! The Fastener Tabs!! Since they come with adhesive on both sides I placed the tab, without separating the velcro, on the flap and I closed it. It worked AMAZING!! For the little pocket I used a little less of half of a tab, same method. Just added a little stack of buttons and Ta-Da!!
I made this A2 card (4 1/4 x 5 1/2) so you can understand how tiny this backpack will be. For the card I used the Stamp Runner Dot Adhesive and the Foam Tabs for the sentiment and the chipboard sticker.
Do you think you will give this a try?? Show us at the Tombow Facebook Page!!
Take Care!!

I am so excited to be sharing my first post with you here on the Tombow USA Blog! I have long loved Tombow products – in fact, Mono Adhesive was the first tape runner I ever used as a scrapbooker!

Today I am sharing an interactive mini book I created using Tombow’s The Craft Collection 3D Foam Tabs, Mono Grip Correction Tape, Mono Power Bond Adhesive Runner, and Fastener Tabs.

Decorating acrylic can be quite the challenge and many inks take next to forever to dry on acrylic. I had a stash of acrylic pennants that I wanted to incorporate into my mini book and I knew inking would not match the clean aesthetic of the other pages in my book. The Tombow Mono Grip Correction Tape was the perfect solution!!
I removed the protective plastic coating from both sides of the acrylic pieces and then ran the Correction Tape around the border of each page, about ¼” in from the edge. The Correction Tapeglided onto the acrylic like butter!!

I was totally amazed and there is no other way I could achieve such a clean look with paint or pens – believe me, I have tried in the past. The white line created by the Correction Tape was just enough to make the acrylic pages noticeable but not overbearing. Now I have to hide these from my daughter because she already commented how she “love” the pink and purple color of the Correction Tape Runners!

Next, I created some rolled flowers using a diecut machine, felt, fabric, and Tombow’s 3D Foam Tabs. One of the challenges in making this type of rolled flower is that the center can often look ugly and be pushed down into the flower itself. I would normally use a hot glue for this type of flower, burning my fingers regularly in the process. This time I added a 3D Foam Tab to the part of the flower I would normally put the hot glue on and proceeded to create the flower.

The 3D Foam Tab held the Wool Felt perfectly!! And the foam pushed the center of the flower upwards so that it was more visible and super cute than if I had used a glue gun to create the flower!

Many companies are now including designs on the backs of the UPC strips attached to their 12×12 patterned papers. I love to trim these and use them as “paper ribbons”. The Tombow Power Bond Mono Adhesive Runner is perfect for this task!

Since there is adhesive along the entire strip, the pleated “ribbon” can be added to the book immediately after pleating.

Run the adhesive along the back of the entire strip and then begin making paper pleats. Most adhesive will not be able to withstand the force of the paper trying to unfold itself but Power Bond holds it like a charm!


Power Bond adheres wonderfully to acrylic—again, my go-to here might have been hot glue, but that can melt the plastic, and other adhesives tend to lose their tack after time on acrylic. The same technique can be used for wider strips of paper, like the pleated paper ribbon I created on this page:

I also used the MONO Adhesive Power Bond Runner to adhere strips of paper to stick pins to make the “flags” on this page.


My kids love looking through all the mini books I create and one of the things I always see kids doing is trying to pull off the embellishments on my books. They are just curious and if we think about it, most of their toys involve removable parts. So why not incorporate removable parts into our scrapbooks?! Tombow’s Fastener Tabs are a Hook & Loop Style Connector with adhesive backing—that means one section of the tab is fastened to the project and the other piece of the tab is fastened to the object. The hook & loop action of the Tab is what holds it all together. I decided to add these tabs to a few of the flowers on the cover of my book.

This way, the next child who picks up the book can enjoy not only the photos, but also enjoy being part of the design process by moving the flowers around. My son has already had some fun re-arranging the flowers!


Another benefit is that if you are unsure which flowers to use where, you can use the Fastener Tabs to change the design around yourself.
I hope you enjoyed this fun little mini book and next time you make one yourself, consider making it interactive with Tombow’s Fastener Tabs!
Supplies:
- Tombow MONO Grip Correction Tape
- Tombow The Craft Collection Fastener Tabs
- Tombow The Craft Collection 3D Foam Tabs
- Tombow The Craft Collection MONO Adhesive Power Bond
- Acrylic Pages : Clear Scraps, Zutter
- Patterned Papers : Pebbles Inc, Crate Paper
- Fabric: Joann’s, etsy.com
- Die Cuts: Sizzix
- Chipboard Flowers: Pebbles Inc
- O-Wire, Binding Machine: Zutter Innovative
- Twine: The Twinery
- Frame Sticker: Joann’s
- Chipboard, Ribbon, Pins, Trims: hydrangeahippo.etsy.com
This week’s Tipnique is all about the wonderful new Fastener Tabs! They are fantastic for use as a closure on any object you want to open over and over again – like this paper wallet to show off your Zentangle tiles! What? You don’t know what a Zentangle is? Check out the official Zentangle site!
Here is the finished wallet shown closed. The wallet is made with 90 lb. watercolor paper for durability and to be able to tangle and color nicely. MONO Multi Liquid Glue was used to put it all together. I used Dual Brush Pens and a Glue Pen as a resist to color the tangles. Click here see a video of me demonstrating this color resist method.
Here is a close-up of the Fastener Tab. I have cut it in half before placing in on the wrap-around band. It is ultra thin – perfect when working with paper items such as cards and packages. The Tabs are long lasting and pre-paired so they are easy to use.
This view shows the inside of the wallet filled with 12 finished tiles. Use the wallet to share your tiles, or as a way to present them as a gift.
Tangle on! A word of warning: coloring your tangles is very addictive! Join me next week for another Tipnique using Power Tabs.
If you have followed me here or on my blog at all, you will know I love making these notepads. They were also a huge hit at CHA. They are so quick and easy to make, fit into your purse and the perfect size for keeping track of things our minds so easily forget (esp. as we grow older. Ü)
I used Fancy Pants papers. I love using double sided papers as it makes creating projects like this so easy. The just a note was created on my compter. I just made a sheet of them and then centered them with my circle punch and punched out. I used Mono Adhesive Permanent to adhere the papers to the notepad.
This is the first time I’ve made a tab closure. To give the tab more strength, I adhered Power Tabs to the end of the tab that went to the back, and then a Fastener Tab for the round end that goes to the front.
I hope you enjoyed this project and will give it a try.
PS: Be sure to go HERE if you haven’t to sign up for Tombow’s Leap Year prize.
This is a great project for children and teens. There is a really nice YouTube presentation of traditional black and white friendship bracelets – this is a colorful Tombow version using the Dual Brush Pens.
Start by cutting strips 8 ½” x ¾” from ordinary cover stock paper. You will also need to cut ¾” strips from overhead transparencies or other clear plastic sheet.
Choose your Dual Brush Pen colors – the best color combinations are those that are close together on the color wheel – some suggestions include: Greens and Blues: 195 Light Green, 373 Sea Blue, and 565 Deep Blue, Pinks and Purples: 725 Rhodamine Red, 665 Purple, and 606 Violet, Oranges and Reds: 933 Orange, 725 Rhodamine Red and 815 Cherry.
Draw the designs onto the paper strip – you can get lots of design ideas from the Zentangle Books from Design Originals.
Use the Dual Brush Blender Pen and blend all the colors together. Let dry.
With Clear Adhesive apply two strips of adhesive to the top of the colored paper strip. Place the clear strip over and rub firmly with a bone folder.
Trim the bracelet to a ½” strip and to a length to fit around your wrist. Cut a Fastener Tab in half and apply to the ends of the bracelet. It’s now ready to wear and share with friends!
This is such a fun project, I hope you enjoyed it and hope you share this with all your friends and tean that enjoy making their own Frienship bracelets.Until next time…
If you enjoyed this post follow us on facebook and twitter!
http://www.facebook.com/tombowusa and
http://twitter.com/#!/tombowusa
The theme of this week is “Love Notes” so I wanted to make a little notebook to write those love notes.
This notebook is very easy to make. For the cover I used a 3 1/4 x 11 piece of cardstock and I scored at 5 and 10 inches. I also inked it, mist it and, then stamped it using Tombow Dual Brush Pens. For the pages I just gathered a few sheets of paper size 3 1/4 x 4 1/2 and I stapled it to the one inch tab on the bottom. After stapling I used a Fastener Tab on top of the staple to close the notebook. I made the vintage cover before gluing it to the notebook with my Mono Multi Liquid Glue. Using the Tombow Dual Brush Pens I stamped the first page of the inside of the notebook.
I really loved using the Fastener Tabs!! They are so easy to use and durable!!
I hope you like my lovely notebook.

It’s never too early to start thinking about Easter is it? I didn’t think so, so I have created an “Easter Egg Seed Packet” for my project today.
The adorable seed packet cover and packet template is from High Hopes Rubber Stamps.
I stamped and embossed the image with black ink and embossing powder. I stamped the sentiments inside the banners with black ink. The image was colored with Tombow Dual Brush Markers. I added liquid appliqué to the clouds and heat set it to make it puffy. I made the seed packet with cardstock scored on the fold lines and cut the window out. I adhered a piece of acetate behind the window and the edges of the seed packet with Tombow MONO Power Adhesive Bond . Using my doily lace punch I cut ¾” strips of white cardstock and punched the borders. I cut the corners at 45degree angles and adhered them to the back edges of the image. Using foam tape I adhered the image to the seed packet front. To close the packet I used Tombow Fastener Tabs. Fastener tabs are sticky backed hook and loop fasteners perfect for papercrafts where a closer is needed. They close securely and open with ease!
I filled the seed packet with candy and it’s ready for an Easter basket!!
Here are the Tombow Dual Brush Marker colors I used…. 947 brown, 985 yellow, 451-491 blue, N25 black, N65 grey, 761-772 pink, 623- 603 purple, 133-126-076-177 greens.
This is a fun and creative way to send some Easter fun to those you know far and wide…I hope you enjoy this project.
Huggs,
Karen
If you enjoyed this post follow us
http://www.facebook.com/tombowusa and
http://twitter.com/#!/tombowusa
after cutting the flags from pattern paper, decorate each one using paper or embellishments. i used Tombow MONO Adhesive Permanent runner to attach a strip of paper to the top of each.
the numbers were created by layering a punched scalloped circle and a punched circle, again using Tombow MONO Adhesive Permanent runner. the numbers were cut with an electronic die cut machine and then glued to the top circle with Tombow MONO Glue Pen. I’ve said it before, and i’ll say it again….my favorite thing about the Glue Pen is that the adhesive formula does not adhere to your skin! when working with small items you don’t have to worry about your hands getting sticky and making marks on your project.
the activities were all written on more punched circles. hinges were created by cutting small strips of cardstock, approx 1″ x 2″. fold the strips in half and glue one half to the back of the punched circles with the activities. i used Tombow MONO Aqua Liquid Glue.
next i took a sheet of Tombow Fastener Tabs and cut them in half while still on the sheet. then i attached a Fastener Tab on the other half of the hinge. keeping the punched circle with hinge face up pull off the backing from the Fastener Tab then center the scalloped number over the hinge and the punched circle.
once the two-piece hinge is complete apply Tombow MONO Adhesive Permanent to the back of the punched circle with the activity written on it and adhere one to each flag.
tie the flags together with ribbon. i chose to punch holes on both corners of the flag, then cut short lengths of ribbon and tie knot between two flags, and then continue it all the way down.
as the days pass the numbers can be removed, revealing the activity underneath OR can be left on and flipped up to look at the activity.
because the numbers are fastened onto the activity with the hook and loop Fastener Tabs they can be rearranged for next year. our activities include parties we have to go to, performances the kids are dancing in, and other events that have a specific date. most likely we will be participating in the same or similar events next year, so i will be able to move the numbers around accordingly.
do you have a countdown with activities? i’d love to see what other people are doing. post them to our facebook page so i can take a look!
If you enjoyed this post please follow us on
http://www.facebook.com/tombowusa and
http://twitter.com/#!/tombowusa
I enjoyed this challenge; it reminded me of my love of Fairy Tales so I created my own little story booklet.
Some lucky little child will receive this and enjoy many hours of bedtime stories from their family! I love the new ‘Once upon a Springtime’ paper collection from Graphic 45 and wanted to do something extra special with it and this project is definitely the start of many…what’s your favorite Fairy Tale?
from the Internet (lots of sites to find classic fairy tales!) onto cream colored cardstock, trimmed them and then adhered to the pages with the Permanent Adhesive. Being able to print your own tales also gives you the opportunity to personalize the characters with the names of the children who will receive the booklet.
Then came the fun of embellishing the pages! Tiny paper flowers, rhinestones, stamped images softly colored with Irojiten Colored Pencils and glitter makes the booklet extra special. The glitter wings of the fairies and rhinestones in crowns are added using the Glue Pen and larger embellishments added with the MONO Multi Liquid Glue, Foam Tabs and the stamping feature of the Permanent Adhesive Stamp Runner.
The ribbon bellyband uses a Fastener Tab for a decorative touch that also holds the book together.
..and they all lived happily ever after….


.jpg)
.jpg)


