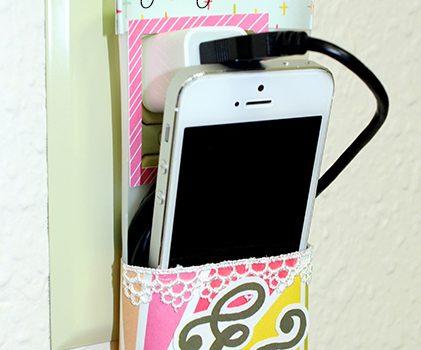
Posts Tagged ‘MONO Removeable Adhesive Runner’

Jan
04
the color of the year…tangerine!
funny thing, i don’t have very much of this color! looks like i’m going to need to pick some up!
i liked using this color with these pictures from this past summer. they needed a bright vibrant color background to set them off.
 
 i used a  Tombow Dual Brush Pen to color in a title i printed. there is something therapeutic for me to sit and color, i don’t mind it at all.
i went through the first time with #885 and then back over it with a blender pen to fill in the letter and soften the edges.
 
 
then using Tombow MONO Adhesive Removable Runner i adhered a stencil to a piece of cardstock. the cardstock was a few shades lighter than the background, and went over the edges of the stencil with Dual Brush Pen #885.
i used Tombow MONO Permanent Adhesive Runner to put the whole thing together.


    if you enjoyed this post follow us on facebook and twitter!
  http://www.facebook.com/tombowusa  and  http://twitter.com/#!/tombowusa
Sep
20

It’s a blog hop with Purple Onion!

This summer I became a little more domestic. A friend taught me how to make scones. I have to admit, I’m actually proud of myself…scones sound so classy and hard to bake. Really they weren’t…classy, yes, but hard, not at all. So I’ve made them several times since then.
When I got my stamps from Purple Onion I was tickled that one of the stamps was the wording  for yummy homemade goodies, including scones, as well as a “sweet treats” label.

I began thinking about the upcoming fall and winter holidays and the baking I could do and the yummy domestic homemade goodies I might be able to whip up.

I wanted some tags to tie onto said goodies, but the “sweet treats” stamp had a solid middle.
Now, I admit, I don’t normally do this, but I grabbed an exacto knife and cut out the center. Now I can take the wording stamps for the homemade treats and place it in the center opening of the “sweet treats” stamp directly on an acrylic block together.

The result are several super easy totally cute tags…just waiting for all the baking I’m going to be doing.


Purple Onion stamps are unmounted rubber stamps. The images stamp clear with crisp lines and they are easy to store, as they lay flat. I found to attach them to the acrylic block for stamping I could use the Tombow MONO Adhesive Removable to hold it down. While I was stamping the adhesive held strong. And when I was done I was able to peel the stamp from the block and rub off the adhesive, leaving the stamp clean and free of residue.


If you enjoyed this post please follow us on

  http://www.facebook.com/tombowusa  and  http://twitter.com/#!/tombowusa


Apr
21

www.elizabethallan-blog.blogspot.com

Supplies: Tombow Dual Brush Pens: 055, 133, 173, 228, 685, 703, 755, Tombow Foam Tabs, Tombow Power Tabs, Tombow Mono Adhesive Removable, Tombow Dot Adhesive Stamp Runner

Rubber Stamps: Penny Black – 4154K Lace-Edged, 30-067 To You, 30-048 Illuminations, Penny Black Mix & Match  Cardstock: Olive Grove 04-001, Periwinkle 11-003, Fuchsia Fantasies 13-003Other Materials: Craft Fun Foam, Black Dye Ink, Crystal Glitter, Paintbrush, Decorative Trimming Scissors

To create a background stamp, cut a piece of Fun Foam to the desired size and attach it to an acrylic block with Tombow Removable Adhesive.

Color the foam with a Dual  Brush Pen and slightly blend the ink with your finger tip leaving a bit of the foam uncolored in the center. “Huff” on the ink and stamp. To blend the image, lightly smooth the impression with a damp paintbrush.

Stamp the flower and sentiment with black dye ink. Color the flower with a combination of DTP (direct-to-paper) and Transfer methods.

For the background pattern, ink the image with Tombow Marker #228 and stamp on olive cardstock. Repeat the same steps for a second impression. If a slightly softer second impression is desired, do not re-apply the marker color, but simply “huff” on the stamp after the first impression has been completed to re-activate the remaining ink. Trim the stamped cardstock with decorative scissors and adhere to a white, top-folded card with Tombow Dot Adhesive Stamp Runner. Layer the stamped image with colored cardstocks and attach to the front of the prepared card with Tombow Foam Tabs.

To create a fun embellishment, attach a Tombow Power Adhesive Tab to the card and remove the protective backing. Dust the exposed “sticky” portion of the tab with crystal glitter. Rub the glitter into the sides and top of the tab. Tap off the excess glitter and dust with a soft brush.

 Au revoir -
Elizabeth


Dec
31

Happy New Year from Tombow!

Just a little reminder on how great the Dual point pens are for lettering!

This three-color method uses the lightest color first; 623 Purple Sage, then the medium shade 452 Process Blue and then the darker 555 Ultramarine.

Use the brush point for the thick lettering and the fine point for the thin lettering. Using a mixture of letter widths, both bold and light, make an interesting and aesthetic composition.

MONO Multi liquid glue was applied using the fine point to the dark part of the letters and then sprinkled with ultra-fine transparent glitter.

I also used the same Dual Brush Pens to color these Zentangle inspired snowflakes that will be scattered on the table during our New Years Brunch.

I started with chipboard snowflakes and painted them white with acrylic paint. I used the MONO Repositionable Adhesive to hold them onto a piece of paper while painting to make it easier. The adhesive was applied to the paper, leaving no sticky residue on the back of the snowflakes when finished. The tangles were drawn with a permanent black pen and then colored with the Dual Brush Pens.

Draw and create and make good cheer, let’s make it last throughout the year!

Nov
16