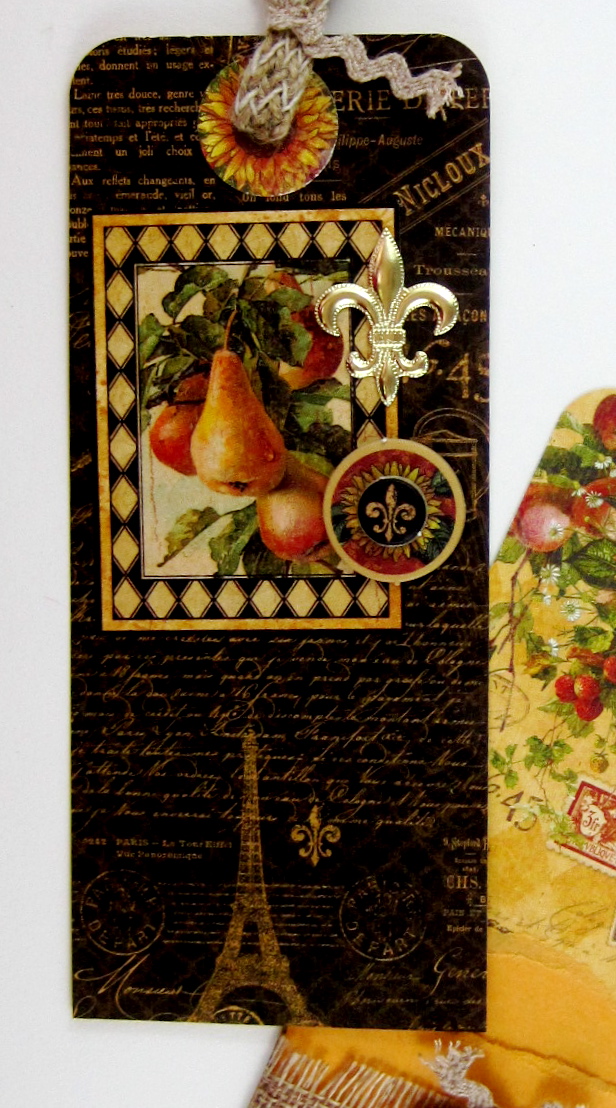
Posts Tagged ‘Graphic 45’

Dec
02

in my short lifetime I have held over 18 jobs…not counting daughter, sister, wife and mother. i have been working since i was 11 years old, when my first job was a “page” in the public library. since then i have been a babysitter/nanny, telephone operator, sandwich maker, a retailer of clothes, books, vidoes and scrapbook supplies, and a teacher to children and adults. quite a variety.

when i first got this “suitcase” mini-album from clear scraps i immediately knew that the subject i wanted for the book had to be something other than travel. trying to think of other ideas i used my best sounding boards….and with their help we came up with an album about all my jobs.

over the last year the companies we have teamed up with have been incredibly generous with what they have sent. i was able to go back through my stash and pull out papers and embellishments that pulled this album together…..basic grey, graphic 45, maya road, cosmo cricket, and hambly screen prints

the best thing about this album is that i am using random pictures that i’ve been holding onto for years. none of my jobs have been documented with pictures, not even my scrapbooking jobs. so a random picture here or there, or a company logo is all i have taken with me. this book will be a place to write the memories and experiences i had while at those jobs. could be a good laugh years from now.

while working with this clear album i have come up with some tips to keep in mind, because there are challenges as well as rewards to working with clear.

1.       definitely use Tombow MONO Vellum Adhesive. the most you’ll see is a shimmer…but it really is invisible.

2.       apply the adhesive to the picture, paper or embellishment instead of the clear pages. easier to apply…and go slow, the more even the coverage, the less “goobers” will occur.

3.       take care when placing your pictures and paper…once it is down, it is down!

4.       Tombow MONO Glue Pen will adhere embellishments to the clear acrylic

5.       take advantage of layers

6.       clear album pages are a double sided paper’s best friend…you get to show off both sides! no choosing or leaving one side out!

May
26

This week Tombow is partnering with Graphic 45. Be sure to visit both the Tombow blog and the Graphic 45 one for chances to win product. There are some super fun ideas on both blogs too!

Do you ever make anything and love it so much you have a hard time giving it away? This is one such project. I had so much fun making this. The idea actually started out as a baby basket using this paper, but didn’t have any baby items to fill the box AND I didn’t know anyone expecting. LOL!

Then I remembered this fun paper I had received from Graphic 45 with the cherry drink on it (paper with the circles) and thought it would be fun to make a Cherry Coke themed box for a friend or graduate. (aqua), (cream scallops), (polka dots), (swirls), and (circle cherry drink paper).
Okay, let’s get started with all I did to make this fun box as there are a lot of details. I’m going to break up the details in numbers to make it easier to read. (I hope Ü)

1. The box. This is a 2-drink carrier from McDonald’s. (seriously!) We went to McDonald’s drive thru asked for 2 waters (we did order their 3 chocolate chip cookies for a dollar…okay getting off the subject here) in the 2-drink carrier. As soon as we pulled away, I had my son get the cups of water out of the carrier and put it in the back so I could use it later. I brushed all the edges of the box with tan ink.

2. I traced the sides onto scrap cardstock to make my patterns to cover the box. After I had decided on my theme, I went through the papers (and there were a LOT of them…Thank you Graphic 45!) that I had received and chose 5 coordinating papers.
3. I cut my pieces as I wanted them on the box and stitched around each piece (except for the scallop edge) and took a tan ink pad and brushed each piece WITH the ink pad to grunge it up. I went with the grunge look as the Cherry Drink paper has a vintage image on it.

4. For the scallop edge, I used my new favorite EK Success punch.

5. I adhered all the pieces with Tombow’s Mono Adhesive Power Bond.

6. Several elements of this box is inspired are inspired by my friend Michelle Wooderson (you SERIOUSLY have to check out her blog if you aren’t familiar with her work!) First element is using old pattern tissue for tissue paper. I found some old patterns at a shop for 5 cents each. Pretty inexpensive tissue paper! On one side of the carrier is a bottle of Coke and a Twin Bing candy.

The candy has a cherry nougat center. This candy is only found in a few states. It has a nutty chocolate outside. Very yummy!

7. On the other side of the carrier is this cup that I found at a local store for $1. How cool is this???!

The colors match my paper perfectly. I was looking all over for a Coke glass and found this AFTER my box was made. I was tickled pink…I know, doesn’t take much for this farm girl to get excited. I included a cello bag of chocolate covered cherries (if I would have had the time I would have made homemade candy, like Black Forest Fudge)

8. Another inspired item on the second side is a recipe card. Mish decorates her recipe cards so cool. I can just imagine how cool her recipe book looks! You can buy Cherry Coke, but I thought I’d Google a recipe for making your own and found this simple recipe and what fun that it uses cherry Kool-Aid…another decorating element I can use for my gift box. (hey did you know that Kool-Aid got it’s start in Hastings, Nebraska? I live some place famous. Ü You can read about it here.)  

I stamped on the recipe with Stampin’ Up’s Canvas (retired) stamp to give it a grungy look. I punched a scallop circle in aqua and hand cut a circle (dots) and taped it to the recipe card. (oh yeah, you can use this recipe for Sprite too. kids used to order cherry Sprites when I worked at Dairy Queen.
9. I couldn’t figure out how to decorate the front and it finally came to me to use the Kool-Aid packet somehow. Mish came up with a pocket card a few years back and recently has been making paper bag ones. BINGO! I have a BUNCH of “smaller than lunch bags” sized sacks and knew they would be the perfect size.
10. I folded the bag into a “pocket” shape and machine stitched the sides, then brushed edges with ink and inserted the cherry Kool-Aid. I used buttons to represent cherries and drew a stem. I hand cut a leaf from felt and sewed down the center.
11. To hold the pocket to the box, I used a clothespin (yet another Mish idea…I told ya she was creative!). I cut paper to fit both sides of the clothespin and distressed with ink. Using crochet thread, I knotted two Basic Grey buttons and glued to clothespin with Mono Aqua Liquid Glue and WA-LA ~ a lovely gift basket to give.

May
10

i have to admit, i found graphic 45 at my local archiver’s and called joanna immediately. she got on their website while we were on the phone, and before our conversation was over she had contacted them to do a partnership….and here we are, less than a month later, creating with their gorgeous paper! we’re doing a graphic 45 partnership later this month and i was just too excited not go give you a little sneak peak so keep watching for this fun team-up.
there is so much that i want to do with it…but for my first project using graphic 45 i was loving the fact that i could mix and match several of their lines. i ended up using two sheets of paper from the botanicabella collection, one from times nouveau collection, and the tags from the communique collection. i added my journaling with tombow dual brush pens. i love that they have a brush tip and a fine pen tip so i have more flexibility in my work. my adhesive is my trusty MONO DOTS adhesive runner. one thing is for sure, graphic 45 is now on my list of companies to watch… remember to check back soon for this fun upcoming partnership.