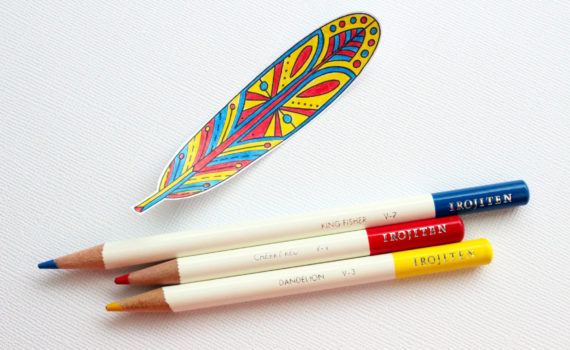
Posts Tagged ‘Tombow Irojiten Color Dictionary Pencils’

Jan
09

I have taken the Ten Top Pantone Colors for 2012 and matched them to Tombow Irojiten Colored Pencils and Tombow Dual Brush Pens. Even though the colors reflect fashions, color trends take their cue from lifestyle trends and filter down into scrapbooking, greeting cards and home décor.

Some of the colors are a perfect match and some are close. I only had to do one blended color with the Cabaret Irojiten color. Some Dual Brush Pen colors are a slightly darker color but would be a perfect match if blended out with the blending pen.

PANTONE 17-1463 Tangerine Tango

Provocative Tangerine Tango, an enticing juicy orange, is a vivacious and appealing refresher to enliven anyone’s outlook this spring. Tangerine Tango is also the color of the year!

Irojiten V-2 Tangerine Orange

Dual Brush Pen 905 Red


 PANTONE 18-2140 Cabaret

Scintillating and sexy, Cabaret is a sensual and intense rosy-red

Irojiten Mix of V-1 Cherry Red and P-1 Orchid Pink

Dual Brush Pen 755 Rhodamine Red

 PANTONE 13-0759 Solar Power

Providing a jolt of energy, Solar Power radiates warmth and cheer.

Irojiten P-13 Gamboge

Dual Brush Pen 985 Chrome Yellow

PANTONE 19-3953 Sodalite Blue

Sodalite Blue, a classic maritime hue, brings order and calmness to mind. Like an anchor to a ship, this dependable shade works with every color in the palette.

Irojiten V-7 King Fisher

Dual Brush Pen 528 Navy Blue

PANTONE 18-3628 Bellflower

Fanciful Bellflower, a distinct ornamental purple, exudes uniqueness and creativity.

Irojiten P-20 Crocus

Dual Brush Pen 623 Purple Sage

PANTONE 14-5420 Cockatoo

Cockatoo, a tactile blue-green, is sure to make spirits soar. This unusual hue adds a whimsical touch to the palette and makes a strong statement.

Irojiten P-17 Turquoise

Dual Brush Pen 373 Sea Blue

 PANTONE 14-2808 Sweet Lilac

Fragrant Sweet Lilac evokes the fresh scents of summer. This delicate pinkish lilac adds a touch of romance.

Irojiten VP-1 Cameo Pink

Dual Brush Pen 723 Pink

PANTONE 14-0116 Margarita

Margarita, a piquant yellow-green, lifts spirits with its refreshing and stimulating glow. Reminiscent of a blossoming garden on an early spring morning,

Irojiten DI – 4 Sage Green

Dual Brush Pen 192 Asparagus

PANTONE 16-1120 Starfish

Starfish, a perfect warm neutral, complement all of the colors in this season’s top 10.

Irojiten Lg-2 Cork

Dual Brush Pen 992 Sand

PANTONE 18-1210 Driftwood

Natural, versatile neutrals add practicality to this season’s brights. Driftwood, an adaptable blend of beige and gray with a slightly weathered feel,

Irojiten D-10 Taupe

Dual Brush Pen N79 Warm Gray 2

What a wonderful world of color…and so many beautiful colors to choose from….I hope you enjoyed this project, if you did please follow us on

  http://www.facebook.com/tombowusa  and http://twitter.com/#!/tombowusa

 
Sep
14

I enjoyed this challenge; it reminded me of my love of Fairy Tales so I created my own little story booklet.

Some lucky little child will receive this and enjoy many hours of bedtime stories  from their family! I love the new ‘Once upon a Springtime’ paper collection from Graphic 45 and wanted to do something extra special with it and this  project is definitely the start of many…what’s your favorite Fairy Tale?

The pages are cut from the cardstock with my Bog Shot and the Accordion Album die. Using Stamp Runner Permanent Adhesive, I put the booklet together forming ten pages. I printed the story
from the Internet (lots of sites to find classic fairy tales!) onto cream colored cardstock, trimmed them and then adhered to the pages with the Permanent Adhesive. Being able to print your own tales also gives you the opportunity to personalize the characters with the names of the children who will receive the booklet.


Then came the fun of embellishing the pages! Tiny paper flowers, rhinestones, stamped images softly colored with Irojiten Colored Pencils and glitter makes the booklet extra special. The glitter wings of the fairies and rhinestones in crowns are added using the Glue Pen and larger embellishments added with the MONO Multi Liquid Glue, Foam Tabs and the stamping feature of the Permanent Adhesive Stamp Runner.
 
    The ribbon bellyband uses a Fastener Tab for a decorative touch that also holds the book together.


..and they all lived happily ever after….

If you enjoyed this post please follow us on   http://www.facebook.com/tombowusa  and   http://twitter.com/#tombowusa


Jul
27

We thought you might like to see a sneak preview of a New Book By Marie Browning


 In the book, one of the techniques is ”Impressed Color Drawing“. 


This drawing style uses Tombow’s Irojiten Colored Pencils and is an easy to learn technique that marks impressed lines on the paper with an embossing stylus before applying the color. The ‘impressive’ result is a whimsical drawing that gives you permission to color outside the lines!
 
                                                                                                      
 This drawing technique is the art of removing. You can quickly create beautiful drawings with the subtractive technique using thin metal stencils, Tombow drawing pencils and MONO and Zero Tombow Erasers. This is a very different and enjoyable technique to try and will get you creating appealing little drawings suitable for framing or presenting on a card.


Marie will introduce ‘Impressed Color Drawing’ and ‘DoodleDabs’ in the new book.
The DoodleDab technique was designed with the Tombow Dual Brush Pens. It uses a simple stroke technique to produce delightful little motifs to use in all your paper crafting projects. She will be stepping out over thirty favorite DoodleDabs in the book. The Rose DoodleDab is shown here accenting a stamped image.
 
We’re sure you’ll love learning these unique techniques from Marie. The book will be presented at Winter CHA….we hope you enjoyed this “sneak peak”…Stay tuned.
If you enjoyed this post please follow us on   http://www.facebook.com/tombowusa  and   http://twitter.com/#!/tombowusa


Jul
21

i have been playing like a kid….with SHRINKY DINKS! (and thanks to Inky Antics stamps i made an adorable mini card!)


yes, it is true. i went in search of shrink film so i could do my own images. i’ve learned several things about using shrink film and i’ve learned that Tombow and Shrink Film are a match made in heaven!

i will pass some of my new found knowledge on to you (but some of you may have already figured this out…so if you have more tips please share!)

1. there are (at least) two kinds of shrink film – clear and roughed up

2. the clear is great for permanent marker and  StazOn stamp inks (yes! you can stamp it!) so stamp your image or draw something, either free-hand or by tracing it, and then color it in

3. the roughed up shrink film works with TOMBOW DUAL BRUSH PENS and  TOMBOW IROJITEN COLOR PENCILS.

4. no need to use the oven or toaster oven, a hand-held heat gun works.

5. put your colored image on foil, aim the gun to heat up the shrink film and watch MAGIC!

6. the heat gun blows hot air (caution!) and can blow the shrink film image away, to hold it in place use one of the adhesive runners on the foil. i used TOMBOW MONO PERMANENT ADHESIVE RUNNER, because it was the closest while i was playing, but the TOMBOW STAMP PERMANENT ADHESIVE would work well too, simply stamp a spot of adhesive right on the foil

7. once the image has done it’s MAGIC fold the foil over it and gently pat the plastic flat. (however, there are ways to make curved or shaped images…oh the possibilities!)

8. and last, once you have your cute little Shrinky Dink image use TOMBOW MONO AQUA to set it

i have the opportunity to use Inky Antics Rubber Stamps this week. there they were, sitting side by side on my table – shrink film and cute little cat stamps, what was i supposed to do?

yup. i shrunk them! they are so cute mini! my daughter did some too! (mine is the set on the left, hers is the set on the right…with the tiny piece of cake. seriously, smaller than my pinky fingernail!)

after playing a bit i did a few more and made up a mini card. i’m already loving the mini cats, a mini card just makes me smile all the more!

1.  stamp your image with staz-on ink, then cut out (this is the step to color it)

2. apply a small amount of Tombow MONO Permanent Adhesive Runner to a piece of foil3. bring out the heat gun. move heat gun over the shrink film image while it shrinks (it may fold over on itself. continue holding the heat on it for a second more, as it tends to straighten itself out. but, if it doesn’t, cautiously pull apart the pieces that are stuck and use the foil to press it flat.

4. using the foil, folded over the shrink film, to press it flat when it is done shrinking

5. not much of a “step” in the process, but this is what they look like when they are done.

6. use scraps of paper to make a mini card. this one is 3×3. glue shrinky dink images down with Tombow MONO Aqua.

8. more scraps on the inside and stamped words and image.  then…..congrats! you did it!

thanks Inky Antics! maybe this post should have been “honey i shrunk the….” – well, you fill in the blank!

honestly, this is so much fun! give it a try…show us what you’ve made!      ~sarah~


If you enjoyed this post please follow us on   http://www.facebook.com/tombowusa  and   http://twitter.com/#!/tombowusa


Jun
06
I drew the white circle for the card with my trusty old compass measuring 3 ½” from center and cut the scallop edge with my decorative scissors. It was embossed with a CB folder swiss dots. The purple circle was cut the same way with a measurement of 3 ¼” and the DP measured and cut at 3 1/8”.  I folded all the circles in half and then adhered them together with Tombow Mono Aqua Liquid Glue. The circle the image is layered onto has been cut with my Nestabilities circle dies.

I stamped the image onto ordinary white card stock with Stazon jet black ink. I colored the image with Tombow Irojiten Color Pencils from volume 4, 5 and 6.

Starting with the lightest of a color group I added the color leaving lots of white space layering the color from lightest to darkest. I used a paper stump and Gamsol (odorless mineral spirits) to blend the color.

You can add more color and re-blend or if you have too much color you can remove some with the Gamsol.

I layered the circles and the image using Tombow Mono Aqua Liquid Glue to adhere them together and Tombow Foam Tabs to attach them to the card.

I punched the flowers & ferns and used Tombow Foam Tabs to adhere them to the card.

The adorable image I used is from High Hopes Stamps- Sitting Buddy with Balloon S-195 and Happy Bear-day sentiment.

I layered the circles and the image using Tombow Mono Aqua Lliquid Glue to adhere them together and Tombow Foam Tabs to attach them to the card. I punched the flowers & ferns and used Tombow Foam Tabs to adhere them to the card. The adorable image I used is from High Hopes Stamps- Sitting Buddy with Balloon S-195 and Happy Bear-day sentiment.

So…Happy Bear-day ~ Karen

Apr
05

This month Tombow is featuring their awesome Stamp Runner! I love this new adhesive runner. It is more ergonomically correct and even smoother than my loved Mono Adhesive Permanent.

For my project this week I used not only the Stamp Runner Adhesive, but also Tombow’s Irojiten Color Dictionary Pencils.

This card uses a fun spring image from Designed2Delight called Ladybug Bloom. I cut a flower shape (yellow) to go with the flower theme  with my cricut and zigzag stitched around it.