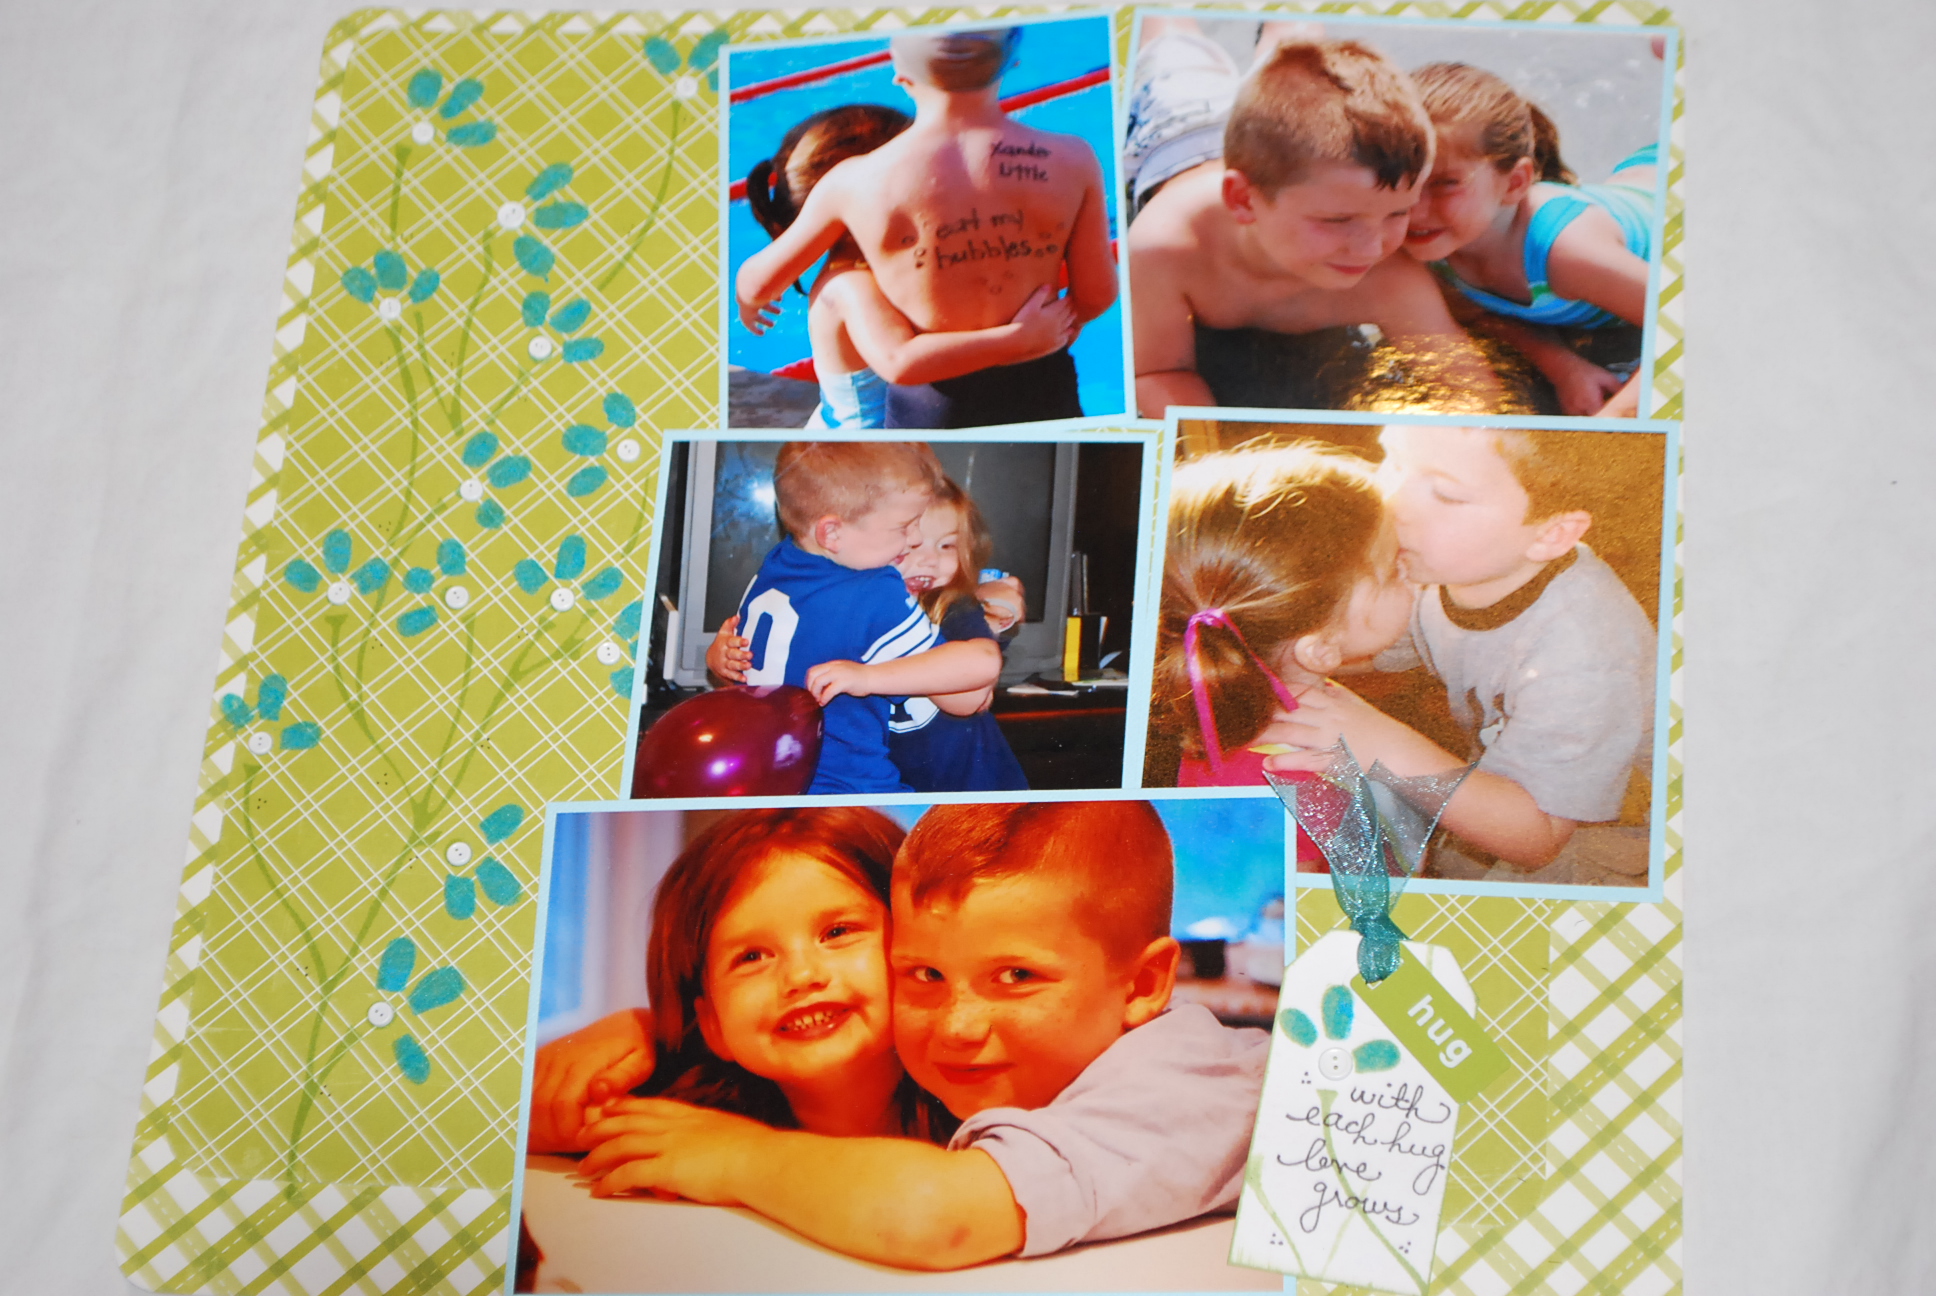
Posts Tagged ‘Sarah Little’
the dress
i have been using hambly with my tombow products for several years…since the invention of Tombow MONO Vellum adhesive.

there are many fun projects that can be created with their clear screen prints…clear cards, clear favor boxes, cutting up the screen prints to use as individual embellishments and using the screen print as a background for a layout, which is what i did with this project. because the layout was about a dress my mother made by hand i sewed through the screen print and the cardstock for the detailing around the scalloped edge piece and the title “dress”. i used the Vellum adhesive to hold it in place. then i cut up another screen print sheet that had several frames and used one over the focal picture and another to frame around the title. i used Vellum adhesive to put those down too.
i have several more ideas and lots of hambly product to play with, i’ll be working on a few more projects to post in the next few months. so many ideas, so little time. what about you? any hambly projects you have in the works?
-Sarah
the box from paper posies arrived and i opened it expectantly. i have never ordered from a kit club before. i was excited to use products that i wouldn’t normally buy for myself…and i was not disappointed. take a look at the loot!

i wasn’t inspired instantly, i had to sit on it for a few days, but then looking back through it i saw the maya road chipboard tickets and then i hatched an idea. my assignment was to do something altered. so i went to my box of items that i have saved for just an altering occasion. in there was a box that i had saved from a wallet i have from franklin covey. the box is really sturdy and i knew one day i would find the perfect use for it. well, today is that day.
i decided to make a ticket box…a place to keep tickets from shows that i have the pleasure of attending….broadway, local theatre, my daughter’s dance recitals. i don’t always get to take a picture at the event, or if i do, one picture and a ticket don’t always make a full scrapbook layout. so i set out to create a place to save them.

on this box i did the top cover and inside the front cover (when you flip it open). because it was a box and not a layout i felt a little more daring and layered a little more than i normally would. using pearls and the flowers is out of my comfort zone, so it was challenging but i LOVE LOVE LOVE the result. did i mention LOVE?
thanks paper posies. i think i have a new way of buying my scrapbook supplies. send me another kit!

to make the box i used Tombow PowerBond to adhere the paper to the box and to each other. I used Tombow MONO Multi on the flower, the lace paper (although i was very minimal with the application of it, so it wouldn’t ooze out the sides when i smoothed it down) and the chipboard. i still used Tombow Mono Dots on the ribbon on the inside of the box. the lace paper was actually pink, so to make it coordinate with my “blues” i flipped it over and colored the backside with a Tombow Dual Brush Pen #312. the chipboard ticket inside the cover was done with #879, as was the writing of the quote, also on the inside.

i LOVE it so much that i am going to find myself another box and make one for my son using sports paper and stickers…for all the braves games he goes to!

(and just as an afterthought…maybe find a box big enough that programs can be stored inside too with the tickets. i see the tickets laying loose in the box and easy to look through. however, this collection from franklin covey had 4×6 photo album/sleeves too. i had scored myself one of these that has been laying around,
so i am going to use it to hold the tickets and try to be a little
creative with the presentation by scrapbooking a little 4X6 card to
stick the ticket to and that one picture that is taken outside the theatre. )

p.s joanna are you proud of me? my first vintage piece!
“tangle” supplies;
Tombow MONO Adhesive Dots , Tomobw Dual Brush Pen – N15 black , Tomow White Gel Pen
the idea of the “ZENTANGLE” is interesting to me. all those doodles in
the notebooks of my college classes actually have a name now! well, unfortunately i am
not much of a doodler now, but i took inspiration from the zentangle
and put it toward my scrapbooking.
this layout was inspired by the doodling now called zentangle. Both the pattern paper blocks on the page and the title were a result of the research i have done concerning zentangle. the result is a fun technique that fits my style. i’m coining my own phrase and calling it a “scrap-tangle”!
using coordinating pattern papers (all of mine came from OCTOBER AFTERNOON’s recess line) i cut (mostly) straight lines from one of the pattern papers. then using the other coordinating patterns i filled in a 4″ square piece of white cardstock. the final result is similar to the different doodling one might do with they were creating their own zentangle.
*tips* (because i tried this three different ways)
*you can doodle a zentangle first.
i took my 4″ square piece of white cardstock and drew directly on it first.
then using a piece of vellum i laid it over the design and traced it.
next i flipped the piece of vellum over onto the pattern paper i wanted to use and re-traced the lines on the back side of the vellum.
this will transfer the lead from the front side of the vellum to the pattern paper.
now you have a guide to cut out your shapes out of patterned paper.
a suggestion with this method – number each piece that is traced on the vellum AND on the pattern paper. so when all of your pieces are cut out you can fit it together like a puzzle with a pattern.
*another way to do this is to use scraps pieced together
generously apply adhesive to the background you want to use, again mine was the 4″ square, and then apply pattern paper. i used the Tombow MONO dot runner, as it is a little more forgiving if the pieces need to be adjusted.
then after laying down the background pieces i covered the seams, where the pattern papers came together, with the bold strips.
*keep all of your “bold” strips the same pattern paper. it will keep a cohesive feel to the final piece.
*try to make your bold lines wavy, not always straight
*use your Tombow Dual Brush Markers and ink the edges of the pieces being put together. it makes the “scrapped zentangle” have more definition.
“scrap-tangle”!
i have been on a frame kick lately. i love frames, and i keep buying them, but i don’t always fill them right away. this frame i’ve had for quite sometime, and because of the odd sizes and the number of pictures it needed i never felt like i found what i wanted to use it for.
so fast forward to last week, when i got a fun box filled with basic grey’s max and whiskers line! i don’t have animals, but i immediately was impressed with how masculine the papers looked. then the ideas started flowing…pictures of my husband, with the kids, in the frame, just in time for Father’s Day. so i used some of the pattern paper as the background, letter stickers, the paper ribbon and some embellishments. because i wanted to use the lumpy embellishments i took out the glass and made sure it would last with Tombow MONO POWER BOND Adhesive. the end result was totally unique and very quick to come together. once i had the idea it was put together in 15 minutes. thank you basic grey for having a paper for every occasion. happy father’s day!
-sarah
one thing i love about maya road are their chipboard albums. they are extremely versatile and fun to use, not only as albums, but also as other altered projects. for the tots project this week i used this large flower album. it had six “pages” with a pre-punched hole. i chose not to use it as an album, but as a decoration in my daughter’s room.
my little girl loves to paint, so i turned over some purple acrylic paint and a paint brush and she thoroughly enjoyed herself. even my son came in from playing baseball to help her out (secretly he loves painting too!)
once we painted both sides and let them dry i let her use the Tombow MONO Glue Pen to adhere small white clips.
i hung the new flower “clipboards” on the wall in her room. now she can add art work or pictures to decorate with.
to step the end result up a little (maybe more for the adult than the tot) i took the liberty of adding a few embellishments and some pattern paper to a couple of the flowers. too many pretty purple papers…i couldn’t not use them!
![]()
using graphic 45 paper was a wonderful treat. the colors are vibrant and the images tantilizing. they transport you back in time…i am sure that life a few decades ago was not dull and muted, but just as vibrant as this paper!
i love graphic45
i love keeping tickets and programs and little notes.
i love pockets.
…. a perfect match.
i have done many scrapbook layouts that included pockets to keep special trinkets from events and memories.
one of my favorite classes to teach is a technique class around my intrigue with pockets.
here are a few of my ‘go to’ pocket designs….

the most basic of pockets involves a piece of paper and glue. i like to use the Tombow MONO Aqua on my pockets. on a square or rectangle apply glue to three edges, the two sides and the bottom. on the “beach bound” card i used one of the postcard beach scenes from g45′s the boardwalk collection. easy enough to cut it from the paper, apply the adhesive to three side and attach it where i wanted it. then i used the pocket to hold tags with information regarding an upcoming family reunion.


the second card is a traditional card that opens to a message on the inside, but the front has a pocket functions as a gift card holder. the boardwalk collection also has coordinating sheets with punch-outs (as do all of the g45 lines). some of those punch-outs are strips of pattern papers. i removed them from the sheet, cut them into 3 1/2″ strips and adhered them to the card front. this time, i only put the MONO Aqua on the two side edges. the middle is open all the way down, perfect for sliding a tag into the pocket. on this tag i used the Tombow MONO Removable adhseive runner to attach a gift card to the back of the tag. the top of the tag are punched circles adhered together on either side of the tag to serve as a “pull”, to remove the tag from the pocket. i personalized the inside of the card using the Tombow White Gel Pen.
have you seen all the fun video’s on graphic 45′s blog? be sure to look there for more inspiration! oh wait, did i mention i love pockets?
It’s Spring time and if you haven’t already done a little spring cleaning, I know you’ve at least thought about it. Can you still call it springtime if it’s almost summer? Oh well, I live by the mantra, ‘Better Late Than Never’. So before the summer really gets into full swing I thought I’d re-evaluate my studio/office/scrapbooking space. A little cleaning, clearing and organizing never hurt anyone, right? Of course our DT is full of amazing, creative and useful information and so I asked a few of them for a little advice. Check out what their favorite tips on workspace organization are below…
SARAH SAYS…
my favorite tip would be to have one….a workspace that is.
i work out of a room in my home that we consider the office. two corners desks, a whole lot of paperwork, and books and files from my real job and my desk space becomes non-existent!
i do have a rolling cart parked in my kitchen (much to my husband’s dismay) that i use to scrapbook on, and hold in progress projects. and then there are some nights that i end up parking myself on the living room floor (much to my chiropractor’s dismay). sometimes i treat myself and i head down to the scrapbook store for a weekend crop and spread out on one of their tables.
so back to the point, the question… my tip for organization would be to have a set of tools and adhesives at each station, and most definitely a portable set. i do have two paper trimmers, and keep them in different locations, and i have quite a bit of tombow adhesive (imagine that!) and i keep one of each on my desk in a spinning carousel, i keep a set in a small tool bag that is very portable from my desk to the kitchen cart to the floor, and another set in a bag i can take to a crop that stays mostly packed. it may cost a little more up front to stock up like that, but for someone like me that is a nomad scrapper, it is invaluable!
DEBBIE SAYS…
My organization tip is for ribbon. I wrap my ribbon around heavy chipboard that I have cut 3.5″ x 7″. I sit them on the long end as shown in photo boxes. I have them organized by color and have the boxes marked what colors are in each. This way I can see at a glance what I have and match ribbon to my project.
I’m in a card mood lately. I love the simplicity of them, I love the variety and I love the sweet sentiments that they send. Then again, it might be because sometimes I feel overwhelmed with mini-albums and other projects but I love the fact that cards come together so fast. Little effort, Big reward.
This card is really one of Maya Road’s Coaster albums that I split up to make a bunch of school themed cards. I just colored in the chipboard and twine with Dual Brush Pens, added a matching leaf with our MONO Adhesive DOTS and added a tag and a few rub-ons. It was quick, easy and I was able to make up 3 cards in less than 20 minutes, which has to be some kind of record for me! Speaking of Maya Road, I wanted to tell y’all that we’ve been listening! You asked for it and we deliver, baby! We’re doing a Maya Road Tombow Team Up May 31st – June 5th so be sure to join in the fun all week.
This quick card was made for a a certain beach-loving friend and her summer plans. The Paper is all Graphic 45 attached with MONO adhesive DOTS but what I wanted to show you is one of my little secrets for embellishments. See the wooden beads tied on the ends of the twine? I keep a stash of them in different shapes and sizes in my supplies. They’re super cheap and really fun I only buy the plain wood ones though. Then I tint them in multiple colors depending on the project I need them for using the brush side of our Dual Brush Pens. It’s a fun, easy and super custom way to add the perfect accent to your work without having to stock up on every shape of embellishment under the sun. Try it… love it! Oh wait- and we’re teaming up with Graphic 45 later this month too! Check out their blog today for a sneak peak at what Tombow products their Design Team will be working with May 24th-29th. Candy’s video is so fun and will make you want to rush out and join as many Design Teams as humanly possible. I can’t wait to see what she comes up with.
Sarah made this cute card to share too. That scroll action on the side is adorable, her hand-made bird adds so much life and I love, Love, LAH-VE the ric-rack. LOVE! Of course she attached it with no mess using our MONO Adhesive DOTS . It seems to be the adhesive of the day, love that stuff.
Remember that our give-a-way is still going on and you still have a really good chance of winning! CLICK HERE FOR MORE INFO! Have a creative weekend!
-Joanna
i have to admit, i found graphic 45 at my local archiver’s and called joanna immediately. she got on their website while we were on the phone, and before our conversation was over she had contacted them to do a partnership….and here we are, less than a month later, creating with their gorgeous paper! we’re doing a graphic 45 partnership later this month and i was just too excited not go give you a little sneak peak so keep watching for this fun team-up.
there is so much that i want to do with it…but for my first project using graphic 45 i was loving the fact that i could mix and match several of their lines. i ended up using two sheets of paper from the botanicabella collection, one from times nouveau collection, and the tags from the communique collection. i added my journaling with tombow dual brush pens. i love that they have a brush tip and a fine pen tip so i have more flexibility in my work. my adhesive is my trusty MONO DOTS adhesive runner. one thing is for sure, graphic 45 is now on my list of companies to watch… remember to check back soon for this fun upcoming partnership.
start by going to home depot or lowes or a similar kind of store and picking up some sheet metal.
unfortunately the smallest piece i found at home depot was 12×18, so it needed to be cut down to fit the 8×10 frame. this was the most difficult part, but perhaps a very nice person in the store can help you out. so my 12×18 piece became two 8×10 pieces.
next i gathered up paper and embellishments that coordinated together. the finished picture is october afternoon’s report card line, and the in-process board used the cherry hill line, also by october afternoon. i picked up some chipboard circles that i had from bazzill basics, and i made sure i had my Tombow MONO MULTI liquid glue...my adhesive of choice when putting together chipboard and other altered projects. lastly i made sure i had my scissors and paper trimmer, some “raw” magnets and a picture frame. (take the glass out of the picture frame)
i cut my paper so it was about an inch to an inch and a half bigger than the sheet metal. then i spread Tombow MONO MULTI over the front of the metal. i adhered my pattern paper to the front and folded the excess to the back, gluing it down to the back too, also with my MULTI.
using stickers and paper scraps decorate the front of the sheet metal. i choose to do just a few simple strips.
then cover the chipboard circles with pattern paper, when the glue is dry cut from the pattern paper with scissors or rub the edges with sand paper. embellish the front with stickers, rub-ons, etc., and use Tombow MULTI to adhere a magnet to the back. fyi, “raw” magnets are pretty strong. when gluing them to the chipboard circles be sure to separate them so they don’t accidentally “stick together”.
not pictured…i also took Tombow MONO AQUA liquid glue and a foam brush and coated each finished chipboard circle/magnet, to seal the elements together and protect it a little.
my daughter loved helping to make these for her teachers. i let her pick the embellishments and put down the glue. it really goes together quickly, even when little hands are helping out. she even choose to use buttons for some of the magnets instead of chipboard pieces. nice touch miss c!
thank you to all you teachers! as a parent and a teacher myself i completely understand the challenges you face each day. you are truly appreciated!


